
Some of Our Sources
- Slashdot
- Joshua Blankenship
- Smashing Magazine
- TutsPlus - Design
- You The Designer
- Line 25
- Specky Boy
- Spyre Studios
- Design Modo
- TechPowerUp
Help Webnuz
Referal links:
How to Draw on a Tiny Budget: Single Pencil Drawing

When you try to learn how to draw, the first chapter of the book is often about all these fancy tools you will need. This is quite scary—you have no idea if it's for you, but you're already asked to invest money in it!
In this tutorial, I'd like to show you the power of the simplest tool you probably have in your house—anHB pencil, also called no. 2. You don't need to buy anything, so you can just go and see if drawing is for you. Keep in mind that this tutorial is based on structural drawing—creating final lines on the base of guide lines. If you want to draw more spontaneously, it may not be for you.
I will show you how to start a drawing of a lion from imagination, how to add the anatomy using references, how to use "traditional layers" to remove the guide lines, and how to shade the final drawing. This process will be the most useful for drawing creatures or characters.
What You Will Need
- HB (no. 2) pencil
- 2 sheets of paper (possibly thin; cheap printer paper will be perfect)
Every pencil has two basic modes you need to know about. You can either draw it the "classic" way or tilt it to draw with the side of the lead...

... and you can draw with either a sharpened or blunt pencil. Both are useful!

You can also control the pressure, which is very important for the final effect. You don't need to press hard every time just to create dark lines! Keep it all in mind during the tutorial, and listen carefully when I mention changing the mode or pressure.
You will also need some references, for example:
1. Start the Drawing
For this phase of drawing we need thick, general lines. Use a relatively blunt pencil for this purpose—this way you won't be very precise, and it will be easier to resist perfectionism.
Draw very lightly, and later press harder to draw thick lines over the thin ones—don't press hard until you're sure the line should be there. Thin, subtle lines are much easier to fix! If you do it properly, you won't need to use an eraser even once.
Don't worry about mistakes—this layer doesn't need to be clean.
Step 1
The idea in your mind is probably very complex, but we can't draw it all at once. We need to simplify it without losing the spirit of the drawing. To do this, it's best to reduce your idea to a few very general lines. They should show us the size of the final illustration.

Step 2
The next step is to establish perspective. No, don't panic! This is easy—just look.
If you want to create an interesting position and show a few sides of the object at the same time, you need to rotate it. To draw rotation, simply shorten and rotate the side.
If you find this confusing, try Think With Forms, Not Lines: Take Your Drawing to the Next Level.

This is how it can look. Creatures look the best when they're just slightly rotated, because this way you don't need to shorten the sides too much.

Step 3
Our creature doesn't have only one side—the front must be rotated as well!

You can show it by drawing a few lines here and there just to see the perspective. You don't need to use a ruler—if you can see what you were trying to show, that's all you need!

Step 4
You should now be able to imagine a kind of box your creature is standing in. Sketch the paw prints on the ground following the perspective and the pose of the animal.

Step 5
Before we draw the legs, you can sketch a very simplified version of them, just to find their end points.

2. Construct the Skeleton
Step 1
Let's construct a "skeleton" of the animal to establish the proportions before diving into the details. Skeletons are relatively easy to remember, but if you've never tried to memorize one, don't guess—find a reference, like this lioness with cubs, and analyze it. Usually it's better to use a few references showing various poses and views.
Let's start with the legs. Look at the photo and think for a moment how to capture their shape with simple lines.

Bring your idea to your sketch, following the perspective.

Step 2
If you can see the basic shape of the body, it's time to add the head to balance the proportions. Use a simple circle for the skull, a line for the nose, and a line for the eyes.


Step 3
The muzzle can be added easily with a teardrop shape.


Step 4
The torso is the easiest part!


Step 5
Hips are always the most complicated. You can use my method or create something that you'll understand better.


3. Construct the Skull
Step 1
The body is mostly established, so let's make the head more detailed. First, add the nose bridge...


Step 2
... then the brow area.


Step 3
Cheekbones are very important—find them and see how they can be simplified most efficiently.


Step 4
Find and add all the other important details.


4. Build the Body
Step 1
The silhouette is very well established now, so we can finally add the details. Add the paws, following the perspective.


Step 2
Add the rest of the paws.


Step 3
Find the landmark on the legs—the parts of the bones that can be seen under the skin.


Step 4
Add the muscles, step by step.


Step 5
Find the other elements necessary to finish the body.


Step 6
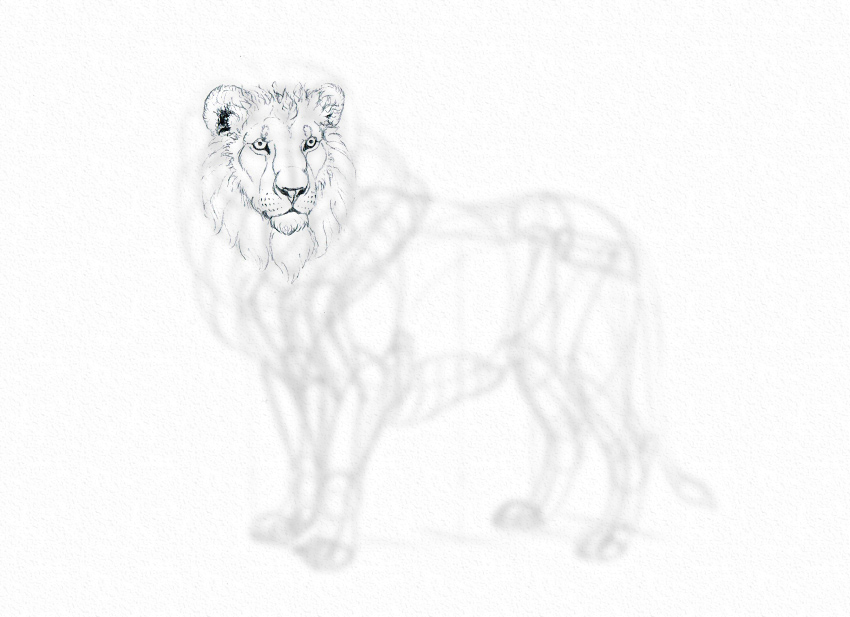
Finally, pay more attention to the head.


Step 7
Connect the head with the rest of the body by adding muscles to the neck.


5. Add the Mane
Step 1
Find a reference, or, better, a couple of references, to analyze and simplify the mane. Start with the "cheek mane".


Step 2
Then add the mane on the forehead.


Step 3
Draw one more layer of mane behind them both.


Step 4
Finish the mane.

6. Convert the Sketch Into the Final Lines
Step 1
Our sketch is complete, but it's very messy. It would be quite hard to add final lines to it now. In digital drawing you could use a new layer for line art, but did you know that you can do it when drawing traditionally, too?
Take another sheet of paper and put it over the sketch. If you can see the lines beneath, great! If not, you may need to create some kind of makeshift light table—for example, place both sheets on an easily accessible window.

Step 2
Sharpen your pencil, and keep it sharp during this section—we need the precise mode now. Keep your references close and start drawing clean, final lines. It's good to start with the eyes—they're very easy to mess up, and if you do so at the beginning, you can just take another sheet and try again.

Step 3
If you're sure the eyes look right, you can continue with the face.


Step 4
Once you finish and approve the face, which is the hardest part, you should proceed with the other parts, trying to move in the direction of your hand. So, if you're right-handed, first draw the elements on the left.
In my case it's the mane. Fur seems complicated, but you should draw it as it looks, not as you imagine it. Don't draw single hairs, but rather try to draw the "fluffiness" of the mane as a whole. A lion's mane isn't smooth, so you can shake your hand a little when drawing to show it.
First draw the outline of the area...
... then fill it with light, squiggly lines.

You can draw the whole mane this way!

Step 5
Keep drawing the body, using your references as a guide. Don't go overboard with the anatomy—even if you know where the muscles are, there's no need to show them all. You can simply use very subtle "hair lines" to suggest their location.


7. Shade the Drawing Using One Pencil
Step 1
You can now remove the original sketch from beneath the line art. We're going to add the shading using a very simple method. You can learn more about it here: How to Crosshatch a Landscape From a Photograph.
First, find and subtly outline the areas that don't get too much light. You must be able to imagine the 3D form of the animal to do it. You can also find a reference with good lighting to use the shape of its shadows in your picture. You don't need to do it 100% correctly—our eyes are easy to fool!

Step 2
Fill the shadow area with diagonal lines. Use only one direction in the whole picture! Draw the lines quickly, evenly, with a constant level of pressure. Keep your pencil sharp!

Step 3
Find another level of shadow, and make it darker by adding lines in another direction.

Step 4
Find one more level of shadow. You can continue with cross-hatching, or you can fill this area with tiny "curls". Be very careful when adding this kind of shadow to the mane—you don't need to shade every tuft of hair!

Step 5
Now, find the places that need the darkest shade, and draw over them, pressing the pencil hard. Don't use too much of this shadow, or you'll lose its impact. A pinch of black improves contrast, but whole areas of it can kill it.

Step 6
This isn't the end! As I described inHow to Use Optical Illusions to Be a Better Digital Artist, lines are the result of contrast between shades. A line that has the same shade on both sides looks artificial.

If you want to be more realistic, add a very simple background to your drawing. You can tilt your brush to do it fast. The goal here is to not leave any line surrounded by a single shade (remember that white is a shade too!).

Step 7
When you're finished, you can finally digitize and upload your picture for others to see. Before you do it, however, make sure it looks like you intended. You may find these tutorials useful for this purpose:
- Quick Tip: Clean Up Your Traditional Drawings in Photoshop
- How to Enhance Traditional Art in Adobe Photoshop

Good Job!
As you can see, you don't need a whole lot of tools to create a decent drawing. It's all about the technique and a proper plan.
If you enjoyed this tutorial, make sure you check others of mine:
- 7 Sins of Beginner Artists: What Keeps You From Being Good
- 10 Drawing Myths That Block Your Progress
- How to Start a Drawing: 5 Methods for Beginners
If this was too simple for you, you can also try one of our more advanced tutorials:
- How to Draw Different Kinds of Texture With Ink and Nib
- How to Draw and Render Realistic Fur With Pencils and Charcoal
- Create Your Own Star Wars Fan Art With Pencils
Original Link:
TutsPlus - Design
More About this Source Visit TutsPlus - Design