
An Interest In:
Web News this Week
- April 19, 2024
- April 18, 2024
- April 17, 2024
- April 16, 2024
- April 15, 2024
- April 14, 2024
- April 13, 2024
Some of Our Sources
- Techcrunch
- Technology Review
- Team Treehouse
- Joshua Blankenship
- Pearsonified
- FanExtra - PSD
- Line 25
- 24 Ways
- Specky Boy
- Dev To
Help Webnuz
Referal links:
How to Paint Realistic Skin: Wrinkles, Freckles, and Scars

We're always used to seeing smooth skin. It's the paradigm of the digital art world.
But what about all the other fascinating characteristics about skin that occur from things like aging, genetics, or even diehard combat?
In this tutorial I'll show you how to transform a simple face in three different ways, by painting freckles, wrinkles, and scars with Adobe Photoshop.
Studying Different Faces
Some of the best references you can find on Envato Market are related to the skin-care industry. Here I'll be using this skin reference as the base of this painting. Using photos with that clean, polished look will ultimately help you master smooth skin over time.

But in order to achieve the other looks, I'll need to gather a couple more photos. Study a variety of faces to strengthen your ability to paint skin. Here are some references I'll be studying.
1. The Initial Skin Painting
Since I've been personally working on painting faster, I'm going to create a base painting to try out each skin characteristic. This will help me cheat the process a little and ultimately cut down on painting time.
Step 1
Let's start with the sketch. All we really need for our foundation is a basic face. Use a Hard Round Brush to sketch the reference on a New Document with the following settings:
- Dimensions: 1250 x 1250 pixels
- DPI: 150

Step 2
Set the Layer Blend Mode for the sketch to Soft Light. Then use a Hard Round Brush to fill in the base colors of your painting.

Step 3
For this painting I'll be using the same methods from my original tutorial of How to Paint Realistic Skin. Set New Layers as Clipping Masks to the flat colors and use Layer Blend Modes to paint light and shadows onto the face.

I always start with shadows, using layers set to Multiply.

Step 4
Next, Fill the Background Layer with a medium gray color and paint a bright soft spot of white in the middle with a Soft Round Brush.

You can also add a little warmth to the skin tone by painting some orange hues onto a layer set to Overlay.
Step 5
Take this opportunity to clean up the details and smooth out the skin. Use the Smudge Tool (O) to blur any harsh lines to give the skin that velvety texture.

As you progress with the details, incorporate a Chalk Brush to add the texture of pores onto the skin. Avoid being too heavy-handed with this technique by using the Eraser Tool (E) to soften any harsh edges.

Finish your base by using a brush with 100% Hardness to
clean up the details. Paint reflected light onto the skin by incorporating some gray tones from the background. Decrease the size of the brush to paint fine hairs
for the forehead and eyebrows, and add highlights all around the
painting.

Here is the finished base. Now we can use this painting for the rest of our studies!
2. Painting Freckles and Moles
Step 1
As an owner of a freckly face myself, I can tell you that freckles and moles are probably the easiest things you can master when painting skin. Starting off with the base we just created, Merge all the layers of the face together.
Next, set a New Layer as a Clipping Mask to the face and use the Chalk Brush from before to simulate the grainy texture of freckles.

Now add some freckles. Use a Hard Round Brush to paint tiny dots all around the face. Make sure the option for Pen Pressure for Opacity is selected because it'll rely on tablet pressure for each stroke.
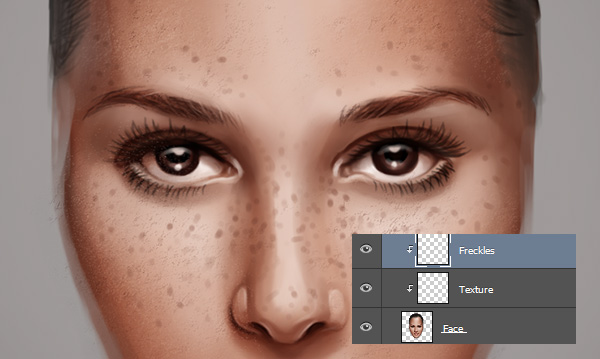
To intensify the freckles, Duplicate the layer to make them darker and soften the effect on certain freckles with the Eraser Tool (E).
Step 2
If you thought that was easy, let's tackle the moles! Moles don't need much effort to appear realistic. Simply paint a dark brown spot and then soften one edge with the Eraser Tool (E). The soft portion will look like the highlight, so all you have to do is then paint black on the opposite corner to give the mole some weight.

Duplicate the mole to add any extras and position them into place. When you're finished, the final freckled look should be like this:

Here is the final effect. You can add more freckles or moles if you'd like, or just keep it simple.
3. Painting Wrinkles
Step 1
What would your original characters look like in 20 years? As we get older, the structure of our face changes and begins to sag. In order to do the same to our painting, we'll need to take the original base into Liquify.
Go to Filter > Liquify and use the Forward Warp Tool (W) to pull the edges of the jawline downward.

Let's age this face even further. As the skin loses its elasticity, the lips will appear thinner and the eyes will sag, making the face appear rounder. Widen the nose using the Bloat Tool (B), thin out the lips with the Pucker Tool (S), and create more sagging around the eyes with the Forward Warp Tool (W).

You can even achieve that "sweet old lady" look by bringing the eyebrows closer together.
Step 2
Now let's move onto the wrinkles. Painting wrinkles is simple. Begin carving lines into the face with a Hard Round Brush in areas where the muscles contract the most. Some common types of wrinkles you might want to study for this step include: frown lines, smile lines, and crow's feet.

If you still have the original freckles layer, unhide the visibility of that layer and bring it down to 60% Opacity.These freckles will now look like age spots on grandma's face. Begin painting more shadow around the wrinkle lines and incorporate texture using the Chalk Brush from before.

Step 3
Little details will help to reinforce this older look. Make her hair and eyebrows look gray by setting a New Layer to Saturation and painting gray softly over these details.

As with anything in nature, the best way to make skin look realistic is to paint highlights. Finish off this painting by painting white highlights all around the skin to emphasize the depth of each wrinkle.

Here's the final result! Doesn't she look like someone's adorable grandma?
4. Painting Lip Scars
Step 1
Maybe in another life grandma was a badass assassin. If she was taking out bad guys left and right, she'll probably have a few scars to prove it. For this last detail, I'll create the gruesome look of a scarred lip.
Starting with the original base, use Liquify again to make her jawline more angular, raise the corners of her eyebrows, and lower each side of her lips. All these changes will help change her expression for a more fierce look.

Step 2
This is what I consider a fresh scar because it hasn't healed over yet. Begin painting the initial line of the scar over the lip on a New Layer set to Multiply. You can also quickly add some shadow around her eyes to intensify her stare.

A scar like this will cause the lip to be warped where the damage was done. So paint the right side of the lip higher to show this distortion. Then go in with some highlights to illustrate torn skin that is in the process of healing.

Add a little depth to the scar by painting shadow on a layer set to Multiply. Just grab color from the lips to apply a deep red shadow into the creases of the scar.

Step 3
Now that you've got some great depth and realism, finish this scar with a little texture. Use the Chalk Brush from earlier to paint highlights on the top lip. Not only will this create the look of pores, but it will also create some contrast against her smooth skin.

Here is the final look. Scarred but still ready for war, you can transform any character with only a few changes!

Now Try These Techniques On Your Own!
Do you have an original character you've created in your spare time? Apply what you've learned here to see how your original characters instantly transform!
With plenty of patience and practice, you can master the art of painting realistic skin in Adobe Photoshop.
I hope you've been able to take away some great tips, but feel free at any time to leave any questions in the comments below! And for a variety of tips and techniques on painting faces, check out these tutorials:
- How to Paint Realistic Skin in Adobe Photoshop
- How to Digitally Paint Faces With Incredible Likeness
- How to Paint Realistic Hair in Adobe Photoshop: Short Hair & Beards
Original Link:
TutsPlus - Design
More About this Source Visit TutsPlus - Design