
An Interest In:
Web News this Week
- April 30, 2024
- April 29, 2024
- April 28, 2024
- April 27, 2024
- April 26, 2024
- April 25, 2024
- April 24, 2024
Some of Our Sources
- TutsPlus - Code
- Smashing Apps
- TutsPlus - Design
- Creative Curio
- Fuel Your Creativity
- My Ink Blog
- Fudge Graphics
- Web Design Ledger
- Android Headlines
- Daily Now
Help Webnuz
Referal links:
How to Design a Summer Seamless Pattern in Affinity Designer

For many of us, summer is the most exciting season. Hot sun, bright clothes, warm sea waves and vacations—these are what we’re waiting for with impatience! In this tutorial we’ll be creating a joyful summer seamless pattern in Affinity Designer. We’ll draw trendy flat-style summer elements one by one and then combine them intro a well-balanced repeating texture. Let’s begin!
It is a good idea to update your website or
blog by making a new background for the summer season! The described techniques,
however, will also be useful for creating any other kind of seamless patterns
in Affinity Designer, whether it is a flat summer seamless pattern or
floral repeating pattern or flat style textures—anything like this.
Let's try it out!
1. Create Stylish Sunglasses
Step 1
First of all, let's make a New File of 600 x 600 px size. We’ll be using pastel colors for the elements to
make the overall palette of our pattern light and gentle.

Step 2
Take the Ellipse Tool (M), hold Shift
and make a 40 x 40 px circle. You can set the size in the Transform panel.
Use the Colour panel to fill the shape with
light-blue color. Duplicate (Command-C > Command-V) the shape,
hold Command-Shift and scale the
bottom copy up to 55 x 55 px. Fill the
new shape with a gentle lilac color, forming the rim of the glasses.

Step 3
Now let’s make a highlight on top of the
glass. Take the Rectangle Tool (M),
make a couple of narrow stripes and group
(Command-G) them. Rotate the stripes while holding Shift and place them above the glasses.

Step 4
Head to the Layers panel, and select and drag
the stripes above the blue glass layer until you see a short blue line, indicating that
you're placing one object inside the other. This way we can hide the unneeded parts of the highlight inside the glass. Check the screenshot below to see how it
works.

Step 5
Make a copy (Command-C > Command-V) for the second half of the glasses and
connect them with a horizontal line, using the Pen Tool (P) and setting the Stroke
Weight to 8 pt in the control
toolbar on top. Apply the same lilac color to the stroke as we have for the
rim of the glasses.
If you’re new to Affinity Designer or
feeling confused about using the color picker, then check Part 2, Step 1 of this tutorial to see
how it works.


Step 6
Use the Node Tool (A) to bend the stroke, making it slightly arched. Add
two small 10 x 10 px circles by the
sides of the glasses to make them look completed.
And let’s move to the next element of our
pattern!

2. Make a Yummy Pistachio Ice-Cream
Step 1
Let’s start shaping an ice-cream from the
cone. Use the Triangle Tool to make a
yellow shape of 60 x 70 px size and
rotate it upside down.

Step 2
Now let’s apply a gentle waffle texture to
our cone. Use the Diamond Tool to
make a 10 x 18 px shape of a darker yellow color, placing it above the cone. Hold
Option-Shift and drag to the right,
making a copy of the shape. Now press Command-J
twice to make two more copies. Group
(Command-G) the four diamonds together.

Step 3
Hold Option-Shift
and this time drag the group down, making a copy. Move the diamonds, placing
them in a chequer position (you will need to delete one extra piece from the
group). Select the cone and the group and use the Align panel on top to align the shapes to Centre.
Create two more copies, filling the empty
space of the cone and turning it into a textured waffle. Don’t forget to group (Command-G) the parts of the
cone.

Step 4
Let’s place a scoop of pistachio ice-cream
on top of the cone. Make a 75 x 75 px
green circle, using the Ellipse Tool
(M). Press Command-Shift-[ to
rearrange the objects, placing the scoop beneath the cone.
Start forming a row of smaller circles at
the bottom of the scoop. Make a 15 x 15 px
circle, hold Option-Shift and drag
to the right, making a copy.

Step 5
Press Command-J
several times to create a row of circles. If elements do not fit each other,
then group (Command-G) the circles
and make them a bit smaller. Select all the elements and align them to the Centre in the Align panel on top.

Step 6
Use the Ellipse Tool (M) to add a couple of gentle highlights. Now the
ice-cream looks completed! Let’s move on!

3. Create a Summer Juice Cocktail
Step 1
First of all let’s create a cocktail glass
with an upside-down cone bowl. Use the Triangle
Tool to make an 80 x 40 px blue
shape. Make another triangle of smaller size on top and fill it with
light yellow for the juice.

Step 2
Finish up with the glass by adding a triangle bottom part and a long thin neck.
Use the Pen Tool (P) to make a simple straw. Set the Stroke Weight to 4 pt.
Switch to the Ellipse Tool (M) and
make a small shape of about 29 x 29 px
circle for the piece of orange, attached to the glass. Set its Fill
color to orange and its Stroke color
to a darker orange.

Step 3
Now let’s make our cocktail layered. Use
the Rectangle Tool (M) to make two
stripes of the same height. Fill them with orange and red-orange colors and use
the Layers panel to drag and drop the stripes inside a yellow triangle shape
in order to hide the unneeded pieces.
So here we have it: our summer juice
cocktail! Let’s move to our next object.

4. Make a Vivid Starfish
Step 1
As you’ve already noticed, Affinity
Designer has a lot of custom shapes, which can suit any need. Apart from
that, any shape can be easily customized from the control toolbar on top. It
makes the process of drawing and designing a lot faster!
Use the Star Tool to make a 5-pointed
star. Head to the upper toolbar and let’s adjust our star. Set the Left curve to 20%, making the points of the star partially rounded. Then do the
same for the Right curve—move the
slider to 20%, making the star
smooth and rounded.

Step 2
Use the Ellipse Tool (M) to speckle some spots above the starfish.

Step 3
We can copy and resize our starfish so that
we can fill the empty spaces of our pattern later. In order to add more variety,
let’s see how we can recolor the object in a few clicks. Select one of the
starfishes and
open the Adjustments menu in the bottom of the Layers panel. Find the Recolour function and in the Recolour Options window move the Hue slider left or right until you find
the color you like. Easy as that!

5. Shape a Juicy Watermelon
Step 1
Make a 150 x 150
px pink circle for the flesh of the melon, using the Ellipse Tool (M). Create another circle of 160 x 160 px, fill it with yellow and place it beneath the pink circle (Command-[).
Finish up by creating a third, larger circle, filled with green.

Step 2
Now we need to group all parts of the
watermelon and divide it in half. Select the Vector Crop Tool and crop the upper half of our watermelon. You can
always undo this or adjust the size of the cropped area using the Vector Crop Tool again.

Step 3
Let’s add some seeds to our watermelon,
making it look more true to life. Make a 7 x 7
px circle. Fill it with dark blue or dark violet. Avoid using black in order to make our future pattern more gentle and light.
Head to the control toolbar on top and use
the Convert to Curves function to
make our circle editable. Take the Node
Tool (A) and select the top node of our shape. Convert it to Sharp corner, using the Convert function in the upper toolbar. Drag
the point up, creating a drop-like shape.

Step 4
Now we can copy and place the seeds above
our melon, rotating them in different directions. First of all, speckle the
seeds over the left part of the melon and then just copy the seeds and mirror the
copy to the opposite side, using the Flip
Horizontal function in the control toolbar on top.

6. Make a Sun Umbrella
Step 1
Now we’re going to make the last elements
of our pattern: a top view of a striped sun umbrella. Use the Polygon Tool to make an octagon (set
the number of sides to 8 in the
top control toolbar). Select the Pen
Tool (P) and draw a vertical line across our octagon. Select both shapes
and Align them to Centre.

Step 2
Copy the stroke, hold Shift and rotate it 90 degrees, placing the line horizontally across the shape. Make more copies,
rotating each of them 45 degrees, thus dividing our octagon into segments.
Select
all the strokes, open the Stroke
panel (you can find this tab next to the Colour
panel) and set the Width value to 0.1 pt.

Step 3
Select the strokes in the Layers panel and go to Layer > Expand Strokes, turning them into shapes. Keeping the lines selected, head to the Operations panel in the control toolbar
on top and click the Add button to merge
the lines into a single shape.

Step 4
Now let’s slice our octagon into pieces.
Select both the merged lines and the octagon and use the Subtract Operation to slice the shape. The pieces of the shape are
still connected, so let’s divide them in Layer > Geometry > Divide. As you can see in the Layers panel, now we have a separate
triangle for every segment.

Step 5
From here, let’s fill the segments, alternating between pink and light yellow.
Finally, add a small pink circle on every
tip of our umbrella, giving it a completed look.

Great! All of our objects are ready, so now
we can combine them into a summer seamless pattern.

7. Design a Joyful Summer Seamless Pattern
Step 1
Now let’s learn the magic of making a
pattern seamless and repeating! Place the watermelon at the left edge of the
document. Make it cross the edge partially, so that one half of the shape is invisible outside the canvas.
Duplicate
(Command-C > Command-V) the object and move the copy 600 px (which is equal to the width of our document) to the right by
typing “+600” in the Horizontal position in the Transform panel.

Step 2
Now place the starfish at the top of our document and let it cross the
upper edge of the canvas. Make a copy of the starfish and move it 600 px down (which is equal to the height of our document), using the Transform panel and typing "+600" in the Vertical position.
This is how it actually works: the repeating copies at the edges of the document make the pattern seamless.
Anything that crosses the edges of the canvas must be copied and placed on the
opposite side.

Step 3
Spread the objects over the canvas, making
copies and recoloring some of the objects to add variety to our pattern.
Here I've added two more ice-creams of different colors, as well as another starfish and a mirrored cocktail glass.

Step 4
Create a light-blue rectangle the same size as our document (600 x 600 px) and place
it at the very bottom of the Layers panel (Shift-Command-[). Or you can also
create a New Layer for the blue
background and place it there.
I’ve recolored some of the elements (the
cocktail glasses and the inner part of the sunglasses) to make them visible
over the blue background. And I’ve also added some minor light-blue elements
like tiny suns, circles, clouds and zigzags in order to fill the empty spots of
the pattern, making it look more busy and detailed.
Finally, Group (Command-G) all the elements of our pattern (except the
background) and drag the group over the background shape in the Layers panel, placing the
group inside the rectangle.

Step 5
Let’s make sure that our pattern is
seamless. Make our rectangle smaller, reducing its size to 300 x 300 px in the Transform
panel. Keep it in the top left corner of the document. Duplicate the pattern and use the Transform panel again to move the copy
horizontally 300 px to the right. As
you can see, the pattern already matches, making a balanced, repeating
composition.

Step 6
Let’s add a few more pieces in the bottom half of our document. Make two more copies of the pattern and
place them next to each other. Great! Our pattern looks perfectly seamless and
detailed.

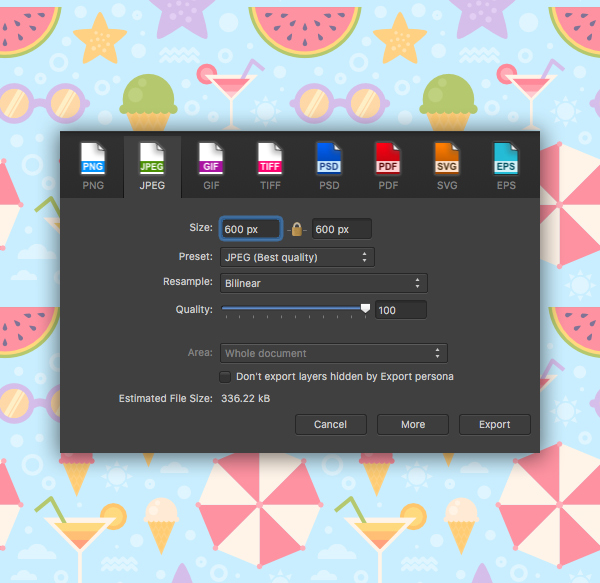
Step 7
Now we can File > Export our seamless pattern in any format, according to
our needs.
High Five! Our Summer Seamless Pattern Is
Ready!
Great job, everyone! We’ve followed a
detailed process to create flat elements and learned some simple techniques,
which helped us to build a repeating summer pattern, which is perfect for
websites and blogs as a background. It can also be used for wrapping paper, fabric,
printed wallpaper and a lot more.
Enjoy creating new seamless patterns, and
stay tuned for more Affinity Designer tutorials!

Original Link:
TutsPlus - Design
More About this Source Visit TutsPlus - Design