
An Interest In:
Web News this Week
- April 30, 2024
- April 29, 2024
- April 28, 2024
- April 27, 2024
- April 26, 2024
- April 25, 2024
- April 24, 2024
Some of Our Sources
- Techcrunch
- Technology Review
- TutsPlus - Code
- Joshua Blankenship
- Abduzeedo
- Vandelay Design
- Creative Curio
- Web Design Ledger
- Wal You
- TechPowerUp
Help Webnuz
Referal links:
How to Create a Digital Portrait Using Adobe Fuse and Photoshop

Portraits are not easy to paint from imagination. They're not only about anatomy, but about the spirit of the person hidden in the facial features and the expression. If you also consider the need to find the right pose, right lighting, right colors, and right technique, it becomes impossible to paint a good digital portrait without a reference.
But it doesn't mean you're doomed to use imperfect photos to create a portrait of your imagined character. Did you know that Adobe has a program designed to, literally, create a character? Of course, it's not perfect, but you can use it to create a highly customized base for a digital painting.
Fuse is basically an advanced character editor, where you can add and modify all the elements of the body. Once you create a character, you can import it to Photoshop CC, where you can adjust the pose and lighting. This way you get 80% of your painting done before you even start! In this tutorial I'll show you exactly how to do it.
Disclaimer:
- For now, Adobe Fuse is still in the development stage, and it can be quite buggy at times.
- Although you don't need a Creative Cloud subscription to use Fuse (only an AdobeID is required), Photoshop versions lower than CC don't handle the Libraries necessary to import a 3D model from Fuse. If you have Photoshop CS6 extended, you can still use this tutorial, but only after using the method described in this Adobe forum thread.
1. Create the Face in Adobe Fuse
Step 1
Open Adobe Fuse.

Step 2
Pick the head that looks the closest to your idea.

Step 3
Switch to theCustomize tab.

Step 4
Find theFace and Head lists and play with their sliders to create the desired effect. The names here may be slightly ambiguous, so if you aren't sure how something works, just drag the marker to one of the extremes. You can easily reset a slider by typing the value 0.
Attention: an inconvenient bug may occur here, making the face change only when you hover your cursor over it.

Step 5
If you switch to theTexture tab, you'll have a chance to play with colors. Be very careful here—it's easy to create an unnatural effect this way.


Step 6
If you're done with the face, go back to theAssemble tab and add all the other parts of the body. This is necessary to move on.

Step 7
The Clothing tab should light up when you're done. Switch to it to add hair.


Step 8
Once you've picked the hairstyle, switch to theTexture tab to adjust the colors. You should also pay attention to the Texture Resolution. Theoretically, the bigger the better, but we'll be working in 3D and this consumes a lot of RAM. Make sure you've got a powerful computer before you pick something higher than 512 x 512!

Step 9
If you feel ready, move your cursor to the upper right corner and click Save to CC Libraries.

Give your file a name and choose a library to save it to. Saving may take a while, depending on the size of the textures you have used.

2. Prepare the Pose of the Head
Step 1
Create a New File in Adobe Photoshop. Again, the bigger the resolution the better, but consider the power of your computer first.

Step 2
Open Window > Libraries and load your chosen library. Drag the character into the canvas.


Step 3
Open Window > 3D and select Hair_Skeleton. Then open Window > Properties and click the mask icon. Here you can choose an expression for your character.

Step 4
You can also use this panel to adjust the position of the head and eyes.

Step 5
Use the Crop Tool (C) to limit the canvas to the head and shoulders.

Step 6
Use the Move Tool (V) to rotate the model and create the pose you need.
Hint: if you get a message about not enough memory, try Edit > Purge > All to free some.


Step 7
Use the Crop Tool (C) once again, this time creating a final frame.

3. Set the Light
Step 1
I'm going to light the character using three-point lighting. In order to better see the lights, we need to turn off the global ambient light.
Go to the3D panel and select Environment.

In theProperties panel, turn off IBL.

Step 2
Select Infinite Light—this is for now the only light in the scene.

Use the Move Tool (V) to set the light properly. This is incredibly easy, especially in comparison to shading from imagination!

Step 3
In the Properties panel you can adjust the Intensity and Softness of the light. You will see the changes in real time, so feel free to experiment until you find the best outcome.

Step 4
In three-point lighting we need three light sources. The previous one was called key light, and its purpose is to reveal the form of the face.
Let's add another light source. Click the light-bulb icon and select New Infinite Light.

Step 5
Create a second weakerNew Infinite Light,as a fill light, that will fill the shadows created by the key light.


Step 6
Finally, add the thirdNew Infinite Light, as arim light, to create a sharp outline of the face on one side. This light source should be placed in the back.


Step 7
The problem here is that what you see is a "simplified" version of the final model. To see the lighting fully you need to render the picture, but it takes time. To avoid a surprise after wasted hours, perform a test render from time to time to set the perfect lighting.
To do it, use the Rectangular Marque Tool (M) to select a section of the image.

Click Render in the 3D panel.

Wait for a moment, until the section gets at least slightly rendered. Judge the effect, decide what you want to change, and then press Esc to abort the procedure and Undo (Control-Z) it.
Apply the changes you have planned, and then use the same action again to see if it looks any better.

Step 8
When you are positive everything looks OK, you can start rendering the picture for real. Select All (Control-A) and press Render. Depending on the resolution of the image and the textures, it may take from a few minutes to a few hours. However, you don't need to wait for the final effect—if you like what you see, you can stop and proceed with it.

Step 9
Save the file as a new file (Control-Shift-S) to create a copy in case something goes wrong. Then right click the 3D layer and select Rasterize 3D to create a flat image out of the model.

4. Make the Face More Realistic
Step 1
Our portrait looks pretty nice, but it still has that "3D model" feel. To reduce it, we will have to use a few painterly tricks.
First, we need to make sure the image has the proper resolution. At least 2000 px width is a must, and the more the better. Use Image > Image Size to ensure it.
Use the Paint Bucket Tool (G) to fill the background with 50% gray.

Step 2
Use a soft brush to add some gradient to the background.
Hint: you can use the same brushes as me. Just download the attachment from How to Create and Use a Set of Brushes for Digital Painting in Adobe Photoshop.

Step 3
We want to make the portrait look more like a portrait of a real woman, so first we need to find out what a real woman looks like. You may feel you know it, but we need specifics, not feelings.
Find photo references that fit your idea the best. I decided to use:
- Natural woman applying cosmetics on her visage as a reference for skin
- Dark haired woman as a reference for hair
You can download both references in your chosen resolution from Envato Market. You can also use this site to find more specific references, for example for lips or eyes.

Place the references behind the head, to see them all the time. This way you'll make your brain compare all three faces, and you'll have a better idea of what else needs to be done to reduce the difference.

Step 4
Let's start with the hair, because it looks more like a helmet at the moment.
Use the Eyedropper Tool (I) to borrow a dark shade from the hair reference, and paint some hair using the Sketch Detail brush (or any brush with variable Flow).

Step 5
Use very thin strokes to draw single hairs here and there. It will make the hair look lighter.
Don't add any details yet. Just make it look more painterly.

Step 6
Next is the skin. Let's swap its shades with the shades of skin of our photo reference.
Duplicate (Control-J) the portrait layer and Clip it (Control-Alt-G) to the original. Then go to Filter > Filter Gallery and pick Artistic > Cutout. Play with the options to create an effect similar to the one below.


Step 7
Duplicate the skin reference, too, and go to Filter > Last Filter to apply the same effect to it.

Step 8
Select the portrait layer (the "filtered" one) and go to Select > Color Range. Pick the brightest shade and experiment with Fuzziness to make it as accurate as possible. Hit OK.

Step 9
A selection should be created. Use the Eyedropper Tool (I) and pick the brightest shade from the photo reference.

Step 10
Create a New Layer, clip it (Control-Alt-G) and use the Paint Bucket Tool (G) to fill the area with that shade.

Repeat the process for all the other shades to create an effect as below. You may need to clean the hair area, too.

Step 11
Now we need to blend the shades of skin. You can use your favorite method of blending here, but if you don't have one, I'll show you mine.
Find the Brush Tool in the Tools panel. Click it and hold for a second to reveal the list. Select the Mixer Brush Tool. Then open its menu and Reset Tool.

Step 12
Right click to open the brush palette and select Rough Round Bristle.

Use it to blend the shades. The motion of your hand is very important here—don't just smudge all over the face, or you'll kill the shading!


5. Add the Details to the Face
Step 1
Slightly lower the Opacity of the layer to mix it with the original. Then use a Layer Mask to reveal the lips. You can learn how to do it here: Quick Tip: Layer Mask vs. the Eraser Tool in Adobe Photoshop.

Step 2
Use the Texture Sketch brush, or any slightly textured brush, to paint over the lips. Use the Eyedropper Tool (I) to pick the color from the area you want to paint over. A photo reference can be very useful here! If you don't want to use one, you can learn more about painting lips in Learn to Paint Beautiful Realistic Lips in Adobe Photoshop.

Step 3
Use the Layer Mask to reveal the eyes and eyebrows. Use the same method as before to paint over the eyelids, eyelashes, and eyebrows. You can also use this step to apply some make-up.

Step 4
Eyes are usually a dead giveaway that we're looking at a 3D model. They require a lot of work before they'll start looking more natural!
Create a New Layer and clip it. Take a dark red and paint the eyeballs with it using a textured brush.

Step 5
Use a soft brush and a brighter shade of red to paint over the inner area. Leave a bit of red around the edges.

Step 6
Use a darker, less saturated red (brown) to paint the shadows.

Step 7
Still using a soft brush, take a very light blue and softly paint over the illuminated area.

Step 8
Use the textured brush to add more details to the iris.
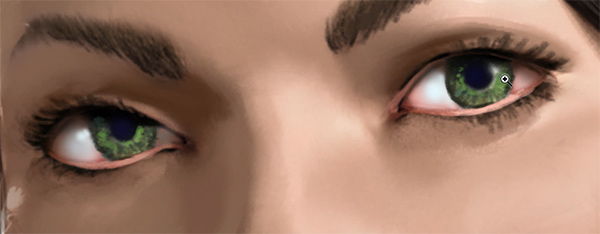
Step 9
Create a New Layer and clip it. Use the Sketch Detail brush and a saturated blue to paint a reflection of the sky. Make it partially sharp, partially blurry.

Step 10
Take white and paint some in the corner of one of the reflections.

Step 11
Finally, use the Layer Mask to reveal the shadow of the eyelashes.


6. Add the Final Touch
Step 1
The biggest flaw of Photoshop's 3D rendering engine is the lack of subsurface scattering. Our skin is slightly translucent, so light can go through it and illuminate it from inside. That's what gives shadows on our face a reddish tint.
Let's simulate this effect. Create a New Layer and clip it. Change the Blend Mode to Overlay. Take a reddish orange and use a soft brush to paint over the terminator (the border between light and shadow).

Step 2
Paint softly on the shadowed side of the line.

Step 3
Add a Layer Mask and erase it softly using a soft brush to create a subtle effect.

Use it wherever shadows seem to be too "cold" or gray.

Step 4
Our 3D model had pores on her skin, but we have removed them when changing the skin color. Let's fix it now!
Create a New Layer and clip it. Fill it with black. Then go to Filter > Noise > Add Noise. Choose the Amount necessary for the white dots to be visible.

Step 5
Double click the layer to open the Styles panel. Change the Blend If to see the noise over the illuminated area only (you can learn how it works here: Quick Tip: the Magic of Photoshop's Blend If). Then lower Fill Opacity to 0.

Check Bevel & Emboss with Contour. Then play with the settings to achieve an effect similar to the one below.


Step 6
Once you're done, you can play with the Opacity to make the effect subtler. You can also add another noise layer and change its Blend Mode to Overlay to add some grain in the shadow.

Step 7
Create another noise layer, this time over the hair. Change its Blend Mode to Screen. Use the Free Transform tool (Control-T) to make the points larger.

Step 8
Add a Layer Mask and Fill it with black to make the noise transparent. Use a soft brush and paint with white to reveal the shiny area. If you want a stronger effect, you can Duplicate the layer and paint once again.

Step 9
Finally, look at your picture from a distance and try to find what else needs some work. I decided to make the hair more detailed and to smooth the skin out some more. If you want to learn more about painting hair, try An Introduction to Painting Realistic Hair in Adobe Photoshop.
Although this portrait is pretty, it still looks more like a robot than a real human. This is because our faces show more than one emotion at the same time, and the subtle signs of them are very hard to paint from scratch. If you want to learn more about his topic, you'll love Human Anatomy Fundamentals: Mastering Facial Expressions.

So Pretty!
This may have seemed like a lot of work, but it all was just detailing—the most pleasant part of the process of painting. Thanks to Fuse, you don't need to spend hours on building the right pose and establishing the light, because you can do both in a very intuitive way.
If you create a portrait this method, either after doing this tutorial or in the future, please post it in the comment section. I'd love to see your result!

Original Link:
TutsPlus - Design
More About this Source Visit TutsPlus - Design