
An Interest In:
Web News this Week
- April 30, 2024
- April 29, 2024
- April 28, 2024
- April 27, 2024
- April 26, 2024
- April 25, 2024
- April 24, 2024
Some of Our Sources
- Slashdot
- BoingBoing
- Technology Review
- Web Designer Wall
- The Logo Smith
- Smashing Apps
- Vandelay Design
- Web Designer Depot
- Line 25
- Willems Lab
Help Webnuz
Referal links:
How to Shade Easily With Layer Blend Modes
Wouldn't you love to learn the incredible art of shading? There are many ways you can accomplish shading, but today I'll break down one method that makes the whole process much easier by incorporating Layer Blend Modes. Let's get started!
Know Basic Lighting Theory
The tips I'll be showing you focus on the application of shading specifically when it comes to painting in Adobe Photoshop, so it's important to have at least a basic understanding of light and shadow theory.

Feel free to also follow along with my painting by downloading this Rose stock from Envato Market. Photo references bring the actual theories to life by putting examples of real lighting conditions in front of you. So take advantage of them whenever you can!
The Color Swatch Method
Normally when people paint, whether it's traditionally or digitally, they start off with a few different swatches. When you pick color swatches, you basically decide on an overall color scheme before you begin painting.
For instance, for this lovely rose sketch, these would be some swatches I would use.
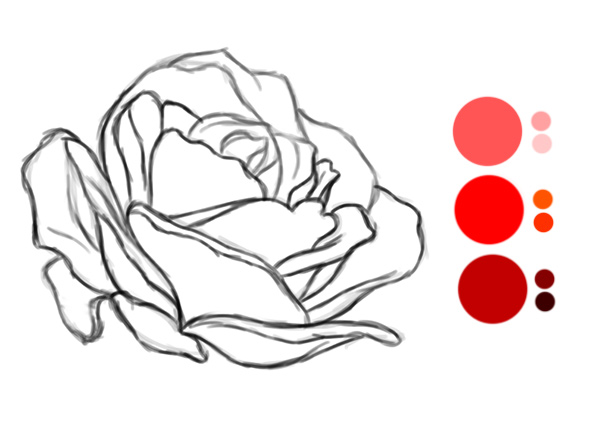
If I wanted to create this painting using these color swatches, I would probably put them on a separate layer at the top of my panel to make sure I always had the swatches available.
Traditional Palette Colors vs. Photoshop Colors
From a traditional standpoint, the main reason why we do this is because we're limited to the number of colors available to us. So if you only have three colors to paint with, unfortunately, that's the full scope of your palette.

But as you enter the world of digital painting, you have every imaginable color right at your fingertips. Digest this realization as best as you can, because having this many colors is both a blessing and a curse.
Although you don't ever have to worry about running out of one particular color, you might still run into trouble if you pick the wrong color swatches.
Picking the Wrong Color Swatches
It's hard to know whether the color swatches you choose are the best fit for your painting. And if you pick colors right out the gate that don't work well together, you're in big trouble.

What usually happens, especially with beginners, is that you get to a point when you finally realize the colors are all wrong. Because you've gotten so far, you probably won't start over, but you also don't know how to fix the problem, so all your efforts become just another scrapped study.
Shade With Layer Blend Modes
Today I'd like to help you bypass your dependence on color swatches by showing you a method that is much easier. For simplicity's sake, I'll just call it the Blend Mode Method.
This method allows you to paint the base tones, mid-tones, and highlights, all without ever having to worry about choosing the right colors.
How to Organize Your Layers
I don't know about you, but I have major commitment issues. There's simply no way I'll paint on just one layer. Quite frankly, I find it scary and intimidating.
But if you want to avoid a messy Layers panel, there is one great way to organize your layers as you paint. This is especially important to this shading process.
First things first, start with the sketch layer above any other colors. Then create a base tone with a flat color on a layer separate from the sketch.

Next, create a new layer and dedicate it to the shadows. Set the appropriate blend mode, and Right-Click the layer to Set as a Clipping Mask. Now recreate the last step, this time dedicating a new layer to highlights.

By painting on these clipped layers, you'll be able to stay "within the lines" of the initial base color. Continue adding more layers whenever you like to further develop the shading.
The Sequence of Steps for Shading
Now let's walk through the steps of this technique with a real-life example.
Your standard shading is broken down into three different steps: base tones, shadows, and highlights. Here is the general sequence of steps I took to paint a study of this lovely rose.
The Sketch
Since this study will just be used to understand shading, create the initial sketch by quickly tracing your reference using a Hard Round Brush.

Establish Base Tones
The base tone is pretty much just the first flat color you'll put on the canvas, so all you need to do is keep the Blend Mode set to Normal.
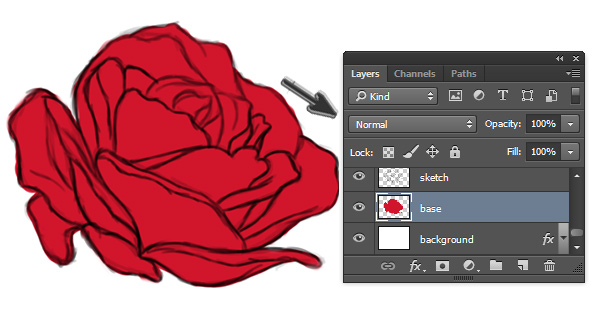
Here I started with a rich red color using a Hard Round Brush to completely fill in the sketch.
Painting Shadows
Now for the magic! The key to painting shadows without color swatches is to utilize blend modes that create a darker effect over your base colors. On one of your clipped layers, set the Blend Mode to Multiply and use the Eyedropper Tool (E) to set the Foreground Color to the same red from the base.

As you begin painting shadow on this new layer, notice how a much darker color is applied because it's being multiplied onto the original color. If you want an even darker color, use the Eyedropper Tool (E) to pick up the darker shade that's on the canvas. You can also duplicate the layer to achieve a deeper tone.
Although I prefer Multiply, you might want to experiment with these other Blend Modes that help to darken areas for the perfect shadow:
- Darken
- Color Burn
- Linear Burn
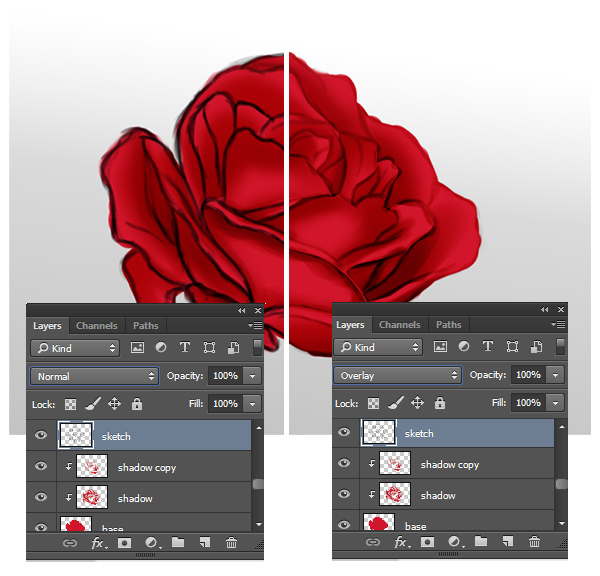
Blending the Sketch
If you want to strive for realism, you have to eventually eliminate the harsh black lines from your sketch. You could paint over each line to cover them individually, but the process would be unnecessarily long. An alternative way to do this is by setting your sketch to Overlay or Soft Light. Instantly, the sketch blends into the painting for a more realistic look!
Incorporating Highlights
Highlights can really make or break a painting. In fact, feeling as if your painting is missing something can be a good indicator that you need to highlight. Do this easily by setting the Blend Mode to Linear Dodge (Add). Just like before, use the Eyedropper Tool (E) to pick up colors from nearby areas to begin painting highlights. Instantly the applied color is much brighter because of the mode that's been chosen.

Color Effects & Additional Light Sources
Environmental light and additional light sources tend to affect the color scheme of our paintings more than we realize. This, in turn, also affects the shading. To incorporate some interesting effects, experiment with color on a New Layer set to eitherColor Dodge or Overlay.

To make the rose appear warmer, I concentrated a light shade of orange towards the top petals.
Finish Shading on Normal Mode
Eventually, it's always a good idea to finish your painting using layers set to Normal. Since all the colors you need are already on the canvas, you can use those same colors to clean up any areas that still need work. This is why the Eyedropper Tool (E) comes in handy, because you'll rarely have to get new colors from the Color Picker.

Here is the final study. Although I never picked colors specifically for the shadows or highlights, I was still able to achieve them using a variety of Blend Modes. And to intensify the colors even more, I quickly adjusted them with Color Balance.
Conclusion
Color swatches are great for traditional art, but aren't completely necessary for digital paintings. You can achieve incredible shading by just utilizing Layer Blend Modes.
I hope this article has showed you the remarkable versatility of Photoshop. Even if you aren't that advanced in technique, you can always depend on it to help make the process much easier.
Let me know if you have any questions in the comments below! And for more digital painting tips, check out these articles:
- 6 Easy Tips for Making Realistic Digital Paintings
- Digital Painting 101: 4 Things You Should Know Before You Start
- Learn How to Improve Your Digital Illustrations in 10 Easy Steps
Original Link:
TutsPlus - Design
More About this Source Visit TutsPlus - Design