
Some of Our Sources
- Simplebits
- TutsPlus - Code
- Team Treehouse
- Six Revisions
- TutsPlus - Design
- Naldz Graphics
- Fudge Graphics
- CSS Tricks
- Spyre Studios
- The Verge
Help Webnuz
Referal links:
How to Digitally Paint Faces With Incredible Likeness

Painting in Photoshop is nothing like working on paper or canvas. And since you don't have to worry about wasting paper, there are so many cool tricks you can use to paint better portraits without ever tracing.
In this tutorial, I'll show you how to paint two portraits in Adobe Photoshop, using a Wacom Intuos Draw Tablet and references from PhotoDune.
1.So What Is Likeness?
Likeness is really simple. It just means how much your painting looks like the actual subject. When you're an artist, you'll be asked a million times to do portraits, characters, or designs based on real people. So understanding likeness is incredibly handy in order to make your clients happy.

Even when you don't want to copy someone's face completely, studying likeness is still really great practice in general face anatomy.
2. First Throw Out Some Rules
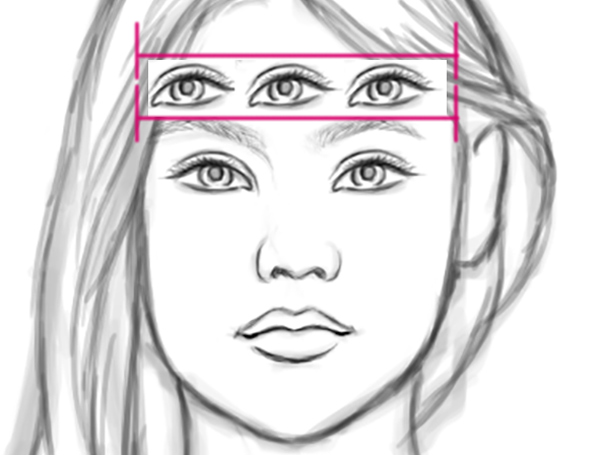
The 5 Eyes Rule
In any art class you take, you'll learn a whole bunch of rules about portraits. Some of those rules are great, but a lot of them can end up confusing you.
You might have heard or seen the classic rule: "The head should be 5 eyes wide."
Why It Doesn't Work
Not every face is the same, so you can't paint them with a cookie-cutter approach. Your subject might have really big eyes for their face, or you might just like the idea of drawing them in a caricature-like style. Either way, it's important to fine-tune your painting to what you actually see in front of you.
Square Heads
Another rule or technique taught traditionally is to draw the head by first drawing it as a cube. The cube represents the direction that the head faces in order to help you conquer different angles.
Why It Doesn't Work
Generally speaking, both of these rules are not necessarily bad, but they just don't exactly help in the likeness department. Cube heads, for instance, are better for understanding the overall head position and the different planes of the face, which can then be used later for shading. But sometimes when we limit ourselves to certain rules, we end up focusing more on the rule rather than our subject.

Save yourself the confusion! I'll show you how to keep things very simple because all we really need is a couple of lines.
3. Achieve Likeness With Grids & Guidelines
If you really want to learn how to paint any face, then you should actually get comfortable with using grids and guidelines.
Grids allow you to see your reference in sections. So as you begin to paint from the photo, you concentrate on matching that area of the grid to the one in front of you. This helps to make the process a little less complicated by allowing you to see the photo in a different light. Don't worry that you "can't draw faces"—just focus on doing your best to match the grids up.

Guidelines are also great for understanding where to place each detail.
Your basic guidelines will probably establish the positions for the eyes, nose, mouth, and center of the face. Once you have these guidelines in, you can use them to understand the relationship between each detail in order to paint your subject better.

4. Why Paint in Black and White?
I know you want to paint incredibly detailed portraits as soon as possible, but it's important to learn how to crawl before you walk. Don't take on too much all at once. Master likeness before incorporating color.
To focus properly on the concept of likeness, we'll be painting both portraits in black and white. Many digital artists also call this painting in "grayscale". But no matter what you call it, the point of painting this way is to make sure you recreate the lighting, shading, and general tones of your subjects perfectly.
5. How to Digitally Paint Faces: Easy Angles
Let's start off with a classic pose. If painting people intimidates you, start off with female subjects and centered head positions. Women and especially young people are easier to paint because their features are softer and you don't have to worry about extra details like wrinkles or facial hair throwing you off.
Step 1
Open your female reference in Photoshop. Change the photo to black and white by going to Image > Adjustments > Hue & Saturation and bringing down the Saturation to -100.
To keep the dimensions similar to the original photo (590 x 886 pixels), I'll create a new document at 600 x 900 pixels. Position both windows next to each other to make the referencing process much easier.

Step 2
Now let's add some guides. There are two different types that can help. One is a grid where the sections are all equal like blueprint lines, and the other is creating guidelines that specifically focus on the major shapes in your reference photo.
I like the second better.

Hit Control-R to bring up the Rulers for each document. Then drag your cursor from the Vertical and Horizontal Rulers to position your guidelines. Recreate the same guidelines for your blank document so that they measure up side by side.

Step 3
Now start drawing your reference with basic shapes using a large Round Brush (B).Don't worry about the details or having a clean sketch just yet. See, now you have a better understanding of where the head should go just because of the guidelines.

Step 4
Let's move on to the main features. Using the guidelines, I place small dots to mark where each feature begins and ends. With the dots in place, I then begin drawing the nose, mouth, and right eye on separate layers.

Eyes can be tricky. So to cheat the process a little, and create a second eye from the one you already have. Just Duplicate the first eye layer, and then flip it by going to Edit > Transform > Flip Horizontal. Now use the Move Tool (V) to position the left eye in place.

Finish up the last details to complete the rough sketch. You can hide the guidelines at any time by going to View > Show > Guides.
Step 5
I know what you're thinking... it doesn't really look like her yet, right? Well we're still not done with the sketch.
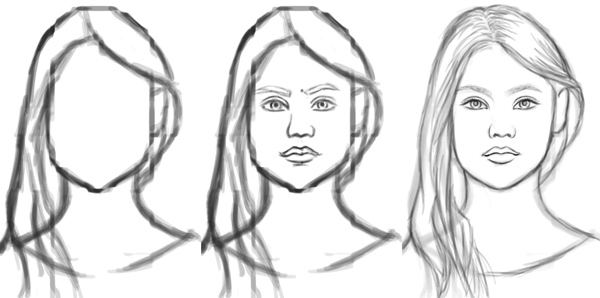
Try your best to not be lazy. You might have to sketch a face two or three times or even more before your drawing looks like the photo. Lower the Opacity to 30% for the rough sketch, and then create a New Layer above it and use the rough one as a guide. To sketch the cleanest drawing possible, use a small Round Brush (B) at 5pixels and take your time.

Here is my final result. Now I can move on to shading.
Step 6
Lay in the initial tones for your portrait using a Soft Round Brush (B). Around this time you should always check to see how well you're doing with making the painting look like the photo. If something doesn't look right, trust your gut and make some edits.

Looking back at the original photo, her face isn't as symmetrical as I've portrayed it. In fact, her head is tilted slightly to the left, which throws off the position of her eyes and head. To fix this, I'll use the Rectangular Marquee Tool (M) to make a selection around the head.
As a safe measure, I'll create a duplicate of the head by Right-clicking to select Layer via Copy.Now just slightly Rotate the head to the side by hitting Control-T to Free Transform.

Step 7
Continue painting more, and really study the original photo to understand the light and shadow. Since I may have drawn the eyes too big, I'll fix the face with Liquify. Merge all your layers together, and then Control-J to create acopy of your painting. Go to Filter > Liquify and use the Pucker Tool (S) to make the eyes smaller. Be gentle—you don't want to do too much.

You may also notice that I fixed the jaw too. Simply move it into the right position with the Forward Warp Tool (W).
Step 8
Now that we've taken on the brunt of the battle, all you have to do now is finish the painting. The last details really help to transform the portrait, so just keep tweaking it until you're comfortable with the result.

Not too bad, right? Let's see how we can do in our next portrait.
6. How to Digitally Paint Faces: Hard Angles
Ah, the dreaded profile. If you hate painting faces that are turned, then start with a profile to make things much easier.
Step 1
Just like before, we're going to set up our Male Reference right next to our blank document in Photoshop. This painting will be much bigger, with dimensions of 1250 x 1667 pixels at 150 dpi.

Step 2
Create guidelines again and change your photo to black and white. This time I'm going to trace these lines with the Pen Tool (P) so that they're much easier to work with. Stroke the lines with a Small Round Brush (B).
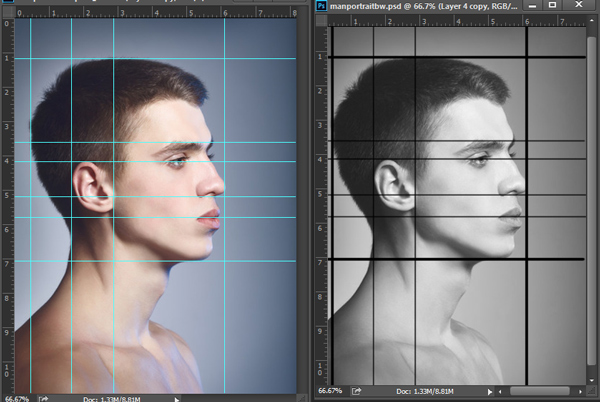
Now Hide the original guides. I also use the Pen Tool (P) to highlight the different angles in this painting by creating bright red lines on a New Layer. Since these angles are more complicated than the first portrait, these lines will help make sure I'm painting in the right direction.

Step 3
Copy and Paste those guides onto your blank document and start sketching with a Large Round Brush (B). Flip through the different guides to compare your progress as you move on to each stage of the sketch.

Select the layer for the rough sketch and lower the Opacity to 25%. Again, create a new layer to clean up the sketch with a Small Round Brush (B).

The important thing about painting men is to understand their bone structure, so don't worry about creating a sketch that is very detailed.
Step 4
Now begin your painting. Men have faces that are more angular than women, so make sure you take the time to study the guides so that you don't step out of the lines. And since their faces aren't as smooth, I also incorporated some nice texture with a grunge brush. This subtle change instantly gives the painting a more masculine vibe.

Step 5
This time around I was much more successful with the placement of each feature, so I didn't have too much to tweak. The angle of his neck does seem to be a little off, so once again I bring the painting into Liquify to straighten the neck using the Forward Warp Tool (W).

Step 6
You really have to zoom in on your photos to understand the subtle differences in shadows, textures, and light. And since we're only painting in grayscale, feel free to use the Eyedropper Tool (I) to paint with the colors from the photo.

As you draw to the final result, really push yourself to paint as much as you can. Here is my finished painting using these techniques. By the second time around, I was able to achieve much better likeness without ever tracing a photo.

Now it's your turn!
Conclusion
You never know what doors can be opened just by learning how to paint better. Keep practicing those portraits in grayscale, and move on to color as you gain more confidence.
Continue experimenting with different angles to make you a stronger artist. I really hope these tips have helped, and if you have any more questions feel free to ask me in the comments!
And if you'd like to see more tutorials on painting portraits, check out the ones below!
- An Introduction to Painting Realistic Hair in Adobe Photoshop
- How to Paint Realistic Hair in Adobe Photoshop: Short Hair & Beards
- Paint Better Portraits With the Liquify Tool in Adobe Photoshop
Original Link:
TutsPlus - Design
More About this Source Visit TutsPlus - Design