
Some of Our Sources
- Techcrunch
- Simplebits
- Joshua Blankenship
- Smashing Apps
- Creative Curio
- Inspiredology
- Noupe
- Crazy Leaf Design
- Stylized Web
- Hashedout
Help Webnuz
Referal links:
How to Create an Animated Pixel Art Video Game Sprite in Adobe Photoshop

You may want to make a retro video game or help with making the graphics for one. Then you’ll need a sprite: a pixel art character, animated and in different stances.
Then check this lesson out, as we’ll make a cute little bunny and give it a running loop animation.
If you find doing the actual pixel work too difficult or tedious, feel free to shop for great ready-made sprites as well as any other game assetsonEnvato Market.
1. Design the Character
Before the animation, we’ll do a static view of the character, and before doing that, we’ll need to figure out what it will look like.
Step 1
It's not such a necessary step if you're going to follow this tutorial exactly, but it was part of my process: sketching the character.
I sketched only the head. I tried a few different options and chose this style.

Step 2
To turn the bunny into pixels, I started drawing the eyes directly in Adobe Photoshop. The sketch wasn’t used much other than for defining the style.
If you’ve never done pixel art, you’ll want to create a New File in Photoshop and not make it very large—it can be 400 px by 400 px. You’ll want to work with a lot of zoom (like 700%) and use the Pencil Tool to draw one pixel at a time. I recommend keeping a second window of the same file open at 100% or 200% zoom so you can cycle between the windows and you can check on progress without the zoom.
I won’t follow a predefined sprite size, but I will make the character about as small as it can be while maintaining its main features. That’s why the eyes are a good starting point.
The eyes will simply be two lines, next to each other. Each eye is 3 px tall by 1 px across, and nearly black in color.

Step 3
With the eyes done, you can proceed with the nose of the bunny plus a few other details. It’s ok if the lines are simple for now.

Step 4
Now we can soften some of those lines. Also I’m already adding some teeth in front of the mouth, because bunnies have big front teeth.

Step 5
Let’s give the mouth a smile.

Step 6
And let’s add some ears. Right now they’re pointing straight up, and that could work also for this character, but we’ll bend them a bit.
The ears are about as thin as possible, with just 1px for the inside and then the outline pixels on the sides.

Step 7
Here’s one ear folding over, flapping down.

Step 8
And the back ear folds down the same way.

Step 9
Now, to finish the head, we’ll give the bunny a relatively big puffy cheek.

Step 10
And now we can draw a body under the head.We’ll make our bunny anthropomorphic, or with a human-like shape.The torso will basically be like a teardrop shape.

Step 11
We’ll give the bunny short legs and big feet. We can start with just one leg.

Step 12
The back leg is the same as the front one, but moved slightly to the side as it would otherwise be completely blocked by the front leg.

Step 13
Finally I moved the legs one pixel to the left because I thought they looked a bit off-center, and I connected the front leg to the belly by removing the pixel separating them.

Step 14
We’ll only have one arm visible in the standing position. The arm will have a kind of teardrop shape.
It will block some of the torso.

Step 15
Let’s clean up by removing the lines of the torso behind the arm.

And now the basic outlines of the bunny character are complete.
2. Color the Bunny
Now we turn those character outlines into a finished static sprite.
Step 1
Pick a color.
What color would you like for your bunny? I went for a tan kind of color and applied it, for now, to all areas except the nose. You can fill the areas with the Bucket Tool.

Step 2
Let’s give the bunny a cute white belly.Also a white pixel for the front teeth.The nose will have a little touch of pink, but mostly it will be white, as highlight.

Step 3
We give the bunny some shading: a darker version of the main fur color applied to areas where less light reaches. This shading can help give texture on the cheeks if we apply it with a bit of a pattern.
We’ll be keeping the back limbs and ears darker than the front ones. So the back leg gets only the new darker shade and the back ear gets mostly this shade except on the tippy top.

Step 4
Extend the shading to the white belly. I added a light grey color with a slightly blue hue.

Step 5
Some features will look better with less contrast, so I replaced some of the near-black color with dark brown on some inside pixels, like the mouth and neck.
I also added more detail with this dark brown to accentuate the puffy cheeks.

And now the character, in its standing position, is finished.
3. Draw the Running Frames
Now let’s give the bunny some motion; we’ll make a running loop.
This animation can be done with any number of frames, but as this is a small character, six frames will do fine.
Step 1
Let’s get the limbs out of the way for now.
The bunny’s torso and head won’t change much while it's running, so we’ll get that ready and keep it pretty much constant while we work on all the frames.
I left a bottom line as reference for the leg height or ground position.

Step 2
Lean the torso forward, simply by selecting the head and an area below the neck with the Rectangular Marquee Tool and then nudging 1 px to the right (which can be done with the right arrow key while the Move Tool is active).
In the end I moved the head forward 2 px.

Step 3
We didn’t properly rotate the torso just now, which means we kind of stretched it, making it slightly longer. So to adjust it back, let’s shrink the torso vertically 1 px and clean up the lines.
Let’s also move the torso 1 px closer to the bottom line, because the legs will be flexed for most of the running animation, and thus they shouldn’t be the same height.

Step 4
To do the legs, we only really need to work on one leg motion, as the other one will move the same way.
So the movement will need to be like a pendulum: the leg is bent through most of the motion except for when it extends forward (which is the first frame here)
So these would be the six frames of the leg motion (feel free to check more references of running frames). Notice the position of the foot when doing these. They're done in a bright color for contrast.

Step 5
We’ll work on all six frames side by side.
Here are the leg frames placed over the bunny. Do this in a New Layer.
Notice that the leg is not fixed to one point of the waist; when the leg goes back, it’s coming out of the back of the bunny, and when it goes forward, it’s coming out of the front of the bunny, to an extent.

Step 6
Here’s a quick way to start turning our guide lines into the final legs. First, replace the color with the fur color (you can do this with the Bucket Tool with the contiguous setting checked off), and instead of drawing the outlines around the legs, select the blank area around them with the Magic Wand and contract the selection (Select > Modify > Contract…) by 1 px. Then invert the selection (Select > Inverse) and then with the Bucket Tool (contiguous checked off) fill in with outline color.

Step 7
The legs aren’t finished yet, but let’s add a little skip to the bunny now because that will affect finishing the legs.
We’ll add the skip because while running we can’t expect the character to stay always at the same level. So we’ll bump the bunny up 1 px on the third frame, when the back leg is most extended, pushing the bunny up, and we’ll also need to add the skip on the sixth frame, when the opposite leg will be pushing the bunny up.
The frames with the skip are marked here with purple bottom lines. The other bottom lines have been turned into 20% black lines that can serve as shadows. On a platform game, this shadow might not be needed, but for now it will make the animation look better.

Step 8
To finish the leg, we have to make the foot chubbier, connect the leg to the body and also do a bit of shading.
Also, all bottom lines are now turned to shadows.

Step 9
Now that one leg is finished, we just have to copy it.
After pasting it, we should move the new leg a couple of pixels to the right, just as the legs were slightly spread on the standing position.
Right now it looks a little bit funny because both legs are moving the same way, which is actually usable for this character, as bunnies tend to hop. But we’ll change that to make them look as if the bunny's running.

Step 10
To get the legs to run, they should cycle alternately, so that when one leg is extended to the front, the opposite leg is extended to the back.
Because we have six frames, that means one of the legs will move its frames three positions to one side (and then take the three disembodied leg frames and move them to the one-legged bunny frames).
The new legs layer should be behind the bunny body layer.

Step 11
To finish the back leg, you should simply shade it darker, if you want to keep the back limbs darker than the front as we did in the standing position.

This is how the frames are looking so far. Don’t worry about making this animation for now. We’ll finish the graphics and animate the running loop at the end.
Step 12
Now it’s time to add the arms.
They’ll move pretty much like this. They’re bent throughout the running cycle, only extending back a little bit in the first frame. However, you can try your own variants to this motion to achieve different running styles.

Step 13
Place the arms over the body frames in a New Layer, and give them the right color and outlines, as we did with the legs.

Step 14
And then give the arms some volume.

Step 15
And finally shade them to convey further volume.

Step 16
Then copy the arm. New Layer, behind the body.

Step 17
And finally shade the new arms and move them so that they cycle opposite to the original ones.
Remember that the arms move counter to the legs so that when the left leg is at the front the left arm should be at the back.

Now this is how the arms are looking.
Step 18
Let’s add a bit of motion to the head, as that may be conspicuously static for now.
We’ll make the ears respond to the bunny’s motion. Here, on the frames where the bunny slightly skips up, I made the ears point down as though inertia is keeping them down while the bunny is skipping.

Step 19
On the frames after the skip, I made the ears less bent and more open, pointing forward.

Step 20
And finally I made the cheek fur move as well. Like the ears, a bit lower when the bunny skips up and a bit higher after the skip.

And here’s how that is looking.

Step 21
The last bit of work on the frames we’ll do will be on the torso, first by animating the white spot on the belly. The chest should be turning slightly as the bunny runs, so the white spot should respond to that motion.
So when the front arm points to the back, there should more of the white spot visible, and less of it when the front arm points forward.

Step 22
We didn’t need to draw the tail when the bunny was standing up, but now that it’s running, it seems that the tail should show up.
So first I put a red square marking where I think the tail should go. It goes in a New Layer, and for now it can be on top of the other layers.

Step 23
Now give the tail some color, shading and outlines.

Step 24
An extra touch for the tail: it hides slightly behind the bunny’s body as the bunny’s chest is more visible.

Step 25
To finish the tail, move the layer to the back and finish any shading/cleaning you see fit.

And the work on the frames is complete. Here’s what it’s looking like in motion—the extra detail work pays off, doesn’t it?

Let’s turn those frames into a loop.
4. Make the Animation
We have six frames that will seamlessly loop into a running cycle. We just have to put them in motion.
Step 1
Copy the frames into a New File.
You’ll have to copy one frame at a time, in the proper order (left to right). To copy all layers at the same time, you have to copy merged (Edit > Copy Merged), and just remember to have no background color when copying.
You’ll want the new file dimensions to be only slightly larger than the bunny.
When you paste them they should line up properly; the bottom line stays the same on all layers, and the nose does too, except for the two frames in which the bunny skips up 1 px.

You should end up with a file with six total layers; one per frame. No background.

Step 2
To make the animation in Photoshop, you’ll need to open the timeline window (Window > Timeline). It has a Create Frame Animation button unless it’s set to Create Video Timeline, in which case you change it to frame animation using the drop-down button.

Step 3
Press the Create Frame Animation button, and then press the timeline window options button, in the top right corner…

… and select Make Frames From Layers.

Step 4
Then finally select all frames and adjust their delay if you want (I chose a 0.1 second delay) and set the looping options to Forever.

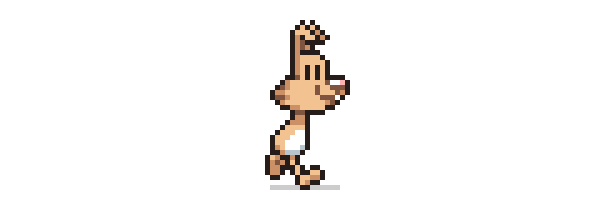
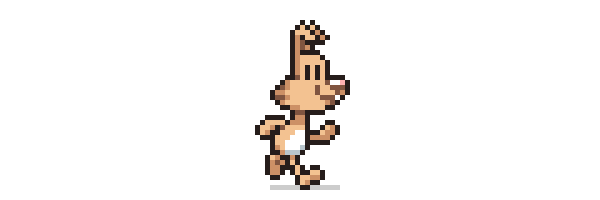
And you've got your bunny running loop!

You can now use this sprite in games or export the file to GIF.
Awesome Work, You're Now Done!
Congratulations, the bunny runs now! He’s ready to save princess bunny or cause mischief or whatever you might come up with for him.
This should help give you an idea of what it takes to design and animate sprites. You can have fun making your own, or get to work and apply these graphics to a game!
And if this was too tedious for you to do, remember you can find finishedgame assetsonEnvato Market!
Original Link:
TutsPlus - Design
More About this Source Visit TutsPlus - Design