
An Interest In:
Web News this Week
- April 28, 2024
- April 27, 2024
- April 26, 2024
- April 25, 2024
- April 24, 2024
- April 23, 2024
- April 22, 2024
Some of Our Sources
- TutsPlus - Code
- Pearsonified
- The Logo Smith
- Smashing Apps
- Vandelay Design
- Creative Curio
- Inspiredology
- Web Design Ledger
- Wal You
- Design Modo
Help Webnuz
Referal links:
How to Create Your Own Fog Brushes in Adobe Photoshop

In this tutorial you will learn how you can easily create your own mist brushes using different filters and transformations.
1. Create a Basic Fog Texture
Step 1
Create a new document in Photoshop. Set its Width and Heightto5000 px and press OK.

Step 2
Grab the Paint Bucket Tool (G) and pick black (#000000). Fill the BACKGROUND with it.

Step 3
Create a new empty layer above BACKGROUND. You can find the button Create a new layer in the bottom part of Layers panel. (If you don't see this panel go to Window > Layers.)

Double-click on the layer you've just created and name it FOG.
Grab the Paint Bucket Tool (G) and fill this new layer with solid black color as well.
Step 4
Grab the Elliptical Marquee Tool (M) and select the circle in the middle of the image. See the image below to get the idea.

Go to Select > Modify > Feather and set theFeather Radius to 500 pixels. Press OK.
Because of this step you'll have smooth transitions between the fog and the rest of the image.

Step 5
Set black as your foreground color and white as your background color.

Go to Filter > Render > Clouds to render the base texture for your fog brushes.

Go to Select > Deselect to deactivate the selection.
Step 6
To make this base texture more realistic you need to blur it a little. Go to Filter > Blur > Gaussian Blur and set theRadius to 30 pixels. Press OK.

2. Create Thick Fog
Now it's time to have some fun! You can create as many variations of fog as you'd like. In this tutorial we'll cover three essential variations. But you can tweak it as youwish.
We'll focus on creating the following three effects:
- Thick Fog
- Gentle Haze
- Wisps of Fog
Step 1
Right-click on the FOG layer and select Duplicate layer. Name the new layer THICK FOG.
Make the FOG layer invisible.
Click on the THICK FOG layer and lower its Opacity to 40%.

Step 2
Go to Edit > Transform > Perspective and set the perspective as shown below. After you're done press Enter on your keyboard to apply the changes.

Great. You've got base for your first brush. Let's move to another one!
3. Create a Gentle Haze
Step 1
Right-click on the FOG layer and select Duplicate layer. Name this new layer GENTLE HAZE.
Make the FOG and THICK FOG layers invisible.
Go to Filter > Blur > Gaussian Blur and set theRadius to 80 Pixels. Press OK to apply changes.

Step 2
Go to Edit > Free Transform and transform the layer as shown below. Press Enter on your keyboard after you're done to apply changes.

Step 3
Lower the Opacity of this layer to 60%.
Grab the Brush Tool (B). Select a soft round brush and lower its Opacity to 30%. Pick a black color and paint over some parts of the mist which are too thick. Look at the image below to see where you should paint.

4.Add Wisps of Fog
Step 1
Right-click on the FOG layer and select Duplicate layer. Name the new layer WISPS OF FOG.
Make the FOG, THICK FOG and GENTLE MIST layers invisible.

Step 2
Go to Edit > Free Transform and transform the WISPS OF FOG layer as shown below. Press Enter on your keyboard after you're done to apply the changes.

Step 3
Go to Filter > Liquify. Grab the Forward Warp Tool and liquify the layer as shown below. Press Enter on your keyboard after you're done to apply the changes.

Step 4
Go to Filter > Gaussian Blur and set theRadius to 50 Pixels. Press OK to apply the changes.
Lower the Opacity of this layer to 50%.

5. Create Custom Brushes
You've just created three basic shapes of fog. As you'll see in the next part of this tutorial, they can be very versatile. But before testing them, you need to create brushes from them.
In this section I'll show you how you can create a brush from the THICK FOG layer. Creating brushes from the remaining two layers is completely the same.
Step 1
Make sure that only the BACKGROUND and THICK FOG layers are visible.

We've worked with a black background and white mist layers because this way it was easier to imagine how the fog actually looks. But now you need to invert colors to be able to create the brush.
Add a new Invert adjustment layer on the top of all layers. You can find the Add new fill or adjustment layer button on the bottom part of your Layers panel.

Step 2
Go to Edit > Copy Merged to copy the whole merged image. After that go to Edit > Paste to paste it. Place this new layer on the top of all layers.

Step 3
To create a custom brush from this new layer, go to Edit > Define Brush Preset.
Name this new brush THICK FOG and press OK.

Step 4
Repeat this process with the GENTLE FOG and WISPS OF FOG layers.
6. Test Your Brushes
Now it's time to test your brushes! Open a photo or photo manipulation where you'd like to add some fog, and start experimenting. There really are no limits to what you can paint with them. But let me give you few tips on how to get more realistic results:
- Brushes will work best on foggy images where you just want to enhance natural fog.
- Don't paint with pure white color. Try some very light shades of blue or yellow to get a more believable result.
- Use your brushes on lower opacities.
- Try working with different sizes of the brushes and different shapes to see what works best for each image.
- Remember that objects closer to you are more visible in the fog than those far away.
- Usually when places are covered in mist, they have less contrast.
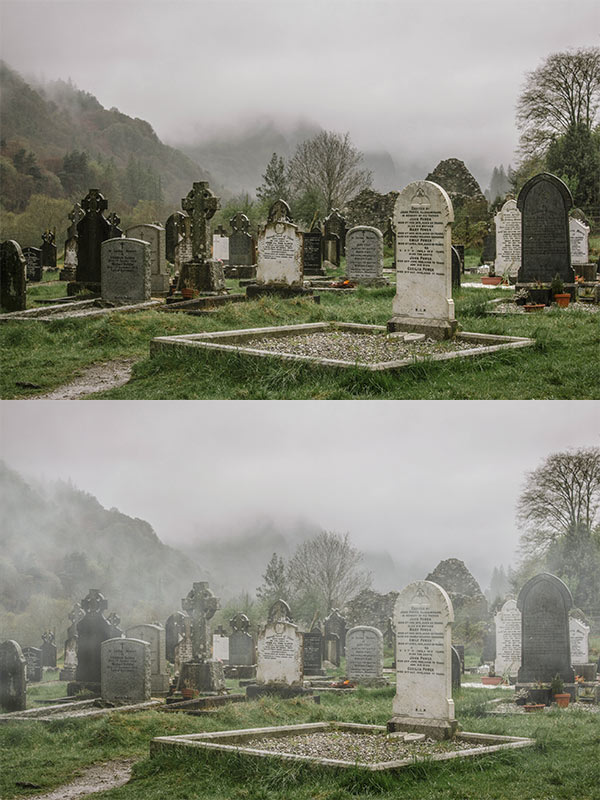
Let's take a look at how your brushes work in images.
In this first image you can see the look of your brush named Thick Fog.

In this image you can see how the Gentle Fog brush works. As you can see I've also lowered the contrast of the image to get a more believable result.

The Wisps of Mist brush is best to use when there is already some mist in the image and you want to just enhance some details.
Conclusion
Congratulations! You've just created your own custom mist brushes!
In this tutorial you've learnt how you can easily create custom brushes using different filters and transformation tools, and you've got some tips on how to work with them to get the most realistic effects in your artwork.
Try to experiment with different shapes, colors and opacities to create your original effects.
Original Link:
TutsPlus - Design
More About this Source Visit TutsPlus - Design