
An Interest In:
Web News this Week
- April 23, 2024
- April 22, 2024
- April 21, 2024
- April 20, 2024
- April 19, 2024
- April 18, 2024
- April 17, 2024
Some of Our Sources
- Slashdot
- Mashable
- Web Designer Wall
- Noupe
- Web Design Ledger
- 24 Ways
- Wal You
- Web Resource Source
- Dev To
- Hashedout
Help Webnuz
Referal links:
Drawing for Kids: Draw aPony
Today we'll draw a cute pony. It may look very simple, but it will be based on a realistic horse—just in less advanced form. You'll learn how to build a "base" for a drawing and how to measure with lines. You just need:
- a pencil (the softer, the better)
- two sheets of paper (it can be a cheap copy paper)
- a ball-point pen or a marker (something that makes dark lines)
You don't need an eraser!

1. Draw the Body
Step 1
Take one sheet of paper. Imagine an oval and sketch it very lightly with your pencil. Don't draw it all with one line. Try to use short lines with gaps.

Step 2
Divide the oval into halves. If you don't know how, here's a way:
Find the center of the oval and mark it with a dot. Then draw one dot on the right and one on the left. Join them with a line to divide the oval into halves.

Step 3
Draw a circle next to the oval. Make it a bit smaller.

Step 4
Now join up both shapes with curved lines. The body is finished!

2. Draw the Legs
Step 1
First draw two lines to find the right place for the legs. The front one (here: left) should be in the front half of the chest-oval. The back one should be placed in the back half of the bum-circle.

Step 2
Mark the places where both lines touch the body (1) and the ground (2). Can you see a line between them? Mark the middle of it.

Step 3
Now mark the middle of each half.

Step 4
These marks will help us put all the parts of each leg in the right places. We can draw lines to plan how wide each of them will be:
- The base of the hoof: the longer this line, the more like a draft horse the pony will look.
- The top of the hoof: make it a bit shorter than the hoof.
- The wrist/heel: make it even shorter.
- The elbow: make it longer than the hoof.

Step 5
Now outline the lines with ovals or circles:
- Hoof and elbow with an oval
- Wrist/heel with a circle

Step 6
We now have enough lines to draw the hooves:

Step 7
To draw the lower legs, join up the hoof with the wrist/heel. If you want to make them more realistic, make the lines curve inward.

Step 8
Now join up the wrist with the elbow, and the heel with the bum.

3. Draw the Head
Step 1
Start by drawing the neck—a single curved line.

Step 2
Attach a line to the neck. This will be the base of the head.

Step 3
Draw two circles on the line. Make one very big (the head) and one smaller (thesnout).

Step 4
Draw the eye, the nose, and the smile.

Step 5
Join the two "head-circles" with gentle lines to complete the head.

Step 6
Now join the head with the body by drawing two lines similar to the neck-line.

4. Add Details
Step 1
To draw an ear, draw a line from the middle of the head.

Step 2
Then join it with the head, creating a "curved triangle".

Step 3
Draw the mane in any style you want.

Step 4
Put a circle at the end of the bum to create the base for a tail.

Step 5
Draw a curved line to show where the tail will go.

Step 6
Draw an oval "attached" to the line.

Step 7
You can now outline the lines to create the tail.

5. Create the Final Drawing
Step 1
The base is done! This is where the actual drawing starts. Take a ball-point pen or anything that creates dark lines, and draw over the sketch. You can fix any mistakesnow.

Step 2
Take the second sheet of paper and put it right over the other. You should see the lines of the sketch underneath. If not, you can use a window to see it.

Step 3
Let's go back to drawing. This time we're working on the real picture, so be more careful. You can also use darker lines.
Draw an outline of the body using the shapes you can see beneath.

Step 4
Draw the hooves with two simple lines.

Step 5
Draw the mane and tail. If you want, you can use a lot of lines to make it fluffy.

Step 6
Outline the eye, nose, and smile. Draw a spot of light in the eye.

Step 7
Fill the eye and nose by drawing tiny circles inside.

Step 8
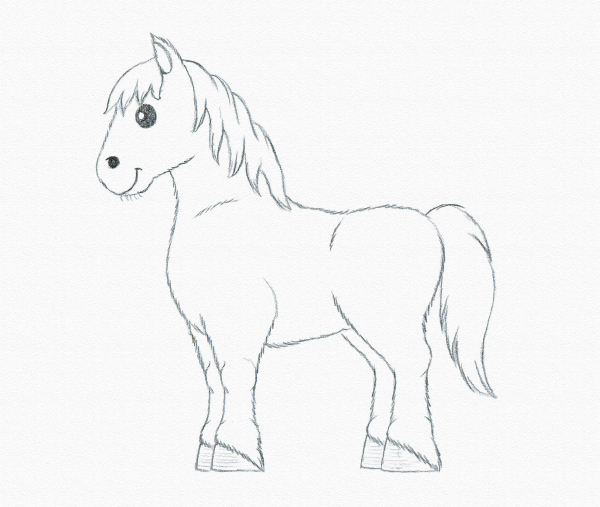
You can now remove the sheet underneath and finish the drawing. For example, you can create hair by drawing short lines all over the main outline. You can also add another pair of legs.

Congratulations!
You've made it! But hey, it's not the end! Do you remember that part where we were drawing hooves, wrists, heels, and elbows? These will be important for the next part of this tutorial, in which we'll be learning how to draw a running pony!
Original Link:
TutsPlus - Design
More About this Source Visit TutsPlus - Design