
Some of Our Sources
- Techcrunch
- Technology Review
- Pearsonified
- You The Designer
- Creative Curio
- Reencoded
- Wal You
- Specky Boy
- Spyre Studios
- The Verge
Help Webnuz
Referal links:
Think With Forms, Not Lines: Take Your Drawing to the Next Level

Drawing, at its most basic level, is intuitive to us. Even young children know how to transfer the image in their head into a set of pencil strokes, even though they may not resemble anything to others. When we grow up, we learn more about the world around us, and we learn how to depict it more accurately with lines.
Lines seem to be almost interchangeable with drawing, but if you look carefully, you won't find them anywhere in the real world. It's us who pack the real objects into tight-fitting wrapping, because wrapping is all we can draw. Wrapping, the lines, is an approximation of reality, and, as it is with approximations, there may be many of them describing the same thing.
Until you understand it, you're forced to draw flatly, using lines as something natural and constant. You're forced to draw your creatures, no matter how beautifully imagined, in one obvious pose, with a shading that doesn't make it any less flat. This is how far talent can take you. Now it's time to take your skill into your own hands. I'll show you a way of thinking you need to use to fully control the lines; to create them from imagination and still make them more realistic than the traced ones.
One last thing before we start: I want you to really, really focus when reading this article. If something seems confusing, stop for a while, re-read it, and try it in practice. If you keep reading without doing that, you won't learn anything.
What Are Lines and Where Do They Come From?
Two Ways of Drawing
We can't draw reality. It's too complex, even if we took only the visual side of it into consideration. If you use only a still snapshot of it, a single frame, you can try to re-create it with colors of various brightness and saturation, simulating the light and shadow of the image. Of course, it will be still a painting of a picture, not of reality.
It's different with drawing. Drawing is based on lines, and lines symbolize the edges of objects we observe. But once we separate the edges from their "parents", the lines become something on their own. They can even be used without any parent—you can use them to depict something you have never seen.
Apparently, our minds don't need much to recognize reality. We are very skilled in terms of recognizing patterns and symbols, even when they're quite far from reality. We don't need to carefully trace edges from a photo to depict an object—we can draw lines randomly until our mind recognizes them as something.

So, there are two types of lines. The first consists of the edges derived from a still frame of reality. There are no arbitrary edges, but the more of them you include, the more realistic the outcome. The other one is a kind of reverse of it: you draw any lines and wait for your mind to lead you to a recognizable outcome. There are many recognizable outcomes, and the more skilled you are, the closer it is to the result of the first type.

We use both ways when learning how to draw. The first one is used commonly as tracing, or when we use a reference. And that's the easy way to get a recognizable picture, but it's the way to draw only things that you've already seen. Boring!
The other one is used when you draw from imagination. You have some image in your mind, but you can't take lines from it, because you don't really see it. Just like a text you try to read in your dream, the image changes each time you try to focus on it. The only way to draw it is to... draw it, constantly comparing every line to your expectation. Obviously, it's not easy.
When Talent Becomes an Obstacle
Talent is a very specific "teacher". It lets you do the things you have never learned consciously—they just seem to turn out on their own. However, when talking about talent we usually imagine a person creating masterpieces just like this, without any effort. The truth is that talent will never give any skill to you—it will only make the basics obvious.
It may seem like a good thing, but I discovered that drawing talent is often an obstacle to your progress. You never learn how to draw, you just draw, and wait for great effects. It works for a while, but then comes a time when the progress just stops. And you don't know what to do, because you have never had this problem before!
When a talented person draws, the lines resemble reality more than the lines of others. The artist doesn't know how it happens; it just happens. Therefore, a talented artist doesn't have any control over their progress. All they can do is to draw more and hope for the best.
No matter whether you're talented or not, to learn how to draw you need to understand the origin of lines. You need to understand the difference between the lines that our mind recognizes as realistic and the ones that are just a mess. Only then will you gain control over your drawings, and you won't be a slave of talent or lack thereof.
The Origin of Lines—the Form
We derive lines mostly from edges. Edges can be "seen" even by a blind person, because they can be felt as abrupt changes in the object's form. But you don't need to touch the object to find the edges—the uneven form influences the light hitting it, so the lines are usually pretty clear.

The problem with lines derived from edges is that the same set of lines can be used to depict different forms:

It seems that shading is the key to present the true form of an object, but does it mean that unshaded drawings must be flat? Fortunately, no, and I'm sure you've seen a lot of sketches with more depth than detailed, colored drawings. How does it work?
Many Faces of a Form
The difference between a form and a flat object is that the latter has only one side. It doesn't have a front, back, top, and bottom, and thus it can't be rotated. It can be easily done with a form, which actually is part of its definition.
Let's look at three sides of a cube, which is a very nice, regular form. We can see the left side (1), top side (2), and right side (3). Each of them, separately, looks very flat and boring. In fact, you can't even shade them to make them more interesting!

This kind of view occurs when you look at a form placed in a "default" position.

If you rotate the form horizontally, you'll see two sides at the same time. But it still looks flat!


Let's rotate the form vertically, too. Voila!


The very definition of a form is that it can be rotated to reveal another side. However, in a still image there is no visual difference between a flat object and an unrotated form without revealed sides. You must rotate the form to give it depth, and that's just what we did in this short tutorial:

From Forms to Lines
In order to draw lines resembling forms, not flat sheets of paper, we need to base them on forms. Talented artists achieve this effect by trial and error, waiting for the proper lines to appear on their own. When they do, the artist doesn't know where they came from or how to modify them without losing their meaning.
The real secret to drawing forms is not the lines you're drawing, but knowing where they come from. Or rather: where they should come from. Before starting a drawing you should imagine the form you want to base your lines on, instead of drawing lines on their own. So, the key is to know how the lines should change when the object is rotated, as the opposite to just remembering a particular set of lines leading to a particular pose.

That's the real reason for why beginner artists tend to draw the same "default" pose all the time. They have no idea how to convert it visually to a 3D form to rotate it. It also applies to the problem with drawing from imagination, when you can draw a horse when looking at a picture, but without it you're lost.
Lines are hard to remember and they can't be modified; forms are easy to remember and they can be modified freely. The reason why we choose the former is because it's intuitive and talent-based. The latter requires more effort and active learning, but the prize is worth it!
How to Draw Forms Instead of Lines
Now that we know why forms are more important than lines, let's see how we can use this knowledge in practice.
1. Think With Forms
The first thing is the change of thinking. If you can easily redraw something from a still photo, but not from life (even if the object is not moving), it points to this very problem—you focus too much on the outlines. I'll show you what I mean:
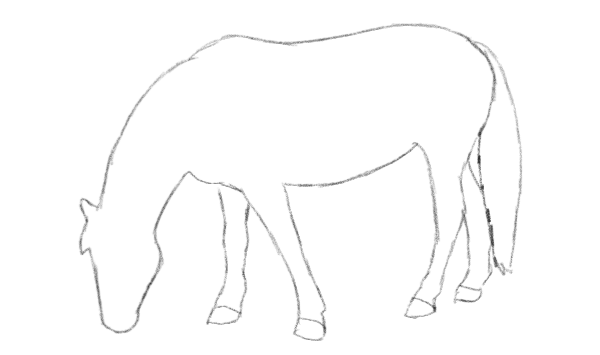
Let's say you're looking at this photo, preparing for drawing it. You think you see a horse, but what you really see...

... looks more like this. You separate the body from the background and look for distinctive edges.

Then you proceed to draw what you see. What do you think—did you really draw a horse this way? Or rather just some edges you've noticed on its body, edges that others will recognize as horse-like?
This may be a decent method, as long as you stick to redrawing references. Because it doesn't allow for predicting other poses! Look at the two examples below. These are both horses, just in different poses. In reality they are almost identical, but their lines have nothing in common!

So, this is your first exercise. You need to change your thinking habits, which will not happen overnight, but don't let that stop you! What you should do is to observe objects around you and de-construct them. Imagine every complicated object as made of simpler objects. Yes, even the horse!

2. Understand the Concept of Sides
Most of us understand this concept intuitively, but when it comes to drawing we tend to forget about it. Let's sum up the most important rules, and I'll show you why they're so important! It may get a bit geometrical for a moment, but basic rules are easiest explained this way.
1. Basic Sides
There are six basic sides we can find in forms, even when they have very complex surfaces and smooth edges:
- Front
- Back
- Top
- Bottom
- Side A
- Side B
The "side" sides can be called left and right, depending on which point of orientation you pick. If you stand in front of the box, side A is your left side, and side B your right side.

It applies even to such an irregular form as Mr. Chubby's body:

2. Views
The problem with sides is they can't be seen all at the same time. For example, when you are in front of the... front, you can see only this and nothing more. The box looks like a square this way. To see any other side you need to move the box, or you need to move yourself away from the box:
- To see the top, move the box down (or move yourself up).
- To see the bottom, move the box up (or move yourself down).
- To see the left side, move the box to the right (or move yourself to the left).
- To see the right side, move the bottom to the left (or move yourself to the right).
- To see three sides at the same time, combine the movements.
You can't see more than three sides at the same time.


3. Opposite Sides
There are three pairs of opposite sides: top-bottom, front-back, left-right. The rule about them is they can't be seen at the same time, because one overlaps another.


4. Adjacent Sides
Adjacent sides can be seen at the same time, but the more you see of one of them, the less of the other. The only way to see one side completely is to use a view with no adjacent sides visible.


5. Perpendicular Lines
Only when one or two sides are visible can their edges create a right angle (they're perpendicular to each other). When you want to see the third side, too, this relation is lost.


It's impossible to show three sides at the same time and keep any right angle. You can use it as a simple method to determine whether the form has been rotated properly.

6. Distance
Objects get optically smaller with distance, so if two opposite sides are very far from each other (the object is big), the more distant one will appear smaller.


For an exercise, check your drawings and find ones in which you tried to achieve a 3D effect, unintentionally ignoring some of these rules. Can you understand your mistakes now?
3. Understand the Concept of Directing Lines
The sides of a cube are easy to understand, but the objects we draw are rarely constructed so neatly. They're usually some kind of approximation between the sides, as presented here:

However, the concept of sides can be used as a base for a much more useful method of presenting rotation. I don't know if it has any professional name, so let's call it directing lines for now. Their purpose is to convince your eyes that they're looking at a rotated form instead of a flat set of lines.
Let's use a cylinder as an example. It's an elongated form with a circle as a base. In most of the views it looks like a rectangle, but in top view (3) and bottom view (4) it looks like a circle. This is important!

- A: this is your eye level (right in front of you). Here the circle lies parallel to you, so you see only an edge of it—the circle looks like a line.
- B: the higher the cylinder goes above your eye level, the more it strives to become its top view—the circle. The line gets curved up.
- C: the lower the cylinder goes below your eye level, the more it strives to become its bottom view—the circle. The line gets curved down.

The same applies to side views, if the cylinder is positioned horizontally:

This is exactly what happens to every form with a roughly circular cross-section, like the body of Mr. Chubby:

That mystical foreshortening you may have heard about is nothing more than the change between two views—the change of length of sides as described in rule 4 (adjacent sides).

When you want to draw directing lines on a side of a form in some transitional view, imagine how the edge you're trying to draw looks at the two views between which you are. It will be as transitional as your view:
- If the view is "front slightly rotated to the right", the directing lines will beslightly curved to the right, and the front will be slightly shortened.

- If the view is "front strongly rotated to the bottom", the directing lines will be a strongly curved to the bottom, and the front will be strongly shortened.

The general rule can be described this way:

If you want to be sure you're drawing the curves properly, always draw them as full ellipses—the loss of symmetry will be a sign you're losing the accuracy.

If you looked carefully, you might have noticed one more curve on Mr. Chubby that doesn't follow the rules we've just described. It's because for now we've been talking about the cylinder, and Mr. Chubby is fully rounded. Relax—there's just one more thing to add here, and it derives from what we already know.
A cylinder has only one circular cross-section, and a sphere has three of them—all perpendicular to each other. It means that if one of them looks like a circle to you, the other ones will look like straight lines.

That's why Mr. Chubby doesn't have only one set of curves. Let's take a closer look:
- As long as we move/rotate the object according to one axis, its directing line will not change (here: the vertical cyan line).
- A: this is the eye level. The blue oval 1 is just a line. The cyan oval is a line too, so curves 2 and 3 make a full circle together; they're the center oval of, respectively, bottom and top.
- B: this is the bottom view. The center oval of bottom looks like a straight line here, and since the cyan oval is still a line, the last of the ovals, 1, gets the whole perimeter.
- C: this is the top view. The center oval of top looks like a straight line here, and since the
cyan oval is still a line, the last of the ovals, 1, gets the whole
perimeter. - Between phases the ovals change places, turning from lines to curves just like in the case of a cylinder.
Take some time to understand this scheme. Try to rotate the sphere in your mind and compare it to the body of Mr. Chubby.

There's one problem with the three-side view, though. A circle seen in it is not only shortened vertically and horizontally, but also kind of rotated. Instead of trying to understand how to rotate it, just remember this ellipse has two pairs of long curves (1) and two of rounder curves (2).

Can you feel your brain steaming? Take a break to find directing lines in your environment!

4. Analyze & Practice Until It's Obvious
OK, now you now the rules, but they seem to have more in common with math than with reality. To really understand how to use them you must "feel" them; there's no better exercise for that than tracing.
Gather a whole set of references, first with some simple objects. Print them on one page, slightly lighter (you can lower the opacity of the images or change the lightness in the printer's settings). Analyze: where is the "camera" in the picture? Is it above the object or under it? Should the directing lines be curved up or down, then? Strongly or slightly?
When in doubt, go back to my explanation of the rules and try to see them in practice. Don't use a ruler or any other tools; try to draw your lines loosely, with a relaxed hand. Draw them lightly, and then stress the outlines. You can also experiment by drawing the lines intentionally wrong, to see what happens to your perception of the object.

When you feel ready, you can try more complicated objects. Draw the lines on them, then try to re-draw the same objects in different poses.

From Forms to Lines—in Practice
You may feel quite confused now—first I tell you that we shouldn't start a drawing with lines, and then I give you a whole bunch of complicated rules which lead to... more lines. Let me explain it.
I mentioned earlier that there are two ways of drawing. For drawing from imagination we always need to use the second method: start with random lines and wait for our mind to recognize them. However, drawing with forms adds another phase to it. You don't start your picture with lines that will be a part of the end result—you're sketching the form and waiting for your mind to recognize it. Once the forms are established, you can safely add the detailing lines, knowing that they will look good no matter what!
Let's see how it works!
Step 1
Start by sketching the base idea. You don't need to use the directing lines yet, but take the rules of sides into consideration.

Step 2
Take a moment to understand what kinds of forms your sketch suggests. How are they rotated? You can define the rotation with simple crosses of directing lines.
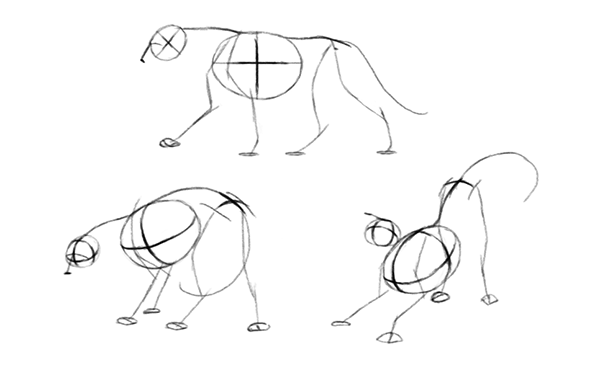
Step 3
Once the base is done, you can add the rest of the body, following the directing lines of the base. Of course, simply knowing the forms will not make the animal anatomy obvious. You need to spend some time analyzing the pictures of a real animal and trying to convert it to simple forms. Once you memorize them, you'll be able to draw the animal from imagination!

Step 4
Now it's time for "normal" drawing. You can add all the details without wondering where they should go, or how they're changed by rotation.

Conclusion
Can you see now how forms, though hard to explain, make drawing easier? Sure, it may seem overly complicated now, but the truth is you're working with forms every time you try to draw realistically. You just don't know about it, so you're shooting in the dark. No wonder it's so hard!
It's natural if you feel overwhelmed by it, but don't give up! Take your time, and learn it step by step; you don't need to grasp it all overnight. You've been presented with the secret of all the great artists—don't reject it only because it's complicated. Slowly apply it to your way of drawing, and come back here every time you have a question you need answered.
If you're interested in this topic, and you'd like to know why a form moved away from us looks like a rotated form, check out this article. You can also learn more about using forms when drawing from imagination with How to Learn to Draw: Stage 3.
Original Link:
TutsPlus - Design
More About this Source Visit TutsPlus - Design