
An Interest In:
Web News this Week
- April 20, 2024
- April 19, 2024
- April 18, 2024
- April 17, 2024
- April 16, 2024
- April 15, 2024
- April 14, 2024
Some of Our Sources
- Simplebits
- Pearsonified
- Spoon Graphics
- Six Revisions
- Inspiredology
- Naldz Graphics
- My Ink Blog
- Fudge Graphics
- Line 25
- Android Headlines
Help Webnuz
Referal links:
How to Learn to Draw: Stage 3, Visual Database

In the previous parts of the series we learned how to tame the pencil and mastered hand-eye coordination. I hope I gave you enough time to practice these lessons! Today I'll present you with a series of exercises that are a continuation of the topic, and for some of you it may just be the start of "true drawing"—creating things instead of redrawing them.
I've explained the philosophy and mechanism of drawing from imagination in this article, so here we'll go straight to the meat. Before starting the lesson, make sure you have read the article and practiced the previous exercises long enough!
What There Is to Learn
Let's define our goal before starting the exercises. Please read the comment I got under the Stage 2 tutorial:
I cannot draw, I really can't but this exercises are easy for me. I can
draw 10 lines of same length and some dots in equal distance and can't
imagine someone who may find them hard.
This is very interesting, isn't it? He can't draw, but actually he can. The problem here is about definition. We've already divided the skill of drawing into four stages, here presented in a simplified way:
- Drawing—making marks
- Drawing—controlling the marks
- Drawing—creating marks resembling real things
- Drawing—creating marks resembling real things in an unreal way
They're all about being able to draw, but each of them is based on a completely different set of skills. Two people saying "I can't draw" may have two different things in mind, and they also may need different exercises to overcome their problems.
The first two stages are technical ones. They're not about imagination or creativity, but about the activity of drawing. The other two stages include the creative element—you use the technical skill of drawing to present the visions you have in mind. People use various media for it, like music or poetry, but if your ideas have a visual form, drawing seems to be the most proper way.
However, even mastering the technical skills doesn't guarantee you'll be able to draw what you want. Here's where the technical part of the skill actually ends, because drawing from imagination isn't about being able to do something, but rather about understanding what you should do.

If you can draw anything from a reference perfectly and accurately, but you can't draw from imagination, it doesn't mean you can't draw—you're actually very good at drawing! The problem is in what you're trying to draw. In case of a reference, you know exactly what it is, with every single line right before your eyes. But imagination doesn't work this way! You can "see" the face of your friend very clearly in your mind, but if I ask you what the color of their eyes is, you'll be lost.
Learning to draw from imagination is therefore not so much about drawing, but rather about getting to know the things you want to draw. You know how to cook, but you need recipes to cook anything. With time you'll be able to create your own recipes, but first you need to learn what they look like!
One last warning: in these exercises it's assumed in advance that you don't have any problems with copying references accurately. If that's not true, go back to the previous part, or, if it's too boring, practice copying references until it's easy. Otherwise it will be very confusing to you, trying to use the recipes without knowing how to turn on the oven!
How to Learn
This lesson will be different from the previous ones. You are not a strict beginner any more, so you should be able to work more independently. These exercises also have a different structure than "do it until it's boring". Here's how long you should do the exercises:
- 1: Until you understand the concept
- 2, 3, 4: Until you're able to draw the forms without bigger effort and obvious mistakes (obvious mistakes are the ones you see right after making them)
- 5: Until you work out a set of lines you can replicate in a fast and effortless way
- 6: Until you are able to make it accurately on time
- 7: Until you find a set of forms you can replicate in a fast and effortless way
- 8: Until there's nothing surprising to you in the topic (long-term exercise)
- 9: Until it's automatic for you (long-term exercise)
- 10: Until you can draw the topic accurately without seeing any reference for a long time (long-term exercise)
Often you'll see me asking you to go back to a previous exercise if something doesn't work as it should. Don't feel bad about this. Sure, it would be great if it went smoothly, but it's better to see the mistakes and go to fix them than not to know why it looks bad and to pretend it doesn't. The structure of this lesson is hierarchical, which means that an uncorrected mistake from one exercise will haunt you in another. Don't let it!
1. Understand the Concept of Depth
Even the word itself, "perspective", brings chills. Architecture and a thicket of carefully measured lines comes to mind immediately. However, that's not what perspective is about.Perspective lets us imagine what an object we observe in one position will look like when rotated or moved. Therefore, it can't be avoided if you want to draw from imagination!
When drawing from a reference, you don't need to care about perspective. All you want is already there. But if you try to draw from imagination, it's usually unbelievably hard to get any position right except that "default", side-view one. Talented people often stop here and master drawing this one default position, because it's the only one that they can draw. And they have no idea that what they can't draw, they can learn!
Drawing only one position is like adding the same seasoning to every dish. No matter how universal and tasty it is, with time it'll become dull, and even the most interesting ingredients won't make your cooking more exciting. Also, there's a difference between adding the seasoning because it fits there, and adding it everywhere because you don't know how to use any others.
There are two ways you can go now. I've written two articles about perspective: a theoretical one and a practical one. You should read at least the first one, but if it's too confusing, you can try another way. Make your own analysis—get a small box and move it before your eyes. See what happens when you move it up, down, to the sides, to the front and back, and when you rotate it. Try to find the rules in it, and make notes for later.

2. Get to Know the Ingredients
In the previous parts you've been practicing lines, but the problem with lines is that they're very simple to use, and very hard to remember. It makes them useless when it comes to drawing from imagination—they have too many forms.
To make it easier to remember, we need to divide all these forms into a few simpler blocks. It's just like writing: an illiterate person could copy all the lines, along with the style of the letters, while a literate person will copy the letters—not the lines, but rather the idea of them.
In this exercise you'll learn the letters of drawing. It's extremely important to understand it. There's even a chance that if you do, the other exercises will be almost obvious to you. Pay all your attention to it, and remember: if you spot lack of control at any point (e.g. an oval doesn't look like you wanted), take a break from this exercise and practice precision for a while.
Using the rules of creating depth, practice drawing the forms.
They don't need to be 100% accurate in terms of perspective—all you need
are well-defined sides. You should be able to tell where the front,
back, top, bottom, and both sides are, which of them are visible, and
which are blocked from the view.
You don't need to be overly
careful about the shape, but make sure you can keep the lines as clean as possible without an eraser. Overusing lines indicates lack of confidence,
and perhaps also skill. If you see you're overlapping the lines too
much, go back to previous exercises.
Step 1: Ellipsoid
This form is similar to a sphere, but instead of having a circle in a cross-section, it has an ellipse. It works great as a base for a torso of live creatures.

Step 2: Cylinder
A cylinder is like a 3D form of a line—a line with volume added. It's perfect for constructing limbs.
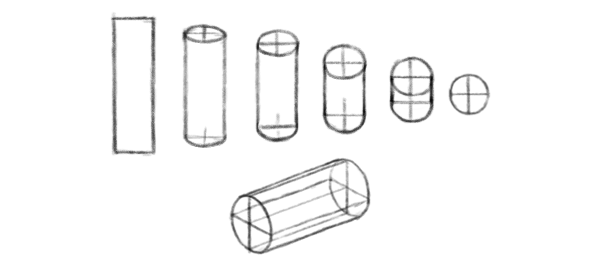
Step 3: Box
Though boxes don't seem too organic, they find their place in some parts in the body, for example in animal hips.

3. Modify the Letters
It would be nice if all we needed were those three letters to build everything, right? Bad news—it's not enough; good news—all the other "letters" we need can be created on the base of these three.
In this exercise, let yourself have some fun with these basic letters. Imagine them as material forms, and do something to them. Squeeze, stretch, bend... The point is to understand the perspective of them, no matter what you do. Again, if it's too hard, go back to practicing perspective. Don't scold yourself, be patient—there's no hurry!

4. Draw Simple Structures From Imagination
Time to draw something from imagination! No, not dragons, not yet. See if you can imagine a simple structure built of all these forms you've practiced before. Then draw it, but not only once. Rotate it in your mind and draw it again. Make sure you are able to keep it consistent, that there's not much luck to this. You don't want to base your skill on luck!

5. Find the Rhythm of the Object
We're going to be more specific from now on. Choose the topic you're interested in. Remember: you can't learn how to draw, let's say, animals from a single exercise. An eagle is not any more similar to a scorpion than to a chair—the name "animal" the eagle and the scorpion share doesn't make them the same thing. Some groups of animals are, indeed, similar, but it may be deceptive. Lions and wolves are similar, but if they could be drawn the same way, they wouldn't be different animals!
So, be specific. If you want to draw animals, you can pick a lion. It's anatomy is well-understood, there are a lot of photos of them on the Internet, and they also share a lot of features with most of the animals you may want to draw, like wolves or even horses. And if you want to draw dragons, they're still a good choice, as long as you imagine your dragons being more similar to dinosaurs than to lizards.
Step 1
Gather a set of references with different poses of your chosen animal. In the case of lions it's better to choose females or young/neutered males, since the mane often covers important anatomical details.
My favorite way of getting a whole set of references in an instant is using Google Images. To get accurate results, try to be specific in your query: "lioness walking/running/hunting/playful" is better than just "lioness". For a warning: stay alert, Google isn't always right about what has been labeled as "lion".
Step 2
Look at all the references and try to find the common rhythm in them. These are all very different poses, in various perspectives, but there's something they all share. Find these elements and sketch them using as few lines as possible. These lines should be easy to lead—no details, no fixing. You should be able to draw them fast, at least after you work them out. Keep the scale small—this way it'll be easier to keep the proportions right.
If you find it too hard, it may be helpful to take a look at the skeleton of the animal and to try to see it in the live body. Remember: your sketches don't need to look like mine. They should be the result of your analysis and understanding—copying me will only make it harder for you in the future.

6. Practice the Rhythm
Step 1
Time to test your "rhythm lines". They should be easy to draw, and they should build a whole silhouette in a very economical way. In order to check whether they do, use this online slide-show maker. Use the same query as previously, adjust the advanced options if necessary (if you don't want surprises, better select Strict SafeSearch), and when the slide-show starts to run, check "very slow".
You can also use any gallery on deviantArt for this purpose, if you prefer a specific selection of pictures.

Step 2
Ready, set, go! Draw the rhythm lines of the slide you are presented with as fast as possible. Don't worry if you can't catch up at the beginning; your goal here is to adjust the rhythm lines you've worked out to the speed. Simplify them on the fly and treat it as a challenge, not a competition.
However, if you feel you are really unable to do it, slow down. Pause the picture, draw it as fast as you can, then switch to the next one manually. Draw a few of them this way, then try to continue with the timer. If there's still not enough time for you, go back to the previous exercise—maybe there's some other rhythm you'll like better?
Feel free to skip the inaccurate slides, and if some picture grabs your attention (if it's an interesting pose), you can also pause the presentation to work longer on it. Don't overuse this function, though!

Step 3
When you finally grasp it, and you can sketch every picture in seconds, you can turn to drawing from imagination. It's best to do this exercise right after the former—your hand and mind are warmed up and focused on the topic.
Draw a few of the poses from memory, and a few imagined ones. Don't restrict yourself to simple ones; go crazy! Is it easy for you? Great! You can continue. If not, go back to Step 1. This time you can choose some other query; e.g. if you used "lioness running", now use "lioness sitting". The more various poses you draw, the harder they'll get imprinted in your mind.

7. Find the Recipe
Once you can sketch every pose from imagination in seconds, clean without an eraser, you're ready to construct the recipe for the body.
Step 1
Again, search for references for your topic, but this time be more selective. Pick only few of them, but each presenting the pose in the way that others can't. Try to find one for a clear side, one for front view, and optionally, for the back and top of thebody.
Step 2
Print the references with a lower opacity. You can modify them in Photoshop or any other graphic software, or make the print more faded with your printer's options. Feel free to use black and white print.
Step 3
Look at all the references, and compare them to a diagram of alion's muscles. Imagine the body stuffed with simple forms we have been practicing before. How could you build something resembling the body out of the smallest number possible?
Use your pencil or a ball-pen to draw the forms directly on the references. Make them consistent on all the pictures—these are 3D forms and they should follow the perspective of the poses. Make it as accurate as possible without using too manyforms.
If your sketches get messy, print the set of references once more. Take your time, because this is a very important step!
Hint: if you happen to have a decently realistic figurine of the animal, incorporate it in your analysis. There's nothing better than a 3D model when it comes to understanding the form of something!


Step 4
Go back to your sketches from exercise 6. Use your "body schemes" as a reference, and put the 3D forms on the "skeletons". When doing this, don't be afraid to simplify and modify the structure. Your scheme should allow you to quickly build the impression of a realistic animal without leaving much to the imagination, but also without redundant details.
Step 5
Again, use a slide-show of your choice and start sketching, this time using both the rhythm and the body. At this point it should be easy for you! If it's not, make sure that the bodies you're drawing have all the necessary lines, but not a line more. Look for shortcuts; see which lines can be connected into one and which you can skip.

8. Add the Spices
This exercise is the slowest one, without a clear end point. Your goal here is to perform a thorough analysis of the details. Sketch the eyes, nose, ears, whiskers, mouth, teeth; analyze the folds of fur, parts of bones visible under the skin, the direction of hairs on the whole body. Use good quality references for it, and never stop with one.
Details have their own drawing shortcuts, too, but this time you need to be more careful in creating them. Any mistake in the proportions will be clearly visible, so sometimes it's better to leave the sketch unfinished than to decorate it with misunderstood details.

9. Practice, Practice, Practice!
After all these exercises become predictable and boring, you can start the exercise that's supposed to imprint this knowledge in your mind for longer. At this point it should be easy to do—if it's not, well, you know the drill.
Turn on good music, or an audio-book, or whatever you like to listen to when doing something mindless. Use a huge set of references and sketch them all, one by one, quickly and effectively. Your job for the day is done once you realize you're thinking about something else and you're sketching automatically—that the sketches start to turn out without any conscious effort from your side.

10. Test the Imprinting
The problem with memory is that information that'snot usedquickly gets discarded. It's quite common to be able to draw miracles after one day of training, and return to the level of a preschooler a few days later.
To make sure the information stays there, you need to convince your mind that you need it. And to do this you just need to use this information regularly. Every act of conscious recalling works like a refresher of the information. It's as if there's a path between your memory and your consciousness, and the more you walk it, the better it's fit for walking. But stop using it for a while, and the path will disappear under the grass and weeds.
These exercises are purely about drawing from imagination. If you've been practicing lions, draw them now without any reference. Use all the poses you can think of: hunting, jumping, sneaking, lying with its paws up... Make sure you're not guessing—that you're taking all the information needed right from your memory. The oftener you do this, the more accessible this information will be in the future.
And if you realize that you must guess something, because you forgot it or never learned it at all, feel free to use a reference to learn this. It's not cheating—learning is a constant process, and being able to draw a lion from imagination doesn't mean you'll never find any of the poses problematic. With time, though, there will be fewer and fewer of these, if you really focus on the topic.
What Now?
Often I see people complaining they can't draw from imagination. I'm sure that after doing all these time-consuming exercises you understand the absurdity hidden in these words. Drawing from imagination isn't an ability that you have or not. It's a skill, and it's a multi-dimensional one. You may be able to draw lions from imagination, and wolves may still be a mystery to you.
You need to decide what you want to be able to draw from imagination. Each topic will consume a lot of your time and energy, and everything you learn will also require regular practicefrom youto keep it in good shape, so choose wisely. You don't need to learn it all!
I have one more task for you. Whenever you hear someone saying, "I can't draw from imagination—I know what a lion looks like, but when I try to draw it, it looks like a mess," explain to them why that is. Knowing what a dish tastes like doesn't mean you can cook it without a recipe! If they really want to learn, show them the way. Together we can root this dangerous myth out!
Original Link:
TutsPlus - Design
More About this Source Visit TutsPlus - Design