
An Interest In:
Web News this Week
- April 12, 2024
- April 11, 2024
- April 10, 2024
- April 9, 2024
- April 8, 2024
- April 7, 2024
- April 6, 2024
Some of Our Sources
View All SourcesHelp Webnuz
Referal links:
10 Basic Mistakes in Digital Painting and How to Fix Them
Digital painting is quite tricky.You get the proper software and that's it, you can start painting. Every tool, even the most powerful one, is within your reach. All the colors are ready to be used, no mixing needed. If you've just converted to Photoshop from traditional painting, it's not that hard; you only need to find the counterparts of your favorite tools. But if you're a beginner in both kinds of art, the start is a nightmare—the one in which you're not aware you're dreaming!
The trickiness of Photoshop is based on its apparent simplicity: here's the set of brushes, here are all the colors, here's the eraser, and this is the Undo command. You start painting, it looks bad, so you search for other tools to make it better. And just look how many tools there are! You try them all, one by one, and magic happens.
However, "magic" means that you're letting Photoshop paint for you. You don't have any control over this, but it still looks better than you, a beginner, would ever do (at least, that's what you believe). So you let this happen and produce lots of pictures in the hope that they'll turn into masterpieces one day.
Professional digital artists you admire use Photoshop to bring their visions to life, but they use it as a tool, not an art producing machine. What's the difference?
- Professionals imagine an effect and make the program do it.
- Beginners make the program do something and if they're satisfied, they keep the effect.
Does the second option sound familiar? If so, keep reading. In this article I'll show you how to improve ten different aspects of your workflow so that you become an aware Photoshop artist. With these ten simple tips you'll understand the mistakes that might have been blocking you for a long time!
Note: the problems I'm describing apply to a situation when the artist achieves the effect unintentionally, while going for realistic style. These aren't mistakes if you plan them!
1. Wrong Canvas Size
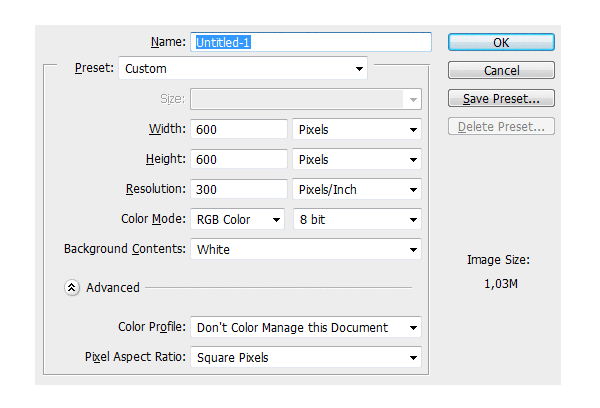
Starting a new picture is child's play. You go to File > New, or, if you're more advanced, use the shortcut Control-N. It looks so simple that it's often overlooked.
There are three aspects to this issue.
1. Too Small a Canvas
Just as all objects are made of atoms, every digital painting is made of pixels. This you probably know. But exactly how many pixels do you need to create a detailed painting? 200x200? 400x1000? 9999x9999?
A common beginner mistake is to use a canvas size similar to the resolution of your screen. The problem is you never know what resolution your viewers use!
Let's say that your picture looks on your screen like in the example 1. It's as high as it could be without a need to scroll over it, and that's OK for you. That's the biggest you can get on your resolution, 1024x600. Users with resolution 1280x720 (2) and 1366x768 (3) couldn't complain either. But notice what happens for users with bigger resolutions—1920x1080 (4) and 1920x1200 (5). Progressively, the picture takes less and less space on the screen. For these users, you didn't really use all the height you could!

And it's not just the matter of "white space" around your picture. "Bigger resolution" doesn't always mean "bigger screen". Your smartphone may have more pixels on its compact screen than you have on your PC! Just look:
- Same size, different resolution
- Different size, same resolution

What does it mean? For viewers other than you,the picture that you planned to fill the whole screenmay look like... this:

But the size you choose for your picture isn't only about this. The bigger resolution, the more pixels it has. In smaller resolution an eye may take 20 pixels, while in a bigger resolution it may have 20,000pixels all for itself! Imagine all the neat details you can put in such a big area!
Here's a cool trick: when you paint something small in a big resolution, no matter how sloppy it is, there's a good chance that from a distance (i.e. zoomed out) it will look interesting and intentional. Try it out!

2. Too Big a Canvas
Does this mean you should always use a huge resolution to give yourself more freedom? Theoretically, yes. In practice, it's not always necessary, and sometimes it's impossible.
The bigger the resolution, the more pixels your basic stroke has. The more pixels in the stroke, the harder it becomes for your machine to process it, especially when it comes to pressure levels with variable Flow. So, that's a practical argument against it—you need a powerful computer to use big resolutions comfortably.

The second point is big resolutions are meant for highly detailed pieces. Contrary to popular beginner belief, every painting shouldn't be detailed. Even when you want to paint realistically, you can safely ignore a whole lot of information that you'd get from a photo—what we see in reality never looks like a photograph!
When you use a bigger resolution than necessary, it may be tempting to add some details here and there, just because you can. And when you do it, there's no way back. There are many levels of details, but a particular piece must use only one at a time. If you want to create fast, painterly fur, don't spend hours on the eye and nose—it'll only make the whole piece look inconsistent and unfinished.
3. Too Big a Final Size
Let's say you found that perfect resolution for your painting. It's neither too big, nor too small—perfect for the level of details you want to achieve. Here's some space for another mistake. That resolution was your working size. Maybe you needed many pixels to get to that eye detail, but that detail will be visible "from distance", too.


Before saving the file for the final view, resize it. I won't tell you the most optimal resolution, because there's none. The rule is: the more detailed the piece, the less it'll lose when presented in big resolution. The more "sketchy" the painting, the better it'll look when presented in small version. If you want to learn more about this, see what resolution your favorite artists use when posting their works online.
One more thing: when resizing the picture, check which resample algorithm works the best for you. Some of them sharpen the image, which may or may not be desired.

2. Starting With a White Background
It may seem trivial—what's wrong with a white background? It's... neutral, right? It looks just like a sheet of paper.
The problem is there's no "neutral" color. "Transparent" is the closest to it, but it's impossible to paint it. Color is color. When two of them occur, a certain relation appears on its own. For white + color A, this relation is: "color A is dark". No matter what your intention was, you start with a dark color only because you used the brightest background possible! Everything is dark in comparison to it.

In traditional art we use a white background, because technically it's easier to put dark on bright than the other way around. But there's no reason for it in digital art! In fact, you could even start with a black background, but it's just as bad an idea as pure white. In practice, the most "neutral" color we can get is 50% bright gray (#808080).
Why? The color of the background changes the way you perceive other colors. On a white background, dark shades will appear overly dark, so you'll be avoiding them. On a black background it'll work the same with bright shades. The result in both cases will be weak contrast that you notice once you try to add some other background. Here's the proof:

Experienced artists are able to start their picture with any color and make the best of it, but unless you feel confident about color theory, always start with something neutral—neither too dark, nor too bright.

3. Avoiding Strong Contrast
Of course, sometimes your perception of bright and dark may be disturbed
by the poor quality of your screen. If you use a laptop, you've probably
noticed how the contrast changes when you look at your picture from an
angle. How can you achieve a proper contrast that everyone will see as proper, no matter what screens they use?
Even if your screen is good, after focusing on a picture for a long time your perception isn't undisturbed either. If you change shades slightly step by step, that contrast may seem good only because it's better than five steps before. The object below may look nice...

.... until you compare it to an object with a stronger contrast. And who knows, maybe if you compared the other one to another, its perceived contrast would automatically drop?

Photoshop has a tool that helps in this situation. It's called Levels, and it's actually a histogram—it shows you how much of every shade there is in the picture. You can open this window by going to Image > Adjustments > Levels or by using the shortcut Control-L.

How does it work? Take a look at these four samples:
- Almost equal amount of white, black, and midtones
- Black and dark midtones only
- White and light midtones only
- Black and white only, almost no midtones
Can you read it from the histogram?

You can modify the levels by dragging the sliders. While it reduces the general amount of shades, it helps to place them in the correct place in the histogram.

The histogram shows us there are a lot of midtones in our object, but there's also a visible lack of dark and bright areas. No matter what we see, that's what the computer says! While there is no one perfect recipe for levels (it all depends on the lighting of your scene), a total lack of dark and bright areas is a bad sign.
Just see what happens when we move the sliders towards the middle!

Is there a way to use proper shades from the beginning, so that all of this isn't necessary? Yes, and it's actually going to take you less time than usually! The solution is to use fewer shades—a dark one, a bright one, a midtone, and a bit of black and white.

To do it in practice, before starting a picture, plan your lighting on a sphere:
- Draw a circle and fill it with the darkest shade (black not recommended).
- Add a midtone.
- Add the brightest shade (white not recommended).
- Add one or two midtones in between.
- Add a pinch of black and white.

Do you see where all these parts lie on the histogram? When we merge them, this is what appears. Use this sphere as a set of swatches for your object, shading it the same way—darkest shadow, midtone, brightest light, more midtones, darkest crevices and brightest highlights. Then you can blend it all!

One last thing. If you compare these two heads once again, one with proper contrast from the beginning, and a corrected one, you'll notice the difference. That's why increasing contrast can't really fix your scene if you haven't considered values from the start—every material has its own range of shades. For example, the darkest part of a white surface will be much brighter than the darkest part of a black surface. It means you should prepare as many spheres as there are different materials in your scene.
Remember: a light object shaded with dark shades is as wrong as a dark object shaded with light shades!

4. Using Too Complicated Brushes and Too Large Strokes
When you compare traditional brushes to Photoshop ones, the difference is so striking that you may wonder why they share the same name. After all, classic brushes let you paint only more or less chaotic strokes, while digital ones create artworks on their own.
And here's the catch. If they create anything on their own, you give up your control. Professional artists use simple strokes most of the time, supporting themselves with more complicated ones from time to time. Using complex brushes on a daily basis not only makes you lazy—it also stops you from learning how to achieve an effect on your own, because there's no need to!

When starting your adventure with digital painting, it's natural to search for ways to progress as quickly as possible. You want results, here and now. Custom brushes are the answer for it. You want fur—here's the fur brush; you want scales—here's the scale brush. You can't paint something—download a tool that can.
Custom brushes aren't bad—they're actually very useful. The problem occurs when you use them as a base of your "skill". If you actually spent time trying to understand how to paint fur quickly, you'd understand it's not really made of single hairs that you need to paint one by one. You'd learn that the vision of something in our minds is often inconsistent with reality. You'd learn how to look and how to create what you see, not what you think you see.
Instead, you give up after spending half an hour on painting single hairs and search for a brush that will do it for you. You find it, you're happy, you're ready to move on. It's so easy that it becomes addictive, and you stop learning at all—you'd rather download all the tricks, if it were possible.
But how do traditional artists overcome it? They don't really have such a variety of brushes. How do they paint fur? The answer is simple—the same way you would if custom brushes didn't exist. If you want to improve, if you want to beat this beginner's curse, discard complicated bushes for a while. Stick to a simple set, for example , and learn how to make the best of it. Don't look for shortcuts when it gets difficult. Fight through it, and you'll get priceless experience instead of cheap tricks.

Going Too Big
Another common mistake linked to brushes is using too large strokes. It's, again, based on impatience. The rule is that 80% of the work takes 20% of the time spent on it, which means you need to spend 80% of the working time finishing your artwork. If you created the sketch, the base, flat colors, and simple shading in two hours, there are still eight hours left. Moreover, during these eight hours you'll see less progress than during the first two! How discouraging is that?
You can clearly see it in the process pieces artists sometimes show to their public, like . The first steps are huge—something from nothing is created. And then it slows down. You can barely see any difference between the last few steps, and yet that subtle difference probably took more time than all the previous ones!
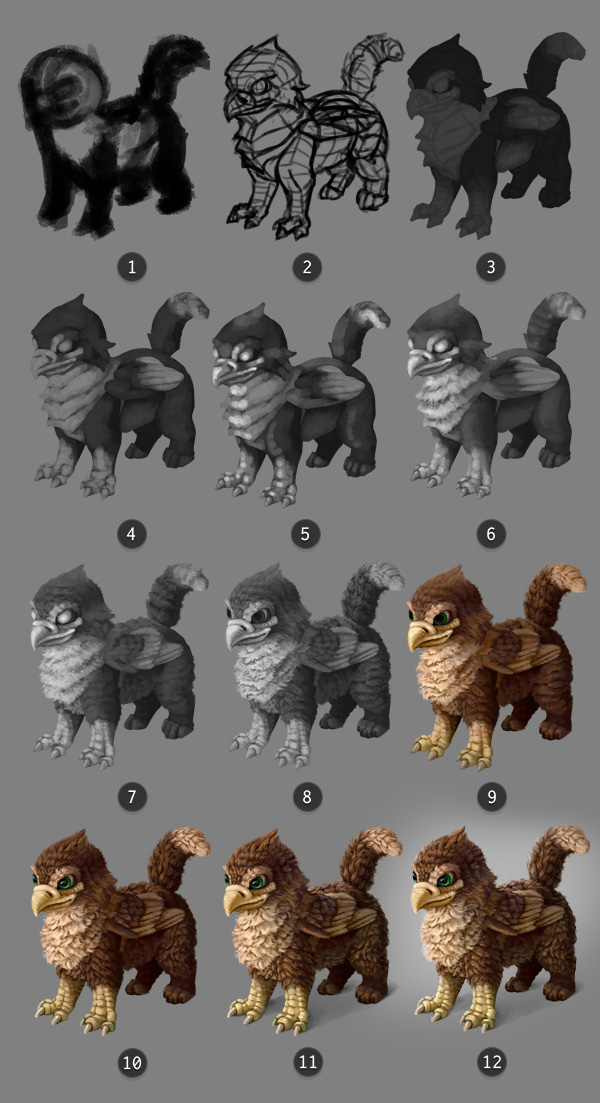
This is the problem. When your picture is almost finished, you feel that urge to finish it and see it done already. But this is the moment when you should actually start! I remember reading a comment under one of these painting processes: "I would stop at Step 4" [out of 10]. And that is the difference between that beginner and the professional! Because the other part of that rule is: that last, slow and subtle 20% of the work contributes to 80% of the final effect.
The solution is simple. You should never finish your picture with big strokes (unless it's a speedpainting). They are reserved for the beginning, for that 20% of time. Use them to block the shapes, to define lighting, to add big chunks of colors. And then gradually go smaller, zoom in, clean up, add the details. You'll see you're finishing when you're working with a very small brush in a very big closeup. Generally, the more places in your picture you touch with your brush (and the more you change it, e.g. adding a slight difference in brightness or hue with every little stroke), the more refined it will look.
There's a bright side to this rule. Since 80% of the piece doesn't contribute that much to the final effect, there's no need to overly focus on it. Start your paintings quickly, loosely, and save all your efforts for later. Remember: not every painting must be finished just because you started it. By discarding something you don't believe in, you're saving yourself four times as much time as you've already wasted!
5. Using Too Many Colors
Traditional artists don't have too many colors ready to use. They must learn how to create them, how to mix them to get the effect they want. This inconvenience is, in fact, a blessing. They have no choice but to learn about color theory. You, as a digital beginner, have all the colors possible within your reach. And that's a curse!

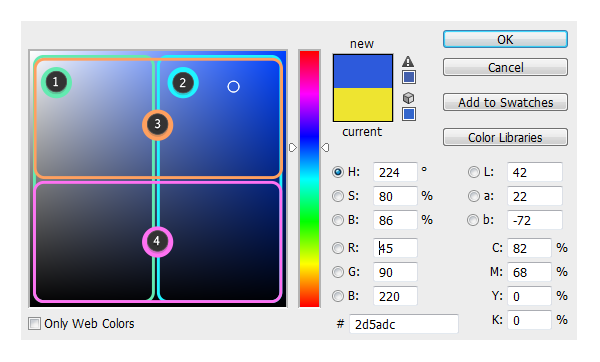
We don't understand colors intuitively. There's no need to in our daily lives. But as an artist, you must completely change your perspective. You can't rely on intuition any more, because it works poorly in this topic. You need to stop thinking about colors as you know them, and grasp the concept of Hue, Saturation, Brightness, and Value.
Colors don't exist on their own. They're based on relations. For example, if you want to make a color brighter, you can either increase its brightness, or decrease the brightness of the background. Red, called a warm color, becomes warm or cool depending on what its neighbor is. Even saturation changes because of relations!

A beginner unaware of all this fills their sketch with a whole set of random colors. They pick a blue, then add a green, without any clue they're picking them from thousands of other colors with bluish and greenish hue, and that they all have some kind of power!
This is how a beginner sees the colors:
- Blues
- Muddy blues
- Grays
- Blacks

But... why do we even have so many shades, if they're useless? The answer is, they're not. You only need to understand where they come from and what they mean. Let's see the same color picker as seen by a professional:
- Desaturated blues
- Saturated blues
- Bright blues
- Dark blues
Looks complicated? Probably, but it's not a reason to ignore it! If it's too overwhelming, stick to grayscale for a while. Understand the issue of lighting, shading, and blending, and you'll get a solid base for the future. More, colors (or rather: hues) are an icing on that cake called your artwork. They can make it sweeter, but they can't be the base of it. No amount of icing makes a bad cake good!
And if you decide to start your color course, try these articles for a start:
- Improve Your Artwork by Learning to See Light and Shadow
- Color Fundamentals: Shading
- Color Fundamentals: Advanced Coloring
- The Secret to Realistic Painting: How to Master Value
6. Picking Colors Directly From a Reference
It's hard to fight this temptation, so hard that it may make you cry. I know it well. Still, if you want to really learn digital painting, you mustn't use the Eyedropper Tool to borrow a color from a reference. Why is it so important?

Beginners usually use low saturated orange/pink for skin. It seems obvious, but the effect is far from natural. If you use a reference, though... that's a different story! Almost every pixel has a different shade, not only pink—you can find reds, yellows, oranges, even cold purples, greens, and blues. Saturation and brightness change all the time, and still, the final effect doesn't resemble chaos.
When you pick colors from a reference, your own picture gains new life. The problem is it's not that different from tracing. In the result of tracing you get lines that you couldn't repeat yourself, and when picking colors you get beautiful shading you couldn't repeat either. The effect is amazing—but you can't be credited for it.
There's another thing. Picking the colors stops your progress. You "buy" the color sets instead of learning how to create them yourself. You've got your color wheel with all the sliders; every color you pick can be recreated by you, on your own. But you still decide to use the ones that have already been created—it's fast and effective, but you know what's even faster and more effective? Taking a photo.
To become independent from references one day, you need to learn to see the colors. Look at any object near you—what's its hue, brightness, saturation? It's extremely hard to tell, isn't it? But if you keep picking the colors using the Eyedropper Tool, you'll never learn it. You can't start a race with your training wheels still on.

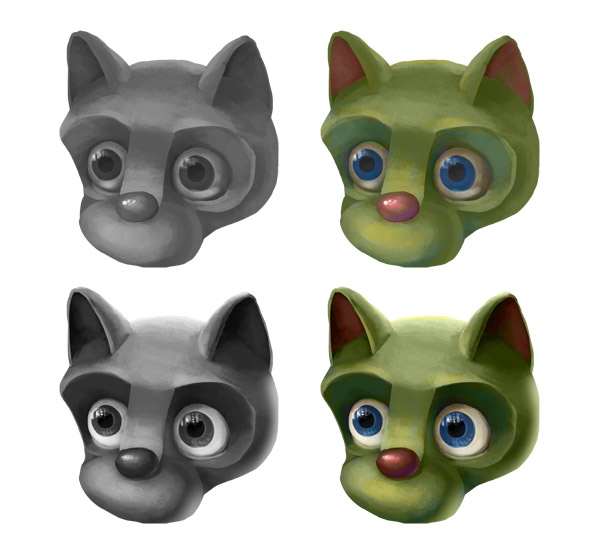
7. Adding Colors to Grayscale Without Proper Values
I painted this picture in 2011. This is certainly a nice, heart-warming scene, and I still quite like it. I remember I painted it in grayscale and then added colors using probably a few Blend Modes (Color, Multiply, Overlay). I remember having this one annoying problem: how to get a proper yellow when painting over grayscale?

I don't have the original file any more, but this is how the grayscale version looked, probably. Notice that both green and yellow areas are equally dark. This is not true in reality!

When I was a beginner like you, I believed that light makes all the colors uniformly brighter, and shadow makes them uniformly darker. That's why painting in grayscale seemed so convenient. I could have focused on shading, and added colors later. Unfortunately, this trick didn't work, and it took me a long time (mainly because I didn't really try) to understand why.
The simple answer is different colors have different brightness independent from lighting. When you ignore it, you get muddy colors as a result. Colors you add directly to a picture in grayscale are devoid of an important part of them. If you want to learn more about it, I've written a complex tutorial on the topic of value.

8. Shading With the Dodge and Burn Tools
The Dodge and Burn Tools are one of the beginner's favorites. They fit nicely the belief that Photoshop is a "painting program". You only need to choose the base colors, and then select the areas you want to shade. The rest is controlled by advanced algorithms, not by you, and that's great, because you wouldn't know what to do anyway.

However, it's not that easy. These tools aren't completely useless, but when you're a beginner, it's better to stay away from them. They're not "shading tools". The Dodge Tool isn't equal to "add light", and the Burn Tool isn't equal to "add shadow", either. The problem is they fit a beginner's vision about shading so neatly that it's hard to overcome the temptation.
The problem doesn't lie in the tools, but in a misunderstanding of shading itself. Beginners often think that objects have some color, and this color gets darker in the shadows, and brighter in the light. It's not that simple. It may work well for cell-shading, or for cartoon purposes, but even there this is just a shortcut.
If it "kind of" works, why not just use it?
- It's another technique that blocks your progress. When using it, you don't even notice what you're missing. Shading is a complex issue, and you limit it to the "darken-lighten" rule, because it's easy. Photoshop is here to work for you, not instead of you. Don't let it stop you from learning.
- It flattens the shaded object. No matter how many textures you add to it afterwards, it works just like a big brush—which means you can start a picture with it, but never finish it this way.
- It misrepresents the colors; they should be dependent upon the environment (direct light, ambient light), but neither the Dodge Tool nor the Burn Tool knows anything about the background you're using. They shade everything the same way!

Shading With Black and White
The extension of this technique is shading by using white for light and black for shadows. This comes from a belief that every color starts as black (in the shadow) and ends as white (in the light). While it may be true for over- or underexposed photographs, it shouldn't be a rule used in painting.

We all search for simple rules, something easy to remember and use. But it doesn't mean we should invent simple rules that have nothing to do with reality, like: "add white to make it brighter, add black to make it darker". This one is true only for grayscale! If you want to learn what rules you can use to shade with colors, see this article.
Unvaried Shading
When you overcome the previous problem, you may fall into another one. Let's say you've chosen orange as the base color for your character. You decide that the light source will be yellow, and the ambient light will be blue (sky). According to this, you shift the hue of the base color to yellow in the light and blue in the shadow, and that's all. It makes shading much more interesting than if you used black and white, but it's still a shortcut that doesn't necessarily lead to the desired results.
Why is it a shortcut? By creating only three basic shades for your object, you automatically place it in an artificial environment, where everything is reflecting light in a 100% predictable way.
In reality, light continuously bounces off everything around, including the "hills and valleys" of your 3D object. Therefore, shading rarely can be limited to two or three colors. The blue of the sky can make some shadows on the object blue, but in some other crevices they may look greenish because of the light reflected from the grass. Moreover, some shadows may be actually bright and saturated because of light that came through the obstacle into the "shadow" (see subsurface scattering).
If you take this into account and decide to use indirect light sources to make the shading more varied, you'll be forced to paint more deliberately—and that's great! You can't use a big brush here, because it would mix the colors and you'd lose them as a result. And a small brush means you're creating a texture on the fly!

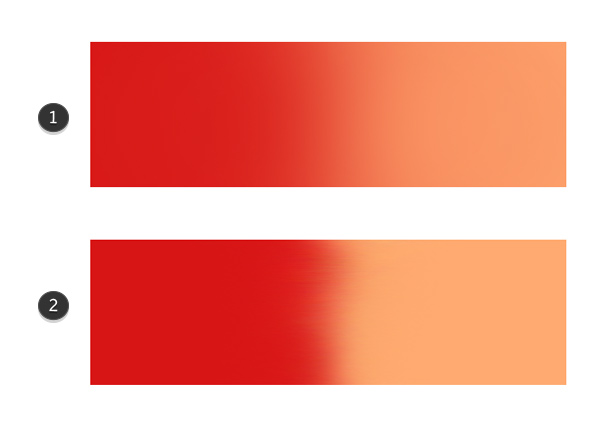
9. Blending With a Soft Brush
There are two main methods beginners use to blend shades, both designed for quick effects:
- Blending with a soft brush
- Blending with the Smudge/Blur Tool
As
we've already learned, quick effects often mean they're out of our
control. In this case, blending with big strokes flattens the object and
makes it unnaturally smooth. Even if you add a photo texture
afterwards, it will not take that "plastic" effect away. Again, this
method may be good only for that starting phase.

If
you want to get a nice subtle texture (which is good for most of the
natural materials), use a harder brush with Flow controlled by pen
pressure (the harder you push, the more solid the stroke).

This kind of brush lets you control the amount of color you want to use.

Thanks
to this attribute, you don't need to blend the border between two
colors. You just start with the base color and cover it lightly with the other one. Then you can add another layer of the same color, making it more solid.

If you want to make it smoother, just pick a color somewhere in between and paint lightly over the border.

For a stronger texture, use a textured brush (with rough edges).

According
to the 80-20 rule, don't bother about blending in the first phase. Use
a big brush, and make the edges apparent, creating an exaggerated shading.

Later you can use a smaller, textured brush to blend the edges. No Smudge Tool, no soft brush, just the Eyedropper Tool and your hard brush with variable Flow. Remember: blending depends on the texture of the surface, so you can't use the same way of blending for every material!

10. Using 2D Textures for 3D Forms
Photo
textures are a beginner's last resort, when the object is theoretically
finished, colored and shaded, but it still looks like a plastic toy. However, a texture itself may make it even worse.
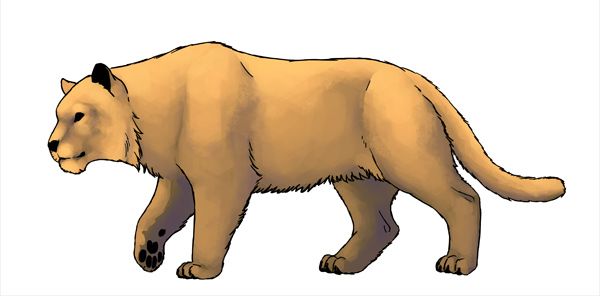
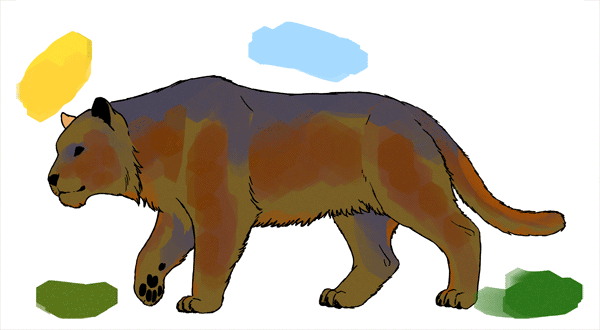
Let's say we want to add a texture to this big cat.

The object must be shaded before adding textures. The tricky part is it doesn't need to be a complete shading. The method of blending depends on the texture—if you blend without having any texture in mind, you'll get a non-texture blending (smooth surface).


You can download a texture from the Internet, or use one of the Photoshop patterns—there are lots of them in the default sets. This is my favorite pattern for scales, inverted Screen Door.


If you change the Blend Mode of the texture to Overlay, you'll see it applied to the shading. However, notice that some parts have been brightened. You may like it if shading wasn't done properly, but it's another case of giving up control. In most cases, we don't want the texture to create its own version of shading. While the Overlay mode isn't the best solution, it lets you see how the texture looks on the object.
Now, the most important and overlooked part. If the object is meant
to be 3D, it can't be nicely covered with a 2D texture. We need to
adjust its shape to the form it covers. There are three main ways to do
this—experiment and find your favorite:
- The Free Transform Tool (Control-T) in the Warp mode
- Filter > Liquify
- Edit > Puppet Warp


The Overlay mode brightens the parts of the layer covered with white
areas of the texture. We could use Multiply instead (it makes white
areas transparent), but it would make gradual tones (grays) darker than
necessary. There's another tool perfect for adjusting a texture's transparency.
Double click the layer and play with theBlend If sliders. In brief, you can adjust the transparency of white and black with them.


We need to understand what a texture really is. It's not a "rough pattern" placed right on the object. It is, actually, the roughness of a surface. When light hits a smooth surface, it's reflected uniformly. If the surface is rough, i.e. made of tiny bumps and crevices, the light hitting it will create a whole set of tiny shadows. And that's the texture we see.
Another fact can be derived from this. If it's light that creates visible texture, there can be no texture without light. And what is shadow, if not lack of light? Therefore, we need to reduce the texture in dark areas (if there's ambient light present), or remove it at all (no light, no texture). You can use the Layer Mask for it, or play with theBlend If sliders (the second row). Keep in mind that the crevices of texture are in fact shadows, so they shouldn't be darker than the "normal" shadow area.


Applying a texture is fast and easy once you know what actions to take after choosing one. However, this is not the end. Every texture is different, and while some of them will look great when applied directly, most require some more work.
Again, the 80-20 rule applies here. Adding a texture is easy, but making it work is what takes the most time. In my example I've blended the shading edges with individual scales. Things like this are very time consuming, but they change everything!


Conclusion
As we noticed, most of the beginner problems come from that urge to achieve great things effortlessly, as quickly as possible. So it's not really about lack of skill—rather, it's about that deep belief that Photoshop is an art-making program. That leads to a constant search for tools and tricks, instead of making the effort to understand and solve the problem.
You can't become a digital artist in one day, only because you've purchased an advanced piece of graphics software. Photoshop is just a tool—more convenient to use than pigments and brushes, but it's still a tool. It can't do more than you intend it to! If you want to make the best of it, treat it as a digital canvas with digital colors. Forget about all these fancy tools, filters, brushes, or Blend Modes. Just paint, as you would on a real canvas.
Learn color theory, perspective, anatomy—all these things that "normal" artists must learn. With time you'll understand how to use Photoshop's tools to do the same things easier and faster—but don't put the cart before the horse by trying to get great effects without understanding them. Patience is the key!
Original Link:
TutsPlus - Design
More About this Source Visit TutsPlus - Design