Your Web News in One Place

Help Webnuz

Referal links:

Sign up for GreenGeeks web hosting
October 26, 2012 10:34 pm GMT

Meet Bower: A Package Manager For The Web

As the web platform has matured, the tools for managing our projects, too, have matured. In this tutorial, I’ll introduce you to one of these tools that makes managing the dependencies of your project considerably easier: Bower.

When I first looked into Bower, I wasn’t exactly sure how it fit in: it wasn’t just a JavaScript package manager, like Jam, and it wasn’t a module loader, like RequireJS. It calls itself a browser package manager, but what exactly does this mean? How’s that different from a JavaScript package manager? The main difference is that Bower doesn’t just handle JavaScript libraries: it will manage any packages, even if that means HTML, CSS, or images. In this case, a package means any encapsulated, third-party code, usually publicly accessible from a Git repository.

Bower is just a package manager.

The important thing to note here is that Bower is just a package manager, and nothing else. It doesn’t offer the ability to concatenate or minify code, it doesn’t support a module system like AMD: it’s sole purpose is to manage packages.

Enough chat: let’s see how this thing works!


Installing Bower

Of course, before we can actually use Bower, we’ll have to install it. This is easy: use NPM:

npm install -g bower

Be sure to install it globally (with -g), because this is project-specific.


Finding Packages

If you don’t know the name of the package you want, you can find packages by using the bower search command. If you use it without a search term, you’ll get a list of all the bower packages available. To filter those down, use a search term.

bower searchbower search backbonebower search bootstrap

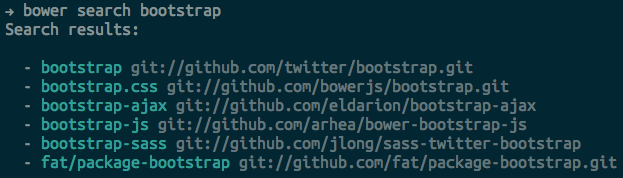
If you’d rather search via a GUI, head over to https://sindresorhus.com/bower-components/.


Installing Packages

Once you’ve found the package you want to install, just use bower install to install it.

bower install jquerybower install backbone

To install a specific version of a package, include the version number after it, with a hash between:

bower install jquery#1.7.0

Check out that components folder that Bower just created for us. Inside it, you should see three folders: backbone, jquery, and underscore. Underscore was installed because it’s a dependency of Backbone; that’s handy! Then, if you compare the contents of these folders with their repository URLs (from the search or install output), you’ll see that they are exactly the same. This illustrates well the fact that Bower is, at its most basic level, a short-cut for Git.

But you can pass the bower install command other things, too. Based on what we’ve just seen, it makes sense that you can use a Git url:

bower install git://github.com/pivotal/jasmine.git

You can also use a link to a single file:

bower install https://backbonejs.org/backbone-min.js

You can even install a package from your own computer: something you’re working on, perhaps:

bower install ~/code/secretProject

You might notice in the output of the bower install command that it mentions caching the package: it does this by saving a copy of it to ~/.bower/<package>. Bower can then use this repo to speed up later installations of the same package.


Updating and Uninstalling Packages

If the next version of a library comes out and you’d like to update to it, you can do so easily by running this:

bower update

Note that you can’t pass a package name to the update command and only update that individual package: it will still update ’em all. You can get the latest version of a single package by running bower install <package>; it will just over-write the version you currently have.

If your needs ever change, you can easily uninstall a package with the uninstall command:

bower uninstall jquery

Using Packages

So, we have our packages installed. Now, we want to use them. Remember, Bower is just a package manager, so there’s no Bower-specific way to use these packages. For now, we’ll just stick with regular old script tags:

<div id="test"></div><script src="components/jquery/jquery.js"></script><script>    $("#test").text("JQUERY!");</script>

Open this in a browser, and you’ll see the text “JQUERY!”; that’s the sign that it’s working!

As I mentioned above, Bower doesn’t have a system for loading packages onto your page, but that doesn’t mean you shouldn’t use one. Bower is un-opinionated and leaves it up to you to choose the method you’re most comfortable with. Maybe it’s multiple script tags that concatenate and minify at build time. Maybe it’s RequireJS (which we can get, via Bower). Maybe it’s Sprockets or another server side asset packaging system. It’s completely up to you.


Other Bower Commands

There are a few other Bower commands that you should know. First, bower list or bower ls will list the packages you currently have installed.

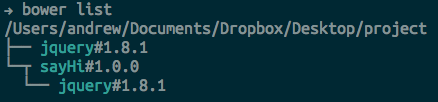
Note that this doesn’t mean we have jQuery installed twice; it means jQuery is a dependency of ’sayHi` (a package we’ll build later on).

If you’d like to see what repository URL a certain package refers to, use the bower lookup command, using the package name as the argument:

The bower info command will tell you what version of a package are available:

Finally, to remove all the packages cached to ~/.bower, run bower cache-clean:


Using the component.json File

The component.json file is an important part of Bower packages. We’ll look at creating a package next; but first, let’s look at how we can use a component.json file to make installing packages for a (non-package) project a bit simpler.

There are only four properties that Bower uses in the component.json file. First is the name of the project; simple enough.

{    "name":  "MyProject"}

Next is a version number:

{    "name":  "MyProject",    "version": "0.0.1"}

The main property is for defining the parts of your component, but since we aren’t building a component just yet, we’ll come back to it. The final property is dependencies, which outlines what packages our component (or in this case, our project) depends upon. It’s an object; and for each property, the key is the package name and the value is the version.

{    "name":  "MyProject",    "version": "0.0.1",    "dependencies": {        "backbone": "latest",        "requirejs": "2.1.1"    }}

Now if you create a project folder and put the above in your component.json file, we can install all the components simply by running:

bower install

And now all our packages are installed. If we, afterward, want to install other packages and include them in our component.json, we can use the --save flag.

bower install jquery --save

Now you can open our component.json file and see that an entry for jQuery was added to our dependencies object.


Building Packages

Let’s wrap this tutorial up by building a super-simple package of our own, and installing it via Bower. It will be a fairly meaningless package, but it will cover nearly every step of the process of creating a package.

Let’s … [build] a super-simple package.

Create a project directory, called sayHi. Within it, we’ll begin with our component.json file. You’re familiar with all the properties, except main.

{    "name": "SayHi",    "version": "1.0.0",    "main": "./sayhi.js",    "dependencies": {        "jquery": "latest"    }}

The main property should be the path to the main file that makes up your package; if you have several files, you can set it to an array of paths. To be honest, I’m not exactly sure what this does. You’re only allowed to have one file of each type (so, one .html file, or one .js file) in your main array, and Bower will still download the whole repository, and not just the main files when you install it. I can’t find any documentation stating clearly what it’s for, but I can find others wondering the same thing. Perhaps it will be used in future versions of Bower. If you have any information on this, please leave a comment below!

Anyhow, now it’s time to create the Git repository.

git initgit add component.jsongit commit -m 'added component.json'

As you’ve seen, when we install the dependencies of our package while here in development, we’ll get a components folder in our repo. I’ve looked at several different component repos, and none of them have this components folder checked in, so we’re going to add it to the .gitignore file; the dependencies will be automatically installed when a user installs our package. When developing for Node.js, we do the same thing with the node_modules folder and the package.json file.

So, in a .gitignore file:

components

And then:

git add .gitignoregit commit -m 'added .gitignore file'bower install

Now, we can write our sayhi.js code:

function sayHi (selector) {    var el = $(selector);    return function (name) {        el.text("Hi " + name + "!");    }}

It’s pretty simple; we just pass the sayHi function a selector for an element, and it returns a function that can take a name and write the message to that element. I’ve done it this way because it allows us to “cache” the element, and because it makes the code a little more interesting.

Okay, now we need to commit it:

git add sayhi.jsgit commit -m 'added sayhi.js'

The final step is to add a Git tag with the version number, because that’s how Bower distinguishes version:

git tag -a 1.0.0 -m 'sayHi v1.0.0'

The next step would be to push this repository up to GitHub, and then register the package with Bower. Registration is simple: use the bower register command, passing it the name you’d like your package to have, and the git URL for the repository:

bower register packageName git://your/git/url.git

I’m not going to do this, because it’s a useless package. But remember that we can use Bower to install a local package as well. What I will do, to simulate GitHub as closely as possible, is create a bare clone of this repository (GitHub stores bare repos).

git clone --bare path/to/sayHi path/to/sayHi.git

Create a new project folder outside of your sayHi folder, cd into to, and try this:

bower install path/to/sayHi.git

The output should tell you that it installed just fine, and that jQuery was installed too. You can see that this was the case by looking within the components folder.

Now, we can use the code in an index.html file:

&lt;div id="message"></div><script src="./components/jquery/jquery.js"></script><script src="./components/sayHi/sayhi.js"></script><script>    sayHi("#message")("Nettuts+");</script>

Open it up. It works!


Configuring Bower

Configure Bower by creating a .bowerrc file.

There’s not much you can do to configure Bower, but there are a few things. Configure Bower by creating a .bowerrc file within your home directory. It’s a JSON file with some combination of these three properties:

  • directory: the name of the components directory; it defaults to components.
  • json: the name of the components file; it defaults to components.json.
  • endpoint: This allows you to run your own Bower server, to serve custom packages from behind a firewall. You can get a simple implementation of a Bower server on Github.

For example:

{    "directory": "packages",    "json": "libraries.json"}

Conclusion

If you’ve looked at other package managers, you might wonder what’s compelling about Bower, especially when it seems to lack a lot of features that other ones have. I had the same question, too. But after getting a grip on how to use Bower, this line from the FAQ made a lot more sense:

Bower is a lower level component than Jam, Volo, or Ender. These managers could consume Bower as a dependency.

So, even if you don’t use Bower by itself, it’s good to know the commands, because other tools will be built around it. In fact, the new-and-already-popular Yeoman uses Bower for package management. If you’re not yet familiar with Yeoman, that’s your next step after reading this article!

So that’s Bower, the completely un-opinionated browser package manager! Whaddaya think? Is this a library you’ll be using, or could you not care less? Let’s hear it in the comments.


Links


Original Link: http://feedproxy.google.com/~r/nettuts/~3/epzTlcOYH9M/

Share this article:    Share on Facebook
View Full Article

TutsPlus - Code

Tuts+ is a site aimed at web developers and designers offering tutorials and articles on technologies, skills and techniques to improve how you design and build websites.

More About this Source Visit TutsPlus - Code