
Some of Our Sources
- Slashdot
- Mashable
- Technology Review
- The Logo Smith
- Smashing Magazine
- Abduzeedo
- You The Designer
- Creative Curio
- FanExtra - PSD
- Fudge Graphics
Help Webnuz
Referal links:
How to Create a Bones Text Effect in Adobe Illustrator

In the following steps you will learn how to create a simple bones text effect in Adobe Illustrator.
For starters, you will learn how to set up a simple grid and how to create several pixel-perfect shapes. Using the Rounded Corners effect and some basic vector shape-building techniques, you will learn how to create the main bone shape. Moving on, you will learn how to save and use an art brush. For the final touches, you will learn how to add Drop Shadow effects and a simple background.
For more inspiration on how to adjust or improve your final text effect, you can find plenty of resources atGraphicRiver.
1. How to Create a New Document and Set Up a Grid
Hit Control-N to create a new document. Select Pixels from the Units drop-down menu, enter 850 in the width box and 600 in the height box, and then click that More Settings button. Select RGB for the Color Mode, set the Raster Effects to Screen (72 ppi), and then clickCreate Document.
Enable the Grid (View > Show Grid) and the Snap to Grid (View > Snap to Grid). You will need a grid every 5 px, so simply go to Edit > Preferences > Guides & Grid, and enter 5 in the Gridline every box and 1 in the Subdivisions box. Try not to get discouraged by all that grid—it will make your work easier, and keep in mind that you can easily enable or disable it using the Control-" keyboard shortcut.
You can learn more about Illustrator's grid system in this short tutorial by Andrei Stefan: Understanding Adobe Illustrator's Grid System.
You should also open the Info panel (Window > Info) for a live preview with the size and position of your shapes. Don't forget to set the unit of measurement to pixels from Edit > Preferences > Units. All these options will significantly increase your work speed.

2. How to Create the Bone Shape and Pattern Brush
Step 1
Pick the Rectangle Tool (M) and focus on your Toolbar. Remove the color from the stroke and then select the fill and set its color to R=253 G=241 B=193. Move to your artboard and simply create a 25 x 105 px rectangle—the grid and the Snap to Grid feature should help.
Focus on the bottom side of this rectangle and switch to the Direct Selection Tool (A). Select the right anchor point and drag it 5 px to the left, and then select the left anchor point and drag it 5 px up and 5 px to the right.

Step 2
Keep focusing on the bottom side of your existing shape. Using the Rectangle Tool (M), create a 30 x 35 px shape and place it as shown in the first image. Focus on the left side of this new rectangle and pick the Add Anchor Point Tool (+). Simply click in the point highlighted with blue to add a new anchor point for your shape.
Switch to the Direct Selection Tool (A), select the newly added anchor point and drag it 15 px to the left. Move to the right side of this shape and make sure that the Direct Selection Tool (A) remains active. Select the top anchor point and drag it 10 px down, and then select the bottom anchor point and drag it 10 px up and 5 px to the left.

Step 3
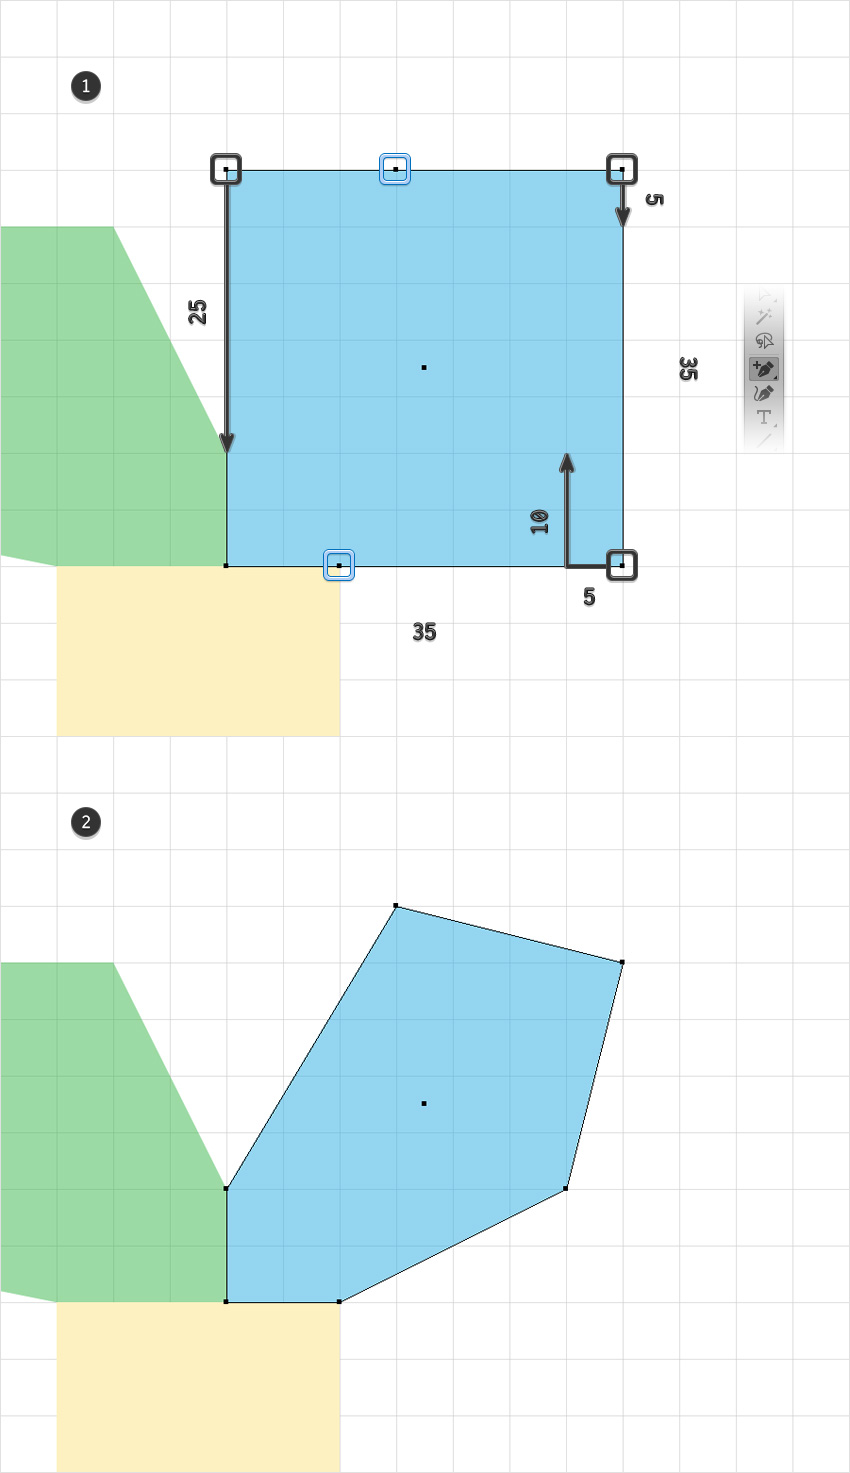
Using the Rectangle Tool (M), create a 25 px square and place it as shown in the first image. Focus on the bottom side of this new shape, pick the Add Anchor Point Tool (+) and add a new anchor point as shown below.
Keep focusing on your square and switch to the Direct Selection Tool (A). First, select the bottom-left anchor point and drag it 10 px up and 5 px to the left. Move to the bottom-right anchor point and drag it 5 px up, and then select the top-right anchor point and drag it 5 px up and 10 px to the left.

Step 4
Using the Rectangle Tool (M), create a 40 x 30 px shape and place it as shown in the first image. Pick the Add Anchor Point Tool (+) and add the two anchor points shown below.
Keep focusing on this new rectangle and switch to the Direct Selection Tool (A). First, select the bottom-left anchor point and drag it 5 px up. Move to the top-right anchor point and drag it 10 px to the left, and then select the top-left anchor point and drag it 5 px to the right.

Step 5
Using the Rectangle Tool (M), create a 35 px square and place it as shown in the first image. Pick the Add Anchor Point Tool (+) and add the two anchor points shown below.
Keep focusing on your square and switch to the Direct Selection Tool (A). First, select the bottom-right anchor point and drag it 10 px up and 5 px to the left. Move to the top-right anchor point and drag it 5 px down, and then select the top-left anchor point and drag it 25 px down.
Step 6
Select all the shapes made so far, open the Pathfinder panel (Window > Pathfinder), and click the Unite button. Make sure that the resulting shape is filled with R=253 G=241 B=193 and move to the next step.

Step 7
Make sure that your shape is still selected and go to Effect > Stylize > Rounded Corners. Enter a 5 px Radius, click OK, and then go to Object > Expand Appearance.

Step 8
Pick the Pen Tool (P) and create three simple triangles as shown in the first image. Select all the shapes made so far and click the Minus Front button from the Pathfinder panel.

Step 9
Make sure that your shape is selected, open the Brushes panel (Window > Brushes) and click that New Brush button. Select the Art Brush box and then click OK. Pick a name for your brush, drag that Width slider to 50%, enter the rest of the attributes shown in the following image, and then click the OK button.

3. How to Create the Text Effect
Step 1
Pick the Type Tool (T) and open the Character panel (Window > Type > Character). Select the Bonez font and then set the size to 150 px and the tracking to 100. Simply click on your artboard and add some text. Make it black (R=0 G=0 B=0) and lower its Opacity to about 30%.

Step 2
Disable the Grid (Control-") and the Snap to Grid (Shift-Control-").
Pick the Brush Tool (B) and select your art brush from the Brushes panel. Use that black text as a rough reference and start drawing paths to create the first letter.

Step 3
Move to the next letters and use the same art brush. Once you're done, delete that piece of text.

Step 4
Select all the paths made so far and go to Effect > Stylize > Drop Shadow. Enter the attributes shown in the following image and then click OK.

Step 5
Make sure that all your paths are still selected, Group them (Control-G) and then go to Effect > Stylize > Drop Shadow. Enter the attributes shown below and then click OK.

4. How to Create the Background
Step 1
Pick the Ellipse Tool (L) and simply click on your artboard to open the Ellipse window. Set the Width to 600 px and the Height to 360 px and then click OK. Fill the resulting shape with R=235 G=107 B=38 and send it to back (Shift-Control-[).
Make sure that this orange shape stays selected and open the Align panel (Window > Align). Set the aligning to Artboard (open the fly out menu and go to Show Options if you can't see the Align To section as shown in the following image) and then click the Horizontal Align Center and Vertical Align Center buttons. This will basically bring your selected shape to the center of the artboard.

Step 2
Make sure that your orange ellipse is still selected and go to Effect > Distort & Transform > Zig Zag. Enter the attributes shown in the following image and then click OK.

Step 3
Pick the Rectangle Tool (M) and simply click on your artboard to open the Rectangle window. Set the Width to 860 px and the Height to 610 px and then click OK. Fill the resulting shape with R=39 G=9 B=62, send it to back (Shift-Control-[), and don't forget to center it.

Congratulations! You're Done!
Here is how it should look. I hope you've enjoyed this tutorial and can apply these techniques in your future projects. Don't hesitate to share your final result in the comments section.
Feel free to adjust the final design and make it your own. You can find some great sources of inspiration at GraphicRiver, with interesting solutions to improve your design.

Original Link:
TutsPlus - Design
More About this Source Visit TutsPlus - Design