
An Interest In:
Web News this Week
- April 2, 2024
- April 1, 2024
- March 31, 2024
- March 30, 2024
- March 29, 2024
- March 28, 2024
- March 27, 2024
Some of Our Sources
- Engadget
- Simplebits
- Web Designer Wall
- Joshua Blankenship
- Smashing Magazine
- You The Designer
- Naldz Graphics
- Wal You
- Spyre Studios
- Android Headlines
Help Webnuz
Referal links:
How to create a real-time bidding platform with Appwrite and Flutter
Using an auctioning platform, real-time bidding (RTB) has become increasingly popular in recent years. RTB is the buying and selling of advertising space in real-time through an auction process. RTB platforms allow advertisers to bid on ad inventory in real-time as it becomes available, typically through an ad exchange.
Creating real-time features for applications has become easy by using the Appwrite client SDK. Thus, this tutorial will demonstrate how to build a real-time bidding platform with Appwrite and Flutter.
This article will entail the following:
- User signup and login
- Creating a Create, Read, Update, and Delete (CRUD) application that permits users to create and update documents in a database
- Creating a real-time feature using Appwrites real-time API to listen to create, delete, and update events in our database collection
To jump straight into the project, clone the repository containing the code for the project.
Prerequisites
The following requirements apply to follow along:
- Xcode (with developer account for Mac users)
- To run the application, use iOS Simulator, Android Studio, or Chrome web browsers.
- Docker installation (recommended), DigitalOcean droplet, or Gitpod.
- An Appwrite instance. Check out this article for the setup.
- The user interfaces template. Here is a link to the repository containing the UI template.
Setting up the Appwrite project
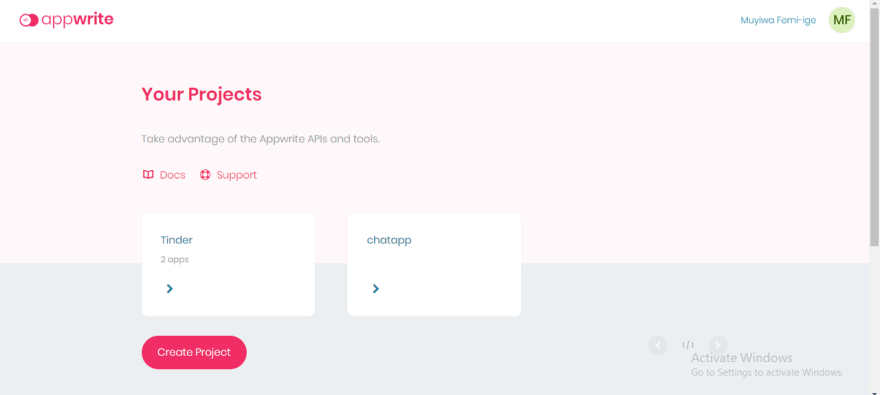
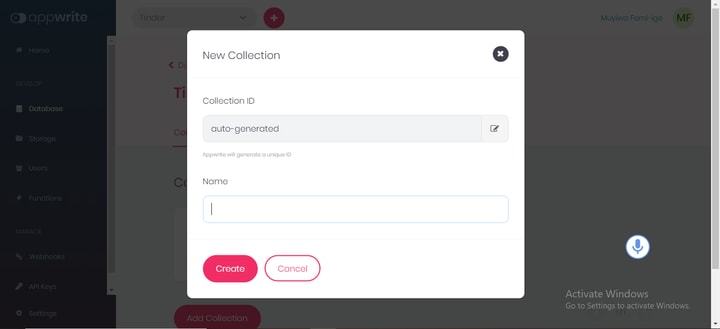
After setting up an Appwrite instance, we head to the browser and type in our IP address or hostname. Next, we select Create Project and fill in our desired project name and ID.
Note: ID can be auto-generated

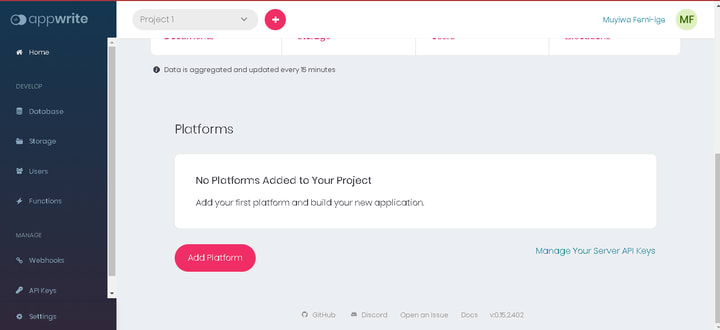
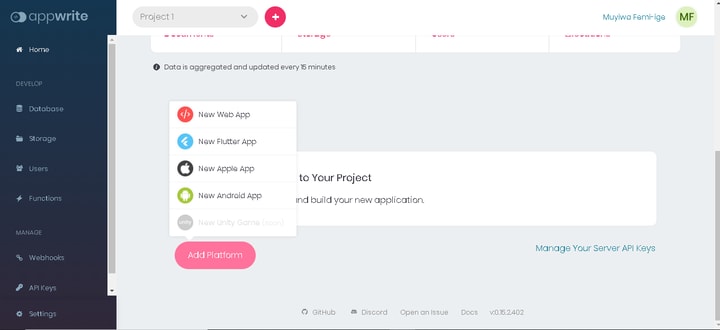
After creating a project, we will scroll down within the Appwrite console and select create platform. When we get a popup, select Flutter and choose the operating system we plan to work on (in this case, choose Android).
Next, specify the application and package names (the package name is in the app-level build.gradle file).

After creating a platform, head to storage to create a bucket. To do so, we click on add bucket, then set the bucket-level permission's read and write access to allow all users (role:all). We will store an image in this file bucket and save its URL in a database collection.


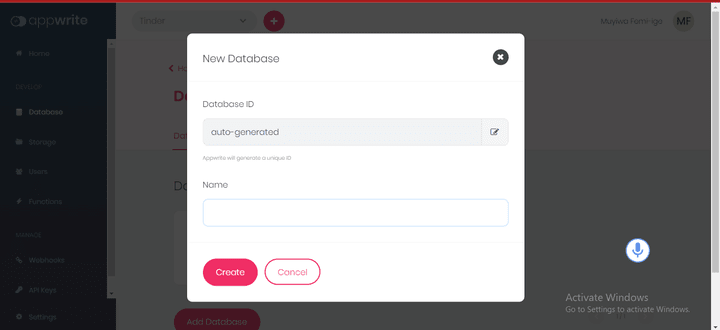
Next, head to the database section and select create database, followed by creating two collections and setting the permission to role:all: product collection, which contains information about a product (price and image), and bidder collection, which contains information about a bidder (bidder ID).

For the first collection, lets create two attributes: a string attribute with the attribute ID imageurl and an integer attribute with the attribute ID bidderPrice.
For the second collection, create a single string attribute with the attribute ID bidderNumber.
Cloning the Flutter UI template and connecting to Appwrite
This section uses a UI template containing user registration, login, and the platform page code. To get it, clone the repository specified in the prerequisites. Check out the official GitHub docs to learn more about cloning a repository.


After cloning the repository, run the command flutter pub get to fetch and install the dependencies for a Flutter project.
If familiar with Appwrite, proceed to the next step. For those new to it, this is how to connect a Flutter project to Appwrite for Android and iOS devices.
iOS
First, obtain the bundle ID by going to the project.pbxproj file (ios > Runner.xcodeproj > project.pbxproj) and searching for the PRODUCT_BUNDLE_IDENTIFIER.
Now, head to the Runner.xcworkspace folder in the applications iOS folder in the project directory on Xcode. To select the runner target, choose the Runner project in the Xcode project navigator and then find the Runner target. Next, select General and IOS 11.0 in the deployment info section as the target.
Android
For Android, copy the XML script below and paste it below the activity tag in the Androidmanifest.xml file (to find this file, head to android > app > src > main).
Note: change [PROJECT-ID] to the ID we used when creating the Appwrite project
Getting started
After running the cloned repo, the UI should look like the image below:


The images above are sign-in, sign-up, and the homepage UI. The homepage UI consists of a container divided into different sections (product image, set price button, current bidders, current price). It also has a popup menu which has the log-out item.
Starting with the constants folder, lets create an app_constants.dart file, to handle some of our important constants and paste the code below into the file:
List document
The information on the UI screen at the moment is static data; thus, to get data from Appwrite, we will start by getting the list of documents from the first collection we created. To do this, we will update the _displayfirstdocument() function in our ChangeNotifier class with the code below:
_displayfirstdocument() async { var result = await databases!.listDocuments( collectionId: Appconstants.collectionID, ); _item = result.documents .map((docmodel) => DocModel.fromJson(docmodel.data)) .toList();}The code above gets the list of documents from the collection using the collectionID. It then iterates over the list of documents and transforms each document into a **DocModel** object using the **fromJson** method. The **.toList()** method is used to convert the resulting iterable object into a list, and this list is then assigned to the **_item** variable.
We will use the same method to get the list of documents from the second collection, and here is the updated code for the _displayseconddocument() function:
_displayseconddocument() async { var result = await databases?.listDocuments( collectionId: Appconstants.collectionID2, ); _seconditem = result?.documents .map((seconditem) => DocModel2.fromJson(seconditem.data)) .toList();}With this, we can get the information from Appwrite using a provider to call the getter of our model class. Here is an example of how to display an image using the imageurl attribute we created in Appwrite:
image: DecorationImage( image: NetworkImage(state.itemone![0].imageurl!)),Update bidding price
Earlier, we said that the homepage UI contains a set price button. This button opens up a dialog that contains a TextFormField to handle the validation process (checks whether the input is an integer, checks whether the new bid is not less than the current bid, and checks whether the bid is within the range of 1-10000).
Thus, we will create a function that takes in the new input and document ID from the first collection. Then, we will replace the previous bidderPrice with the new input using the updateDocument method from the Appwrite database API. Here is how it looks:
updatefirstdocument(int price, String id) async { try { var result = await databases!.updateDocument( collectionId: Appconstants.collectionID, documentId: id, data: { 'bidderPrice': price, }, ); _checkbidder(); } catch (e) { rethrow; }}In the code above, we called the _checkbidder() function after initiating the updateDocument method. We do this to simultaneously check whether the currently logged-in user has initiated a previous bid. Doing this is important because it gives any aspiring bidder an idea of the current list of persons bidding for the product.
To check, we will use the listDocuments method and provide a query that checks if the user ID exists in the bidderNumber attribute in the second collection. If the results total is zero (0), then it will initiate the createbidder function, creating a new document using the user ID as the data. Here is the code for this explanation:
Real- time feature
At the moment, all the necessary features for our application work manually, at least. That means we will have to reload our application after every create, update or delete action. That is where real time comes in, as with the Appwrite real-time API, we can subscribe to single or multiple channels, listen to specific data and perform some actions concerning the event (CRUD).
For this tutorial, we will monitor two events for the second collection: create and delete. And all the events for the first collection.
For the create event in the second collection, we will convert the payload to a model class and add the converted payload to the _seconditem list. For the delete event, we check through the _seconditem list using the **removeWhere** method and remove the element in which the ID and the ID of the payload match.
We will take a similar method to what was done in the delete event of the second collection for the first. The only exception will be rather than remove; we will replace. Here is the code below:
With this, we should have our application working as below:

Conclusion
Most applications available use real-time services to scale a part or all of their functionalities. The legacy way of doing real-time service involving many function calls is barely scalable. Thus, the Appwrite real-time API is the way to develop less cumbersome and scalable real-time features for applications.
This tutorial demonstrated how to build a CRUD bidding platform using Appwrite real-time API and Flutter.
Original Link: https://dev.to/hackmamba/how-to-create-a-real-time-bidding-platform-with-appwrite-and-flutter-41l2
Dev To
More About this Source Visit Dev To