
An Interest In:
Web News this Week
- April 2, 2024
- April 1, 2024
- March 31, 2024
- March 30, 2024
- March 29, 2024
- March 28, 2024
- March 27, 2024
Some of Our Sources
- Techcrunch
- TutsPlus - Code
- Smashing Apps
- CSS Tricks
- Spyre Studios
- Web Resource Source
- Android Dissected
- Daily Now
- Hashedout
- TechPowerUp
Help Webnuz
Referal links:
How to Build a React Native Video Calling App with Callkeep using Firebase and Video SDK
In a world where we are all connected through phones over audio and video calls, if you are planning to make one such app, you have landed at the right place.
We will be building a complete video calling app in React Native, which will allow you to make and receive video calls seamlessly. We'll use VideoSDK for video conferencing and React Native CallKeep to manage the call UI. This is a two-part series in which we will first implement CallKeep in Android and then configure and tweak it for iOS.
Now that all the requirements are well explained, let us dive right into the fun part, but if you are too eager to see the results, here is the link to test the app and the complete code for the app.
What is CallKeep?
CallKeep is a React Native library that allows you to handle the incoming call UI on the Android and iOS device in any given state of the app, i.e., foreground (running), background, quit, locked device, etc.
Before building the app, you should be aware of how the app will function internally, which in turn will help with the easy development process.
How will the app function?
To better understand how the app functions, let's take a scenario where John wants to call his friend Max. John will start by opening our app, where he will enter Max's caller ID and hit call. Max will see an incoming call UI on his phone, where he can accept or reject the call. Once he accepts the call, we will setup the React Native video call between them using VideoSDK.
You might think these are super simple. Well, let's elaborate a little more on the nuance of the implementation.
- When John enters Max's Caller ID and hits the Call button, the first thing we do is map it to our Firebase database and send a notification on his device.
- When Max's device receives these notifications, our app's logic will show him the incoming call UI using the React Native CallKeep library.
- When Max accepts or rejects the incoming call, we will send the status back to John using notifications and eventually start up the video call between them.
- Here is a pictorial representation of the flow for a better understanding.
Here is a pictorial representation of the flow for a better understanding.

Now that we have established the flow of the app and how it functions, let's get started with the development without any more chit-chat.
Requirements and Libraries for the App
First, let's have a look at the set of libraries we will be using to establish the functionalities of the app.
- React Native CallKeep: These libraries will help with invoking the incoming call on the device.
- React Native VoIP Push Notification: These libraries are used to send push notifications on iOS devices, as the Firebase notifications do not function well on iOS devices when the app is in a killed state.
- VideoSDK RN Android Overlay Permission: These libraries will handle overlay permission for newer Android versions, making sure the incoming call is always visible.
- React Native Firebase Messaging: These libraries are used for the sending and receiving of the Firebase notification, which will invoke our incoming call UI.
- React Native Firebase Firestore: These libraries are used for storing the caller ID and device token, which will be used for establishing the video calls.
If we look at the development requirements, here is what you will be needing:
- Node.js v12+
- NPM v6+ (Included with newer Node versions)
- Android Studio and Xcode are installed.
- A Video SDK Token (Dashboard > Api-Key) (Video Tutorial)
- A minimum of two physical devices is required to test the calling feature.
Client Side Setup for React Native Android App
Lets start by creating a new react native app using the command:
npx react-native init VideoSdkCallKeepExampleNow that our basic app is created, lets start by installing all the dependencies.
1.First we will install the @react-navigation/native and its other dependencies to provide navigation within the app.
npm install @react-navigation/nativenpm install @react-navigation/stacknpm install react-native-screens react-native-safe-area-context react-native-gesture-handler2.Second on our list of dependencies is the VideoSDK library which will provide video conferencing to the app.
npm install "@videosdk.live/react-native-sdk"npm install "@videosdk.live/react-native-incallmanager"3.Next will be installing dependencies related to Firebase.
npm install @react-native-firebase/appnpm install @react-native-firebase/messagingnpm install @react-native-firebase/firestorenpm install firebase4.And finally the React Native CallKeep library and the other libraries required for the push notification and permissions.
npm install git+https://github.com/react-native-webrtc/react-native-callkeep#4b1fa98a685f6502d151875138b7c81baf1ec680npm install react-native-voip-push-notificationnpm install videosdk-rn-android-overlay-permissionnpm install react-native-uuidNote: We have put the reference of the React Native CallKeep library using the github repository link as the NPM version has build issues with the android.
We are all setup with our dependencies. Let us now start with the Android setup for all the libraries that we have installed.
React Native Android Setup
VideoSDK Setup
1.Lets start by adding the required permissions and meta-data in the AndroidManifest.xml file. Below mentioned are all the permission you need to add in the android/app/src/mainAndroidManifest.xml
<uses-permission android:name="android.permission.ACCESS_NETWORK_STATE" /><!-- Needed to communicate with already-paired Bluetooth devices. (Legacy up to Android 11) --><uses-permission android:name="android.permission.BLUETOOTH" android:maxSdkVersion="30" /><uses-permission android:name="android.permission.BLUETOOTH_ADMIN" android:maxSdkVersion="30" /><!-- Needed to communicate with already-paired Bluetooth devices. (Android 12 upwards)--><uses-permission android:name="android.permission.BLUETOOTH_CONNECT" /><!-- Needed to access Camera and Audio --><uses-permission android:name="android.permission.CAMERA" /><uses-permission android:name="android.permission.MODIFY_AUDIO_SETTINGS" /><uses-permission android:name="android.permission.RECORD_AUDIO" /><uses-permission android:name="android.permission.SYSTEM_ALERT_WINDOW" /><uses-permission android:name="android.permission.ACTION_MANAGE_OVERLAY_PERMISSION" /> <uses-permission android:name="android.permission.FOREGROUND_SERVICE"/><uses-permission android:name="android.permission.WAKE_LOCK" /> <application> // ... <meta-data android:name="live.videosdk.rnfgservice.notification_channel_name" android:value="Meeting Notification" /> <meta-data android:name="live.videosdk.rnfgservice.notification_channel_description" android:value="Whenever meeting started notification will appear." /> <meta-data android:name="live.videosdk.rnfgservice.notification_color" android:resource="@color/red" /> <service android:name="live.videosdk.rnfgservice.ForegroundService" android:foregroundServiceType="mediaProjection"></service> <service android:name="live.videosdk.rnfgservice.ForegroundServiceTask"></service> // ...</application>2.Add following lines in the app-level build.gradle file at android/app/build.gradle inside the dependencies {}
implementation project(':rnfgservice')implementation project(':rnwebrtc')implementation project(':rnincallmanager')3.Add following lines in the android/settings.gradle file.
include ':rnwebrtc'project(':rnwebrtc').projectDir = new File(rootProject.projectDir, '../node_modules/@videosdk.live/react-native-webrtc/android')include ':rnincallmanager'project(':rnincallmanager').projectDir = new File(rootProject.projectDir, '../node_modules/@videosdk.live/react-native-incallmanager/android')include ':rnfgservice'project(':rnfgservice').projectDir = new File(rootProject.projectDir, '../node_modules/@videosdk.live/react-native-foreground-service/android')4.Update the MainApplication.java with the following packages.
//Add these importsimport live.videosdk.rnfgservice.ForegroundServicePackage; import live.videosdk.rnincallmanager.InCallManagerPackage;import live.videosdk.rnwebrtc.WebRTCModulePackage;public class MainApplication extends Application implements ReactApplication { private static List<ReactPackage> getPackages() { @SuppressWarnings("UnnecessaryLocalVariable") List<ReactPackage> packages = new PackageList(this).getPackages(); // Packages that cannot be autolinked yet can be added manually here, for example: // packages.add(new MyReactNativePackage()); //Add these packages packages.add(new ForegroundServicePackage()); packages.add(new InCallManagerPackage()); packages.add(new WebRTCModulePackage()); return packages; }}5.Lastly register the VideoSDK service to the app in the index.js file.
// Import the libraryimport { register } from '@videosdk.live/react-native-sdk';// Register the VideoSDK serviceregister();CallKeep Setup for React Native Android App
1.Lets start by adding the required permissions and meta-data in the AndroidManifest.xml file. Below mentioned are all the permission you need to add in the android/app/src/mainAndroidManifest.xml
<!-- Needed to for the call trigger purpose --><uses-permission android:name="android.permission.BIND_TELECOM_CONNECTION_SERVICE"/><uses-permission android:name="android.permission.READ_PHONE_STATE" /><uses-permission android:name="android.permission.CALL_PHONE" /><application> // ... <activity android:name=".MainActivity" android:label="@string/app_name" android:configChanges="keyboard|keyboardHidden|orientation|screenSize|uiMode" android:launchMode="singleTask" android:windowSoftInputMode="adjustResize" android:exported="true" > <intent-filter> <action android:name="android.intent.action.MAIN" /> <category android:name="android.intent.category.LAUNCHER" /> </intent-filter> //...Add these intent filter to allow deep linking <intent-filter> <action android:name="android.intent.action.VIEW" /> <category android:name="android.intent.category.DEFAULT" /> <category android:name="android.intent.category.BROWSABLE" /> <data android:scheme="videocalling" /> </intent-filter> </activity> <service android:name="io.wazo.callkeep.VoiceConnectionService" android:label="Wazo" android:permission="android.permission.BIND_TELECOM_CONNECTION_SERVICE" android:foregroundServiceType="camera|microphone" android:exported:"true" > <intent-filter> <action android:name="android.telecom.ConnectionService" /> </intent-filter> </service> <service android:name="io.wazo.callkeep.RNCallKeepBackgroundMessagingService" /> // ....</application>Firebase Setup for React Native Android App
1.To start, go and create a new Firebase project from here.
2.Once the project is created, add your react native android app to the firebase project by clicking on the android icon.
3.Add your apps applicationId in the presented fields and click Register App.
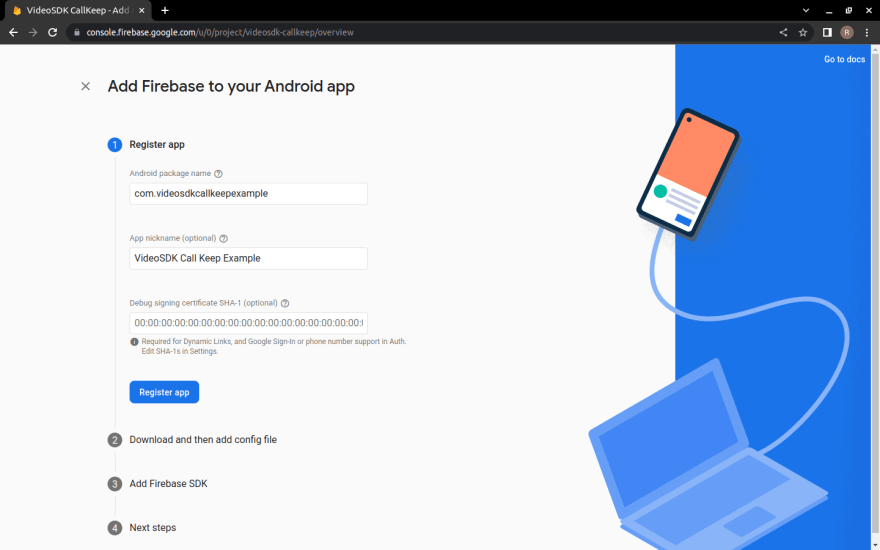
4.Download the google-services.json file and move it to android/app
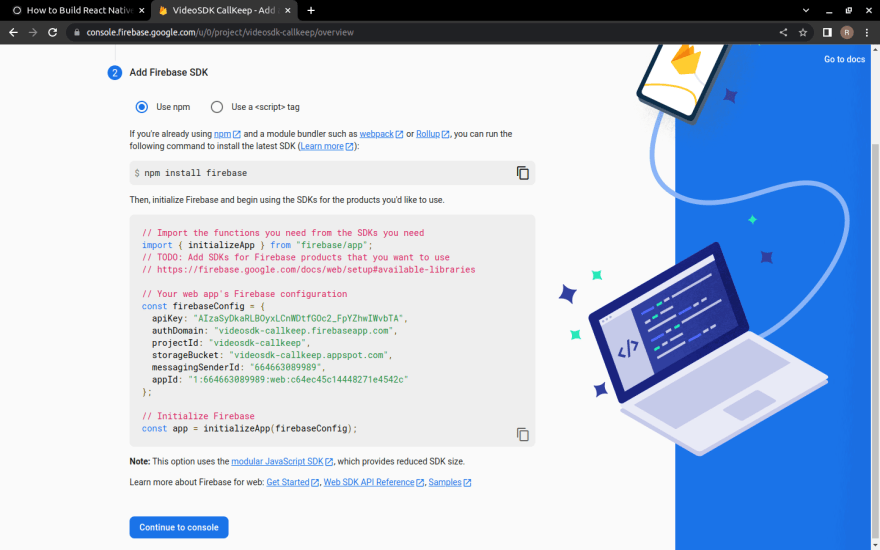
5.Follow the steps shown to added the Firebase SDK to android app.
6.Create a new web app in your firebase project which will be used to access the firestore database.
7.Add the configuration file shown in the database/firebaseDb.js file in your project.

8.Go to Firebase Firestore in the Left panel and create a database which we will use to store caller IDs.
9.With these we are all set with the firebase on Android.
Server Side Setup
Now that we have completed the setup for our app. Let us setup the server-side APIs as well. For creating these APIs we will user Firebase Functions. So lets get straight into it.
1.Go to Firebase Functions in the Left panel. To use Firebase Functions, you will need to upgrade to a pay as you go plan. Although there is no need to worry about charges if you are just building as a hobby project as there is a generous free quota available.
2.Lets get started with Firebase functions by installing the firebase CLI using below command.
npm install -g firebase-tools3.Run firebase login to log in via the browser and authenticate the Firebase CLI.
4.Go to your Firebase project directory.
5.Run firebase init functions to initialize the firebase functions project where we will write our APIs. Follow the setup instructions shown in the CLI and once the process completes, you should see the functions folder created in your directory.
6.Download the service account key from the project settings and place it inside the functions/serviceAccountKey.json.
With these we have completed the setup which we require to run our app.
App Side Code
Lets hop on to start the code on react native side. We will be creating two screens, first would be, where user can see his Caller ID and enter the other persons caller ID to initiate a new call.
We will be following the below shown folder structure:
. Root/ android ios src/ api/ api.js assets/ Get it from our repository components/ Get it from our repository navigators/ screenNames.js scenes/ home/ index.js meeting/ OneToOne/ index.js MeetingContainer.js styles/ Get it from our repository utils/ incoming-video-call.js App.js index.js package.jsonLets get started with the basic UI of the Call Initiating Screen.
1.To give you a head start, we have already create the basic components we will need like, buttons, textfields, avatars and icons. You can direclty get access to all the icons and components from our github repository.
2.With our basic components setup, lets add Navigation screens to the app. We will have a Home screen which will have the caller ID input and a call button and a meeting screen which will have the video call.
So update the src/navigators/screenNames.js with following screen names.
export const SCREEN_NAMES = { Home: "homescreen", Meeting: "meetingscreen",};3.Update the App.js file with the Navigation stack.
import React, { useEffect } from "react";import "react-native-gesture-handler";import { NavigationContainer } from "@react-navigation/native";import { createStackNavigator } from "@react-navigation/stack";import { SCREEN_NAMES } from "./src/navigators/screenNames";import Meeting from "./src/scenes/meeting";import { LogBox, Text, Alert } from "react-native";import Home from "./src/scenes/home";import RNCallKeep from "react-native-callkeep";LogBox.ignoreLogs(["Warning: ..."]);LogBox.ignoreAllLogs();const { Navigator, Screen } = createStackNavigator();const linking = { prefixes: ["videocalling://"], config: { screens: { meetingscreen: { path: `meetingscreen/:token/:meetingId`, }, }, },};export default function App() { return ( <NavigationContainer linking={linking} fallback={<Text>Loading...</Text>}> <Navigator screenOptions={{ animationEnabled: false, presentation: "modal", }} initialRouteName={SCREEN_NAMES.Home} > <Screen name={SCREEN_NAMES.Meeting} component={Meeting} options={{ headerShown: false }} /> <Screen name={SCREEN_NAMES.Home} component={Home} options={{ headerShown: false }} /> </Navigator> </NavigationContainer> );}4.With our Navigation stack ready, let us setup the home screen UI.
For which you have to update the src/scenes/home/index.js
import React, { useEffect, useState, useRef } from "react";import { Platform, KeyboardAvoidingView, TouchableWithoutFeedback, Keyboard, View, Text, Clipboard, Alert, Linking,} from "react-native";import { TouchableOpacity } from "react-native-gesture-handler";import { CallEnd, Copy } from "../../assets/icons";import TextInputContainer from "../../components/TextInputContainer";import colors from "../../styles/colors";import firestore from "@react-native-firebase/firestore";import messaging from "@react-native-firebase/messaging";import Toast from "react-native-simple-toast";import { updateCallStatus, initiateCall, getToken, createMeeting,} from "../../api/api";import { SCREEN_NAMES } from "../../navigators/screenNames";import Incomingvideocall from "../../utils/incoming-video-call";export default function Home({ navigation }) { //These is the number user will enter to make a call const [number, setNumber] = useState(""); //These will store the detials of the users callerId and fcm token const [firebaseUserConfig, setfirebaseUserConfig] = useState(null); //Used to render the UI conditionally, whether the person on making a call or not const [isCalling, setisCalling] = useState(false); return ( <KeyboardAvoidingView behavior={Platform.OS === "ios" ? "padding" : "height"} style={{ flex: 1, backgroundColor: colors.primary["900"], justifyContent: "center", paddingHorizontal: 42, }} > {!isCalling ? ( <TouchableWithoutFeedback onPress={Keyboard.dismiss}> <> <View style={{ padding: 35, backgroundColor: "#1A1C22", justifyContent: "center", alignItems: "center", borderRadius: 14, }} > <Text style={{ fontSize: 18, color: "#D0D4DD", }} > Your Caller ID </Text> <View style={{ flexDirection: "row", marginTop: 12, alignItems: "center", }} > <Text style={{ fontSize: 32, color: "#ffff", letterSpacing: 8, }} > {firebaseUserConfig ? firebaseUserConfig.callerId : "Loading.."} </Text> <TouchableOpacity style={{ height: 30, aspectRatio: 1, backgroundColor: "#2B3034", marginLeft: 12, justifyContent: "center", alignItems: "center", borderRadius: 4, }} onPress={() => { Clipboard.setString( firebaseUserConfig && firebaseUserConfig.callerId ); if (Platform.OS === "android") { Toast.show("Copied"); Alert.alert( "Information", "This callerId will be unavailable, once you uninstall the App." ); } }} > <Copy fill={colors.primary[100]} width={16} height={16} /> </TouchableOpacity> </View> </View> <View style={{ backgroundColor: "#1A1C22", padding: 40, marginTop: 25, justifyContent: "center", borderRadius: 14, }} > <Text style={{ fontSize: 18, color: "#D0D4DD", }} > Enter call id of another user </Text> <TextInputContainer placeholder={"Enter Caller ID"} value={number} setValue={setNumber} keyboardType={"number-pad"} /> <TouchableOpacity onPress={async () => { if (number) { //1. getCallee is used to get the detials of the user you are trying to intiate a call with const data = await getCallee(number); if (data) { if (data.length === 0) { Toast.show("CallerId Does not Match"); } else { Toast.show("CallerId Match!"); const { token, platform, APN } = data[0]?.data(); //initiateCall() is used to send a notification to the receiving user and start the call. initiateCall({ callerInfo: { name: "Person A", ...firebaseUserConfig, }, calleeInfo: { token, platform, APN, }, videoSDKInfo: { token: videosdkTokenRef.current, meetingId: videosdkMeetingRef.current, }, }); setisCalling(true); } } } else { Toast.show("Please provide CallerId"); } }} style={{ height: 50, backgroundColor: "#5568FE", justifyContent: "center", alignItems: "center", borderRadius: 12, marginTop: 16, }} > <Text style={{ fontSize: 16, color: "#FFFFFF", }} > Call Now </Text> </TouchableOpacity> </View> </> </TouchableWithoutFeedback> ) : ( <View style={{ flex: 1, justifyContent: "space-around" }}> <View style={{ padding: 35, justifyContent: "center", alignItems: "center", borderRadius: 14, }} > <Text style={{ fontSize: 16, color: "#D0D4DD", }} > Calling to... </Text> <Text style={{ fontSize: 36, marginTop: 12, color: "#ffff", letterSpacing: 8, }} > {number} </Text> </View> <View style={{ justifyContent: "center", alignItems: "center", }} > <TouchableOpacity onPress={async () => { //getCallee is used to get the detials of the user you are trying to intiate a call with const data = await getCallee(number); if (data) { updateCallStatus({ callerInfo: data[0]?.data(), type: "DISCONNECT", }); setisCalling(false); } }} style={{ backgroundColor: "#FF5D5D", borderRadius: 30, height: 60, aspectRatio: 1, justifyContent: "center", alignItems: "center", }} > <CallEnd width={50} height={12} /> </TouchableOpacity> </View> </View> )} </KeyboardAvoidingView> );}Dont worry if you see error poping up, as we will be adding the methods soon.
You will come across following methods in the above code :
getCallee(): getCallee() is used to get the detials of the user you are trying to intiate a call with.initiateCall(): initiateCall() is used to send a notification to the receiving user and start the call.updateCallStatus(): updateCallStatus() is used to updated the status of the incoming call, like accepted, rejected etc.
- With the UI for calling in place lets start with the actual calling development.
These is how the UI will look:

Firebase Messaging to Initiate Calls
The first step into establishing the call is to identify each user and getting the messaging token for the user which will allow us to send them notifications.
1.So in the Home Page of our app we will get the Firebase Messaging Token. Using these token we will query the firestore database if the user is present in the database or not. If the user is present we will update firebaseUserConfig state in the app, else we will register the user in the database and update then state.
useEffect(() => { async function getFCMtoken() { const authStatus = await messaging().requestPermission(); const enabled = authStatus === messaging.AuthorizationStatus.AUTHORIZED || authStatus === messaging.AuthorizationStatus.PROVISIONAL; if (enabled) { const token = await messaging().getToken(); const querySnapshot = await firestore() .collection("users") .where("token", "==", token) .get(); const uids = querySnapshot.docs.map((doc) => { if (doc && doc?.data()?.callerId) { const { token, platform, callerId } = doc?.data(); setfirebaseUserConfig({ callerId, token, platform, }); } return doc; }); if (uids && uids.length == 0) { addUser({ token }); } else { console.log("Token Found"); } } } getFCMtoken(); }, []);const addUser = ({ token }) => { const platform = Platform.OS === "android" ? "ANDROID" : "iOS"; const obj = { callerId: Math.floor(10000000 + Math.random() * 90000000).toString(), token, platform, }; firestore() .collection("users") .add(obj) .then(() => { setfirebaseUserConfig(obj); console.log("User added!"); }); };2.We will setup the VideoSDK token and Meeting ID when the Home Screen loads so that we have it ready when the user wants to start the call.
const [videosdkToken, setVideosdkToken] = useState(null); const [videosdkMeeting, setVideosdkMeeting] = useState(null); const videosdkTokenRef = useRef(); const videosdkMeetingRef = useRef(); videosdkTokenRef.current = videosdkToken; videosdkMeetingRef.current = videosdkMeeting; useEffect(() => { async function getTokenAndMeetingId() { const videoSDKtoken = getToken(); const videoSDKMeetingId = await createMeeting({ token: videoSDKtoken }); setVideosdkToken(videoSDKtoken); setVideosdkMeeting(videoSDKMeetingId); } getTokenAndMeetingId(); }, []);3.We have to create the getToken() and createMeeting() used in the above step in the src/api/api.js file.
const API_BASE_URL = "https://api.videosdk.live/v2";const VIDEOSDK_TOKEN = "UPDATE YOUR VIDEOSDK TOKEN HERE WHICH YOU GENERATED FROM DASHBOARD ";export const getToken = () => { return VIDEOSDK_TOKEN;};export const createMeeting = async ({ token }) => { const url = `${API_BASE_URL}/rooms`; const options = { method: "POST", headers: { Authorization: token, "Content-Type": "application/json" }, }; const { roomId } = await fetch(url, options) .then((response) => response.json()) .catch((error) => console.error("error", error)); return roomId;};4.Next step is to initiate the call. And to achieve that we will have to create two APIs as firebase functions which will trigger notifications on the other device and update the status of the call whether it was rejected or accpeted.
Create these APIs in the functions/index.js
const functions = require("firebase-functions");const express = require("express");const cors = require("cors");const morgan = require("morgan");var fcm = require("fcm-notification");var FCM = new fcm("./serviceAccountKey.json");const app = express();const { v4: uuidv4 } = require("uuid");app.use(cors());app.use(express.json());app.use(express.urlencoded({ extended: true }));app.use(morgan("dev"));//app.get("/", (req, res) => { res.send("Hello World!");});app.post("/initiate-call", (req, res) => { const { calleeInfo, callerInfo, videoSDKInfo } = req.body; if (calleeInfo.platform === "ANDROID") { var FCMtoken = calleeInfo.token; const info = JSON.stringify({ callerInfo, videoSDKInfo, type: "CALL_INITIATED", }); var message = { data: { info, }, android: { priority: "high", }, token: FCMtoken, }; FCM.send(message, function (err, response) { if (err) { res.status(200).send(response); } else { res.status(400).send(response); } }); } else { res.status(400).send("Not supported platform"); }});app.post("/update-call", (req, res) => { const { callerInfo, type } = req.body; const info = JSON.stringify({ callerInfo, type, }); var message = { data: { info, }, apns: { headers: { "apns-priority": "10", }, payload: { aps: { badge: 1, }, }, }, token: callerInfo.token, }; FCM.send(message, function (err, response) { if (err) { res.status(200).send(response); } else { res.status(400).send(response); } });});app.listen(9000, () => { console.log(`API server listening at http://localhost:9000`);});exports.app = functions.https.onRequest(app);initiate-call: initiate-call is used to send a notification to the receiving user and start the call by sending the details like caller information and VideoSDK room detials.update-call: update-call is used to updated the status of the incoming call, like accepted, rejected etc and send the notification to the caller.
- Now that the APIs are created we will trigger them from the app. Update the
src/api/api.jswith following API calls.
Here the FCM_SERVER_URL needs to be updated with the URL of your firebase functions.
You will get these when you deploy the functions or when you run the functions in a local environement using npm run serve
const FCM_SERVER_URL = "YOUR_FCM_URL";export const initiateCall = async ({ callerInfo, calleeInfo, videoSDKInfo,}) => { await fetch(`${FCM_SERVER_URL}/initiate-call`, { method: "POST", headers: { "Content-Type": "application/json" }, body: JSON.stringify({ callerInfo, calleeInfo, videoSDKInfo, }), }) .then((response) => { console.log(" RESP", response); }) .catch((error) => console.error("error", error));};export const updateCallStatus = async ({ callerInfo, type }) => { await fetch(`${FCM_SERVER_URL}/update-call`, { method: "POST", headers: { "Content-Type": "application/json" }, body: JSON.stringify({ callerInfo, type, }), }) .then((response) => { console.log("##RESP", response); }) .catch((error) => console.error("error", error));};6.With these notification send is setup. Now we will have to invoke the call when you receive the notification, these where the React-Native Call Keep comes into picture.
Call Keep Integration
1.Before initiating the call, we will have to ask for a few permissions and also setup the React-Native Call Keep. In order to do so, update the App.js with following code.
useEffect(() => { const options = { ios: { appName: "VideoSDK", }, android: { alertTitle: "Permissions required", alertDescription: "This application needs to access your phone accounts", cancelButton: "Cancel", okButton: "ok", imageName: "phone_account_icon", }, }; RNCallKeep.setup(options); RNCallKeep.setAvailable(true); if (Platform.OS === "android") { OverlayPermissionModule.requestOverlayPermission(); } }, []);These will ask for the Overlay permissions for the android devices and also setup the CallKeep library. Here is the reference to how to grant these permissions.
2.You might remember that we had setup the app to send the message notification, but did not add any listener for those notification. So lets add those listener and show the Call UI when the notification is received.
Update the utils/incoming-video-call.js which will handle all the functionalities related to the incoming call.
import { Platform } from "react-native";import RNCallKeep from "react-native-callkeep";import uuid from "react-native-uuid";class IncomingCall { constructor() { this.currentCallId = null; } configure = (incomingcallAnswer, endIncomingCall) => { try { this.setupCallKeep(); Platform.OS === "android" && RNCallKeep.setAvailable(true); RNCallKeep.addEventListener("answerCall", incomingcallAnswer); RNCallKeep.addEventListener("endCall", endIncomingCall); } catch (error) { console.error("initializeCallKeep error:", error?.message); } }; //These emthod will setup the call keep. setupCallKeep = () => { try { RNCallKeep.setup({ ios: { appName: "VideoSDK", supportsVideo: false, maximumCallGroups: "1", maximumCallsPerCallGroup: "1", }, android: { alertTitle: "Permissions required", alertDescription: "This application needs to access your phone accounts", cancelButton: "Cancel", okButton: "Ok", }, }); } catch (error) { console.error("initializeCallKeep error:", error?.message); } }; // Use startCall to ask the system to start a call - Initiate an outgoing call from this point startCall = ({ handle, localizedCallerName }) => { // Your normal start call action RNCallKeep.startCall(this.getCurrentCallId(), handle, localizedCallerName); }; reportEndCallWithUUID = (callUUID, reason) => { RNCallKeep.reportEndCallWithUUID(callUUID, reason); }; //These method will end the incoming call endIncomingcallAnswer = () => { RNCallKeep.endCall(this.currentCallId); this.currentCallId = null; this.removeEvents(); }; //These method will remove all the event listeners removeEvents = () => { RNCallKeep.removeEventListener("answerCall"); RNCallKeep.removeEventListener("endCall"); }; //These method will display the incoming call displayIncomingCall = (callerName) => { Platform.OS === "android" && RNCallKeep.setAvailable(false); RNCallKeep.displayIncomingCall( this.getCurrentCallId(), callerName, callerName, "number", true, null ); }; //Bring the app to foreground backToForeground = () => { RNCallKeep.backToForeground(); }; //Return the ID of current Call getCurrentCallId = () => { if (!this.currentCallId) { this.currentCallId = uuid.v4(); } return this.currentCallId; }; //These Method will end the call endAllCall = () => { RNCallKeep.endAllCalls(); this.currentCallId = null; this.removeEvents(); };}export default Incomingvideocall = new IncomingCall();Note: Check the Code Comments to learn about the function of each method
3.We have to add the notification listener on the firebase with which we will invoke the CallKeep to handle the Call UI, which we can to by adding following code in the src/home/index.js
useEffect(() => { const unsubscribe = messaging().onMessage((remoteMessage) => { const { callerInfo, videoSDKInfo, type } = JSON.parse( remoteMessage.data.info ); switch (type) { case "CALL_INITIATED": const incomingCallAnswer = ({ callUUID }) => { updateCallStatus({ callerInfo, type: "ACCEPTED", }); Incomingvideocall.endIncomingcallAnswer(callUUID); setisCalling(false); Linking.openURL( `videocalling://meetingscreen/${videoSDKInfo.token}/${videoSDKInfo.meetingId}` ).catch((err) => { Toast.show(`Error`, err); }); }; const endIncomingCall = () => { Incomingvideocall.endIncomingcallAnswer(); updateCallStatus({ callerInfo, type: "REJECTED" }); }; Incomingvideocall.configure(incomingCallAnswer, endIncomingCall); Incomingvideocall.displayIncomingCall(callerInfo.name); break; case "ACCEPTED": setisCalling(false); navigation.navigate(SCREEN_NAMES.Meeting, { name: "Person B", token: videosdkTokenRef.current, meetingId: videosdkMeetingRef.current, }); break; case "REJECTED": Toast.show("Call Rejected"); setisCalling(false); break; case "DISCONNECT": Platform.OS === "ios" ? Incomingvideocall.endAllCall() : Incomingvideocall.endIncomingcallAnswer(); break; default: Toast.show("Call Could not placed"); } }); return () => { unsubscribe(); }; }, []); //Used to get the detials of the user you are trying to intiate a call with. const getCallee = async (num) => { const querySnapshot = await firestore() .collection("users") .where("callerId", "==", num.toString()) .get(); return querySnapshot.docs.map((doc) => { return doc; }); };4.After adding above code you might observe that when the app is in foreground the call UI works as expected but not when the app is in background. So to handle the case in backroung mode, we will have to add a background listener for the notifications. In order to add the listener add below mentioned code in the index.js file of your project.
const firebaseListener = async (remoteMessage) => { const { callerInfo, videoSDKInfo, type } = JSON.parse( remoteMessage.data.info ); if (type === "CALL_INITIATED") { const incomingCallAnswer = ({ callUUID }) => { Incomingvideocall.backToForeground(); updateCallStatus({ callerInfo, type: "ACCEPTED", }); Incomingvideocall.endIncomingcallAnswer(callUUID); Linking.openURL( `videocalling://meetingscreen/${videoSDKInfo.token}/${videoSDKInfo.meetingId}` ).catch((err) => { Toast.show(`Error`, err); }); }; const endIncomingCall = () => { Incomingvideocall.endIncomingcallAnswer(); updateCallStatus({ callerInfo, type: "REJECTED" }); }; Incomingvideocall.configure(incomingCallAnswer, endIncomingCall); Incomingvideocall.displayIncomingCall(callerInfo.name); Incomingvideocall.backToForeground(); }};// Register background handlermessaging().setBackgroundMessageHandler(firebaseListener);Here how the incoming and outgoing call will look like:
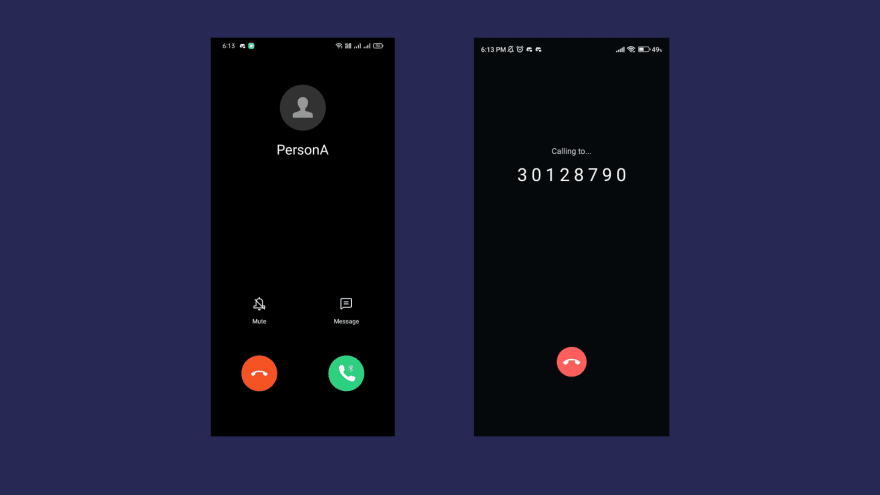
Wow!! You just implemented the calling feature which works like a charm.
But without Video Call its still feels incomplete. Well, for that, we have VideoSDK which we will implement in the upcoming steps.
VideoSDK Integration
1.We will be showing the Video Call in the Meeting Screen which we created earlier. These screen will have creating the room section before the meeting is joined and after that it will have remote participant in the large view and the local participant in the mini-view. We will have three buttons to toggle mic, toggle webcam and to leave the call.
. scenes/ home/ meeting/ OneToOne/ LargeView/ index.js MiniView/ index.js index.js index.js MeetingContainer.js2.First step in integrating the VideoSDK is adding the MeetingProvider in the src/scene/meeting/index.js which will initate the meeting and join it.
import React from "react";import { Platform, SafeAreaView } from "react-native";import colors from "../../styles/colors";import { MeetingConsumer, MeetingProvider,} from "@videosdk.live/react-native-sdk";import MeetingContainer from "./MeetingContainer";import { SCREEN_NAMES } from "../../navigators/screenNames";import IncomingVideoCall from "../../utils/incoming-video-call";export default function ({ navigation, route }) { const token = route.params.token; const meetingId = route.params.meetingId; const micEnabled = route.params.micEnabled ? route.params.micEnabled : true; const webcamEnabled = route.params.webcamEnabled ? route.params.webcamEnabled : true; const name = route.params.name; return ( <SafeAreaView style={{ flex: 1, backgroundColor: colors.primary[900], padding: 12 }} > <MeetingProvider config={{ meetingId: meetingId, micEnabled: micEnabled, webcamEnabled: webcamEnabled, name: name, notification: { title: "Video SDK Meeting", message: "Meeting is running.", }, }} token={token} > <MeetingConsumer {...{ onMeetingLeft: () => { Platform.OS == "ios" && IncomingVideoCall.endAllCall(); navigation.navigate(SCREEN_NAMES.Home); }, }} > {() => { return <MeetingContainer webcamEnabled={webcamEnabled} />; }} </MeetingConsumer> </MeetingProvider> </SafeAreaView> );}3.We used the MeetingContainer Component which will hold the different layouts for our meeting like showing Waiting to Join before the meeting is joined and also the complete meeting view once the meeting is joined
import { useMeeting, ReactNativeForegroundService,} from "@videosdk.live/react-native-sdk";import { useEffect, useState } from "react";import OneToOneMeetingViewer from "./OneToOne";import WaitingToJoinView from "./Components/WaitingToJoinView";import React from "react";import { convertRFValue } from "../../../styles/spacing";import { Text, View } from "react-native";import colors from "../../../styles/colors";export default function MeetingContainer({ webcamEnabled }) { const [isJoined, setJoined] = useState(false); const { join, changeWebcam, participants, leave } = useMeeting({ onMeetingJoined: () => { setTimeout(() => { setJoined(true); }, 500); }, }); useEffect(() => { setTimeout(() => { if (!isJoined) { join(); if (webcamEnabled) changeWebcam(); } }, 1000); return () => { leave(); ReactNativeForegroundService.stopAll(); }; }, []); return isJoined ? ( <OneToOneMeetingViewer /> ) : ( <View style={{ flexDirection: "column", justifyContent: "center", alignItems: "center", height: "100%", width: "100%", }} > <Text style={{ fontSize: convertRFValue(18), color: colors.primary[100], marginTop: 28, }} > Creating a room </Text> </View> );}4.Next we will add our MeetingView which will show the buttons and Participants View in the src/scenes/meeting/OneToOne/index.js
import React from "react";import { View, Text,Clipboard, TouchableOpacity, ActivityIndicator,} from "react-native";import { useMeeting } from "@videosdk.live/react-native-sdk";import { CallEnd, CameraSwitch, Copy, MicOff, MicOn, VideoOff, VideoOn,} from "../../../assets/icons";import colors from "../../../styles/colors";import IconContainer from "../../../components/IconContainer";import LocalViewContainer from "./LocalViewContainer";import LargeView from "./LargeView";import MiniView from "./MiniView";import Toast from "react-native-simple-toast";export default function OneToOneMeetingViewer() { const { participants, localWebcamOn, localMicOn, leave, changeWebcam, toggleWebcam, toggleMic, meetingId, } = useMeeting({ onError: (data) => { const { code, message } = data; Toast.show(`Error: ${code}: ${message}`); }, }); const participantIds = [...participants.keys()]; const participantCount = participantIds ? participantIds.length : null; return ( <> <View style={{ flexDirection: "row", alignItems: "center", width: "100%", }} > <View style={{ flex: 1, justifyContent: "space-between", }} > <View style={{ flexDirection: "row" }}> <Text style={{ fontSize: 16, color: colors.primary[100], }} > {meetingId ? meetingId : "xxx - xxx - xxx"} </Text> <TouchableOpacity style={{ justifyContent: "center", marginLeft: 10, }} onPress={() => { Clipboard.setString(meetingId); Toast.show("Meeting Id copied Successfully"); }} > <Copy fill={colors.primary[100]} width={18} height={18} /> </TouchableOpacity> </View> </View> <View> <TouchableOpacity onPress={() => { changeWebcam(); }} > <CameraSwitch height={26} width={26} fill={colors.primary[100]} /> </TouchableOpacity> </View> </View> {/* Center */} <View style={{ flex: 1, marginTop: 8, marginBottom: 12 }}> {participantCount > 1 ? ( <> <LargeView participantId={participantIds[1]} /> <MiniView participantId={participantIds[0]} /> </> ) : participantCount === 1 ? ( <LargeView participantId={participantIds[0]} /> ) : ( <View style={{ flex: 1, justifyContent: "center", alignItems: "center" }} > <ActivityIndicator size={"large"} /> </View> )} </View> {/* Bottom */} <View style={{ flexDirection: "row", justifyContent: "space-evenly", }} > <IconContainer backgroundColor={"red"} onPress={() => { leave(); }} Icon={() => { return <CallEnd height={26} width={26} fill="#FFF" />; }} /> <IconContainer style={{ borderWidth: 1.5, borderColor: "#2B3034", }} backgroundColor={!localMicOn ? colors.primary[100] : "transparent"} onPress={() => { toggleMic(); }} Icon={() => { return localMicOn ? ( <MicOn height={24} width={24} fill="#FFF" /> ) : ( <MicOff height={28} width={28} fill="#1D2939" /> ); }} /> <IconContainer style={{ borderWidth: 1.5, borderColor: "#2B3034", }} backgroundColor={!localWebcamOn ? colors.primary[100] : "transparent"} onPress={() => { toggleWebcam(); }} Icon={() => { return localWebcamOn ? ( <VideoOn height={24} width={24} fill="#FFF" /> ) : ( <VideoOff height={36} width={36} fill="#1D2939" /> ); }} /> </View> </> );}5.Here we are showing the participants in two different views, first, if there is one participant we will show the local participant in the full screen and second, when there are two participants, we will show the local participant in the MiniView.
To achieve these, you need to following two components:
a. src/scenes/meeting/OneToOne/LargeView/index.js
import { useParticipant, RTCView, MediaStream } from "@videosdk.live/react-native-sdk";import React, { useEffect } from "react";import { View } from "react-native";import colors from "../../../../styles/colors";import Avatar from "../../../../components/Avatar";export default LargeViewContainer = ({ participantId }) => { const { webcamOn, webcamStream, displayName, setQuality, isLocal } = useParticipant(participantId, {}); useEffect(() => { setQuality("high"); }, []); return ( <View style={{ flex: 1, backgroundColor: colors.primary[800], borderRadius: 12, overflow: "hidden", }} > {webcamOn && webcamStream ? ( <RTCView objectFit={'cover'} mirror={isLocal ? true : false} style={{ flex: 1, backgroundColor: "#424242" }} streamURL={new MediaStream([webcamStream.track]).toURL()} /> ) : ( <Avatar containerBackgroundColor={colors.primary[800]} fullName={displayName} fontSize={26} style={{ backgroundColor: colors.primary[700], height: 70, aspectRatio: 1, borderRadius: 40, }} /> )} </View> );};a. src/scenes/meeting/OneToOne/MiniView/index.js
import { useParticipant, RTCView, MediaStream } from "@videosdk.live/react-native-sdk";import React, { useEffect } from "react";import { View } from "react-native";import Avatar from "../../../../components/Avatar";import colors from "../../../../styles/colors";export default MiniViewContainer = ({ participantId }) => { const { webcamOn, webcamStream, displayName, setQuality, isLocal } = useParticipant(participantId, {}); useEffect(() => { setQuality("high"); }, []); return ( <View style={{ position: "absolute", bottom: 10, right: 10, height: 160, aspectRatio: 0.7, borderRadius: 8, borderColor: "#ff0000", overflow: "hidden", }} > {webcamOn && webcamStream ? ( <RTCView objectFit="cover" zOrder={1} mirror={isLocal ? true : false} style={{ flex: 1, backgroundColor: "#424242" }} streamURL={new MediaStream([webcamStream.track]).toURL()} /> ) : ( <Avatar fullName={displayName} containerBackgroundColor={colors.primary[600]} fontSize={24} style={{ backgroundColor: colors.primary[500], height: 60, aspectRatio: 1, borderRadius: 40, }} /> )} </View> );};These how the video call will look like with two participant in it:
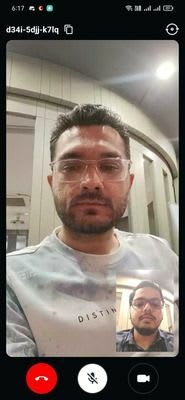
Hurray!!! With these our video calling feature is complete. Here is a video how it looks.
Head over to the second part of the series to see how you can configure the iOS to receive the calls and initiate the video call.
Conclusion
With this, we successfully built the React Native video calling app with Callkeep using the video SDK and Firebase. You can always refer to our documentation if you want to add features like chat messaging and screen sharing. If you have any problems with the implementation, please contact us via our Discord community.
Original Link: https://dev.to/video-sdk/react-native-video-calling-app-with-callkeep-1o73
Dev To
More About this Source Visit Dev To