
An Interest In:
Web News this Week
- April 14, 2024
- April 13, 2024
- April 12, 2024
- April 11, 2024
- April 10, 2024
- April 9, 2024
- April 8, 2024
Some of Our Sources
- Technology Review
- Simplebits
- Smashing Magazine
- Abduzeedo
- Creative Curio
- Crazy Leaf Design
- Reencoded
- CSS Globe
- Web Resource Source
- Dev To
Help Webnuz
Referal links:
AWS Lambda & S3|SNS| Automate JSON File Processing From S3 Bucket And Push data in MYSQL Using Lambda [Python]
TABLE OF CONTENT
- Create Role for Lambda
- Create S3 Bucket
- Create SNS Topic
- Installing & Configuring MySQL on EC2 instance
- Create a Lambda Function and add S3 trigger
- Create a package for lambda
- Create JSON File and Upload It to S3 Bucket
- Testing
Create Role For Lambda
Go to AWS console->IAM->Roles->Create role
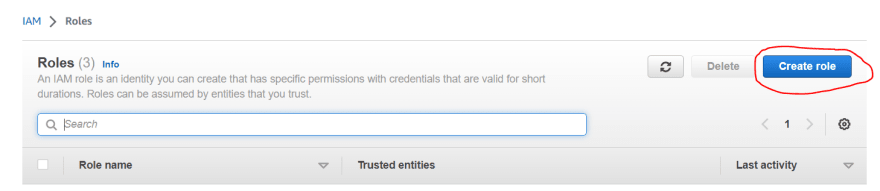
Add permissions for S3, Cloudwatch and SNS and then click on create role.

Create S3 Bucket
Go to AWS console->S3->Bucket->Create bucket

Select ACL disabled (recommend)
Uncheck "Block all public access"
Leave other things as default and click on create bucket.
Create SNS Topic
Make sure you are in the US East (N. Virginia) us-east-1 Region.
Navigate to SNS by clicking on the Services menu available under the Application Integration section.
Click on Topics in the left panel.
Select the Type as Standard.
Under Details:
- Name : Enter mysnsnotification
- Display name : Enter mysnsnotification

Leave other options as default and click on Create topic.
An SNS topic is now created.

Copy the ARN and save it for later.
Once the SNS topic is created, scroll down below and click on Create Subscription.
Under Details:
- Protocol : Select Email
- Endpoint : Enter
- Note: Make sure you give a valid email address as you will receive an SNS notification to this email address.
- Check your Spam box if you don't see the email in your Inbox.
You will receive an email confirming your subscription to your email.
Click on Confirm subscription.
Your email address is now subscribed to the SNS Topic mysnsnotification.
Installing & Configuring MySQL on EC2 instance
Steps for Launching EC2 instance
1. Make sure you are in the US EAST(N. Virginia)us-east-1 Region.
2. Navigate to EC2 by clicking on the Services menu in the top, then click on EC2 in the Computer section.
3. Navigate to Instances on the left panel and click on Launch instances

4.Enter name as Myinstance
5.Choose an Amazon Machine Image (AMI): Search for Ubuntu in the search box and click on the select button.

6.Choose an instance Type: Select t2.micro

7.For Key pair: Choose Create a new key pair.
- Key pair name: Enter Mykey
- Key pair type: Choose RSA
- Private key file format: Choose .pem

8 . Under networking settings
- Choose Create security group
- Check the Allow SSH traffic from Anywhere
- Check the Allow MYSQL/Aurora traffic from Anywhere

9 . Leave other settings as default click on Launch instances button.
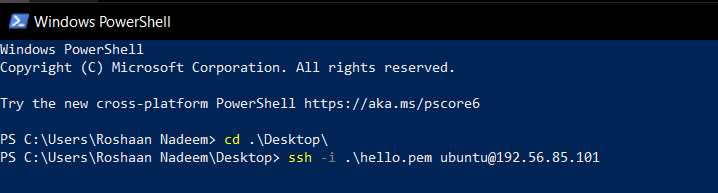
10.Now SSH into your EC2 instance using command;
"ssh -i 'Mykey'ubuntu@'EC2_public_IP'"
Now install MYSQL on EC2 using commands:
"sudo apt update"-
"sudo apt install mysql-server"
Enter into mysql as a root user using command:
"sudo mysql"
Now create user for any host using command:
"CREATE USER 'user'@'%' IDENTIFIED WITh mysql_native_password BY 'password';"
Grant privilges to the user using command:
"GRANT ALL PRIVILEGES ON *.* TO 'user'@'%' WITH GRANT OPTION;"
Enter "exit" command to exit from MYSQL.
Now we have to open connections for the user so that we connect to our MYSQL from any host. For the we have to change the bind-address of MYSQL database using command:
"sudo nano /etc/mysql/mysql.conf.d/mysqld.cnf"

Set the bind-address to 0.0.0.0.
Start the system using command;
"sudo su""systemctl restart mysql"
Create a Lambda Function and add trigger
- Navigate to the Services menu at the top, then click on Lambda under the Compute section.
- Click on Create function
Select Author from Scratch

- Function Name: Enter myfunction
- Runtime: Select Python 3.9
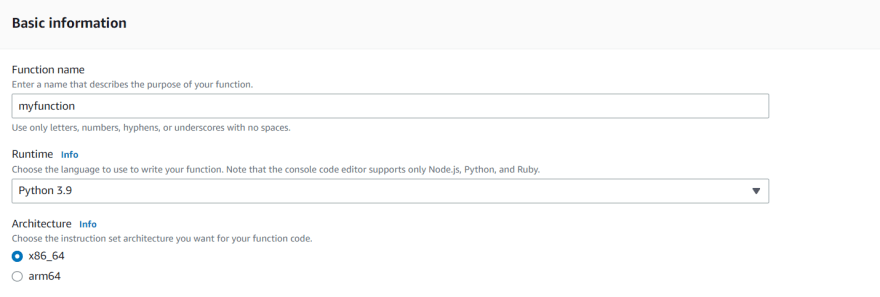
- Under permissions: Choose Use an existing role
- Choose the role that we have created perviously

- Click on Create fucntion button.
Once Lambda function is created successfully, it will look like the screenshot below.

Now add S3 trigger for lambda function.

Choose S3 from trigger list and enter these details:
- Bucket: Select your bucket mys3bucket
- Event type: Select PUT
- Suffix: .json

And Check this option of Recursive invocation to avoid failures in case you uploaded multiple files at once and check the acknowledged option.

Click on ADD.

Now as we see S3 trigger is added. Whenever a .json file is uploaded in S3 then our lambda function will get triggered.
Now we upload our code in lambda function. What the code will do is mentioned below:
- Access and read the file from S3 bucket.
- Parse data from file and format the data.
- Build MYSQL connection.
- Insert the data into MYSQL.
- After successful insertion sent SNS notification.
- For non-successful insertion sent SNS notification.
import mysql.connectorimport mysql.connector.errorsimport astimport boto3s3_client = boto3.client('s3')sns_client = boto3.client('sns')def lambda_handler(event,context): bucket = event['Records'][0]['s3']['bucket']['name'] json_file_name = event['Records'][0]['s3']['object']['key'] json_object = s3_client.get_object(Bucket=bucket,Key=json_file_name) file_reader = json_object['Body'].read().decode("utf-8") file_reader = ast.literal_eval(file_reader) print(file_reader) try: connection = mysql.connector.connect(user='userr', password='password', host='EC2_public_IP', port=3306,database ='dbname') if connection.is_connected(): print("connection is done ") cursor = connection.cursor() for obj in file_reader: query = "INSERT INTO data1(Name, Email,phone)VALUES(%s,%s,%s)" val = (obj['Name'], obj['Email'], obj['phone']) cursor.execute(query, val) connection.commit() print('inserted') cursor.close() sns_client.publish(TopicArn='Topic_arn', Message='Data is successfully inserted into mysql database', Subject='Data insertion') except: sns_client.publish(TopicArn='Topic_arn', Message='Data is not successfully inserted into mysql database', Subject='Data not insert')In the above code enter the values for database user name and password, Host IP and SNS ARN.
If we upload this code in lambda then it will not run because we have to package the libraries for module, mysql-connector-python.
Create package for lambda
For this we have install the module dependencies in a folder using Windows PowerShell.
We first create a folder with name module on desktop. Using windows PowerShell we direct into the module folder and run command:
"cd .\Desktop\"

From desktop to folder module we use command:
"cd .\module\"
Now we are in the module folder. So, we install the dependencies in this folder using command:
"pip install -t $PWD mysql-connector-python"

Now create a lambda_function.py file and paste the above code with the desired changes(username, password and Host).

Make a .zip file of this folder and upload it in lambda function.

Navigate to lambda function and upload the .zip file there.

Testing
Now its time to test our system. For this create a .JSON file and upload it on the S3 bucket. If data of JSON file is successfully uploaded into the MYSQL database you will receive an email.

If there will be some error and data is not inserted then we will get an email.

Original Link: https://dev.to/roshannadeem1/aws-lambda-s3sns-automate-json-file-processing-from-s3-bucket-and-push-data-in-mysql-using-lambda-python-4ofo
Dev To
More About this Source Visit Dev To