
An Interest In:
Web News this Week
- April 2, 2024
- April 1, 2024
- March 31, 2024
- March 30, 2024
- March 29, 2024
- March 28, 2024
- March 27, 2024
Some of Our Sources
- Slashdot
- The Logo Smith
- Fuel Your Creativity
- Crazy Leaf Design
- Freelance Switch
- Web Resource Source
- Android Headlines
- Willems Lab
- Dev To
- Hashedout
Help Webnuz
Referal links:
The essentials for Flutter front-end developers
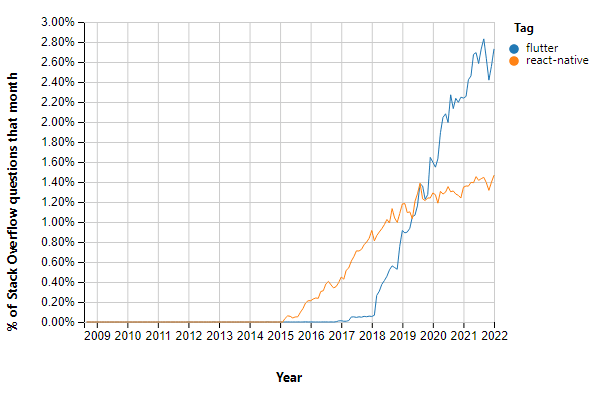
Flutter is recognized as the most popular frontend framework used by mobile app developers as it allows them to develop cross-platforms fast with good performance. In addition, many developers have already adopted Flutter as the main framework used for mobile app development, and the number is going up even now. The graph below proves its popularity.
If you are considering learning Flutter, there are a number of key things that you should know to be a skillful Flutter mobile developer. Lets go through the list below to have a better idea about what you need to learn to be a Flutter developer.
7 Key Essentials
As a frontend developer using Flutter, there are a few essential concepts and skills that you should familiarize yourself with, such as:
1. Dart
The very first thing you should know before learning Flutter is Dart. Dart is a programming language developed by Google that is used to build applications for the web, mobile, desktop, and backend. Flutter, Google's mobile app development framework, is built on top of Dart, becoming familiar with Dart is necessary for Flutter development.
Below are some of the resources relating to Dart:
The official Dart website
The official Dart website has a wealth of information about Dart, including tutorials, documentation, and examples. If you are fairly new to Dart, this may be a good place to start.
The Dart documentation
The Dart documentation is a comprehensive resource that covers all aspects of the language, including its syntax, semantics, and libraries. Also another resource for becoming familiar with the language.
The Flutter documentation
The Flutter documentation includes a section on Dart that covers the language features and libraries that are most relevant to Flutter development.
Online courses and tutorials
There are many online courses and tutorials that can help you learn Dart, such as the Dart programming language tutorial on Udemy. If you are having trouble coming up with a curriculum yourself, its also highly recommended to check our classes to get ideas on how to list the curriculums.
Books
There are also several books that you can refer to when learning Dart. One of the recommendations is "Dart for Absolute Beginners" by David Kopec (https://www.packtpub.com/application-development/dart-absolute-beginners).
2. Widgets
In Flutter, everything is a widget. Image, icon, text, and even row, column, and padding are all considered widgets in Flutter. Understanding how to use and compose different types of widgets is essential for building Flutter apps.
Lets look at the example below:
import 'package:flutter/material.dart';void main() { runApp( MyApp(), );}class MyApp extends StatelessWidget { @override Widget build(BuildContext context) { return MaterialApp( home: Scaffold( body: Center( child: RaisedButton( onPressed: () { // Do something when the button is pressed }, child: Text('Press me'), ), ), ), ); }}This code defines a Flutter app with a single-button widget. When the button is pressed, it will trigger the onPressed callback function, which can be used to perform some action.
The RaisedButton widget is a material design button that is elevated above the surface of the parent widget. It has some customization options, including the ability to change the text, color, and shape of the button.
The RaisedButton widget cannot be used alone, and it should be used together with the Layout widget that can set its location.
To have a better idea about the Flutter widgets, we suggest you explore the widget index provided by Flutter.
3. Layout
Flutter provides several layout widgets, such as Container, Row, and Column, that you can use to arrange and size your app's user interface elements. Here are examples of container, row, and column Flutter widget codes.
Container( width: double.infinity, height: 200, color: Colors.red, child: Text('Hello World'),)Row( mainAxisAlignment: MainAxisAlignment.center, children: [ Container( width: 100, height: 100, color: Colors.red, ), Container( width: 100, height: 100, color: Colors.green, ), Container( width: 100, height: 100, color: Colors.blue, ), ],)Column( mainAxisAlignment: MainAxisAlignment.center, children: [ Container( width: 100, height: 100, color: Colors.red, ), Container( width: 100, height: 100, color: Colors.green, ), Container( width: 100, height: 100, color: Colors.blue, ), ],)The Container widget is a box that can contain other widgets. In the examples above, the Container widgets are used to display colored boxes.
The Row widget displays its children in a horizontal line, and the Column widget displays its children in a vertical line. In the examples above, the Row and Column widgets are used to arrange the colored boxes in a grid.
You may refer to the Flutter resources provided below:
https://api.flutter.dev/flutter/widgets/Container-class.html
https://api.flutter.dev/flutter/widgets/Row-class.html
https://api.flutter.dev/flutter/widgets/Column-class.html
4. Styling
Flutter provides a number of ways to style your app's user interface, including using theme data, inline styles, and custom widgets.
Here is an example of how you can use Flutter's TextStyle class to define styles for text in the app:
TextStyle myTextStyle = TextStyle( fontSize: 18, color: Colors.black, fontWeight: FontWeight.w600, fontStyle: FontStyle.italic, decoration: TextDecoration.underline, decorationColor: Colors.red, decorationStyle: TextDecorationStyle.dashed,);This TextStyle object defines a style with a font size of 18, a black color, a font-weight of 600, an italic font style, and an underline decoration that is dashed and red.
You can then use this TextStyle object to style a Text widget like this:
Text('Hello World', style: myTextStyle),This will display the text "Hello World" with the style defined by the myTextStyle object.
You can also use the Theme widget to define a set of default text styles that can be used throughout your app. For example:
Theme( data: ThemeData( textTheme: TextTheme( headline1: TextStyle(fontSize: 72, fontWeight: FontWeight.bold), headline2: TextStyle(fontSize: 36, fontStyle: FontStyle.italic), bodyText1: TextStyle(fontSize: 14, color: Colors.black), bodyText2: TextStyle(fontSize: 14, color: Colors.grey), ), ), child: YourApp(),)This Theme widget defines four text styles: headline1, headline2, bodyText1, and bodyText. These styles can be accessed using the TextTheme class and applied to Text widgets using the style parameter.
For example:
Text('Hello World', style: Theme.of(context).textTheme.headline1),Here's a link for you to learn more about various style widgets applicable to your Flutter projects.
https://api.flutter.dev/flutter/package-path_path/Style-class.html
5. Interactivity
Flutter provides a number of ways to add interactivity to your app, including handling user input, making HTTP requests, and navigating between screens.
Here is an example of how you can handle user input in Flutter using a TextField widget:
TextField( decoration: InputDecoration( hintText: 'Enter your name', ), onChanged: (String value) { // This callback is called whenever the user types something in the text field print('User typed: $value'); }, onSubmitted: (String value) { // This callback is called when the user submits the form (e.g. by pressing the Enter key) print('User submitted: $value'); },)This code creates a text field with a hint text that says "Enter your name". The onChanged callback is called whenever the user types something in the text field, and the onSubmitted callback is called when the user submits the form (e.g. by pressing the Enter key).
In the example above, the onChanged and onSubmitted callbacks simply print the user's input to the console. You can use these callbacks to perform any actions you want, such as validating the input, displaying an error message, or sending the input to a server.
6. Testing
It's important to test your Flutter app to ensure that it works as expected and to catch any bugs. Flutter provides a number of tools for testing your app, including unit tests and integration tests.
For more information on these, look at the links below:
https://docs.flutter.dev/cookbook/testing/unit/introduction
https://docs.flutter.dev/cookbook/testing/integration/introduction
7. Debugging
Debugging is an essential part of the development process, and Flutter provides a number of tools and techniques for debugging your app, including the Flutter debugger and the ability to print debug messages to the console.
To briefly understand how to use the debugging tool provided by Flutter, watch the video below:
Are the essentials mentioned above enough for developers to create a decent UI?
Developing a user interface (UI) with Flutter can be relatively straightforward, but developing a complex or highly customized UI can still be challenging. It may take some time and practice to get familiar with the available widgets and how to use them effectively to code complex UI, but even an experienced Flutter developer takes 2-3 hours per simple screen and 4-6 hours per complex screen. Is there any way to shorten the time to develop a UI screen with Flutter?
Suggested Solution: FUNCTION12
FUNCTION12 is a developer productivity tool that can convert Figma UI design into Flutter code. It can dramatically shorten the time taken to develop a UI screen, as it analyzes and interprets objects styles, layouts, text, and images in the design into a clean Flutter code within a minute.
If you are curious to learn more about FUNCTION12, please take time to read on the blogs as well.
Final Words
To remind you once again, we have listed a number of essentials for Flutter developers and not All-you-need-to-know. To become more skillful and proficient in Flutter coding, the essentials mentioned above alone may not be enough.
Our suggestion for you is to keep learning while involving yourself in various Flutter development projects. The knowledge you accumulate and the practices you do will improve your coding skills. Eventually, you may be one of the most talented Flutter developers in the world.
We hope our suggestions are helpful. Good luck with your Flutter development!
Original Link: https://dev.to/function12_io/the-essentials-for-flutter-front-end-developers-5dk8
Dev To
More About this Source Visit Dev To