
An Interest In:
Web News this Week
- April 24, 2024
- April 23, 2024
- April 22, 2024
- April 21, 2024
- April 20, 2024
- April 19, 2024
- April 18, 2024
Some of Our Sources
- BoingBoing
- Techcrunch
- The Logo Smith
- Smashing Apps
- Vandelay Design
- Inspiredology
- 24 Ways
- Android Headlines
- Daily Now
- The Verge
Help Webnuz
Referal links:
Quickstart: Getting Started With HashiCorp Nomad
Everyone loves Kubernetes, right? Well, no not right, but it is one of the most popular container orchestrators out there.
However, its not the only orchestrator to manage containers.
One of the up and coming orchestrators that organizations are beginning to adopt is HashiCorp Nomad.
In this blog post, youll learn about what Nomad is, why its useful, and how to deploy it.
Whats Nomad?
First, what is Nomad? Is it any different than Kubernetes or Elastic Container Service (ECS) or Docker Swarm?
Technically, theyre all the same. At a high level, the job of an orchestrator is to schedule, scale and self-heal workloads. Those workloads are typically containers.
So yes and no - Nomad is different, but its the same.
Nomad actually gives you the ability to not only deploy, schedule, and scale containers, but virtualized applications as well. This is something that Kubernetes currently cannot do (unless you use kube-virt) out of the box, so its a great method if you have workloads outside of containers.
Nomad is an orchestrator that was created by HashiCorp. Although adoption hasnt been ridiculously fast, there are definitely organizations that are now beginning to look at Nomad and adopt it.
Deploying Nomad
Now that you know what Nomad is (at a high level), lets learn how to install it.
First, ensure that your Linux distro is up to date. For the purposes of this blog, Ubuntu will be used.
sudo apt update -yNext, download the release repo.
curl -fsSL [https://apt.releases.hashicorp.com/gpg](https://apt.releases.hashicorp.com/gpg) | sudo apt-key add -Add the HashiCorp repo to Aptitude.
sudo apt-add-repository "deb [arch=amd64] [https://apt.releases.hashicorp.com](https://apt.releases.hashicorp.com/) $(lsb_release -cs) main"Update the repo and install Nomad.
sudo apt-get update && sudo apt-get install nomadNext, download the Container Network Interface (CNI).
curl -L -o cni-plugins.tgz [https://github.com/containernetworking/plugins/releases/download/v1.0.1/cni-plugins-linux-amd64-v1.0.1.tgz](https://github.com/containernetworking/plugins/releases/download/v1.0.1/cni-plugins-linux-amd64-v1.0.1.tgz)Create a new directory for the CNI.
sudo mkdir -p /opt/cni/binExtract the CNI binary and move it to the directory that you created previously.
sudo tar -C /opt/cni/bin -xzf cni-plugins.tgzStart the agent. The command below runs Nomad in a dev environment and should be used for experimental use only.
sudo nomad agent -dev -bind 0.0.0.0 -log-level INFOOpen up a website over port 4646 on the IP address of the Linux server that you installed Nomad on.
You should now see Nomad running.

Deploying An App
Once the cluster is up, lets deploy an application.
You have a few options to deploy apps (like apps that arent containerized), but to keep things simply, lets use an Nginx docker image to deploy.
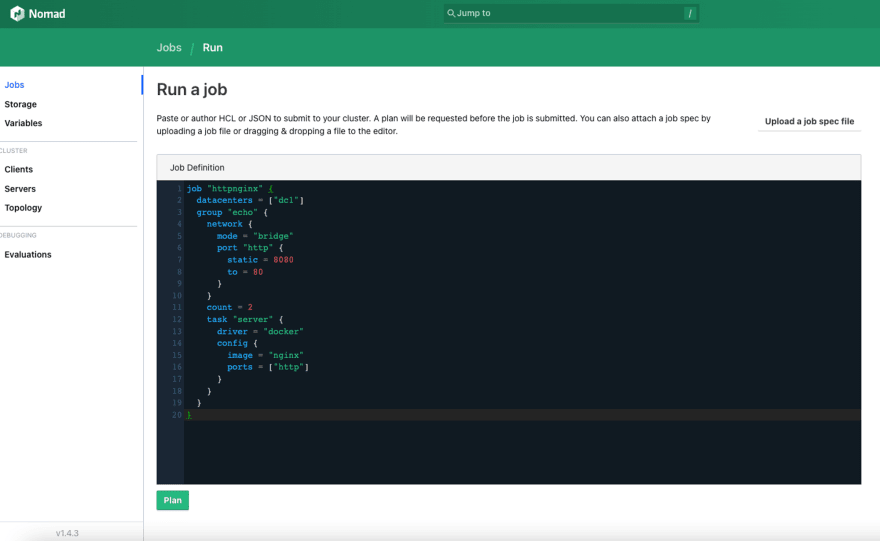
The code below indicates:
- Where you want the Job deployed.
- The port that the containerized app should be available on.
- The replica count.
- The container image.
job "httpnginx" { datacenters = ["dc1"] group "echo" { network { mode = "bridge" port "http" { static = 8080 to = 80 } } count = 2 task "server" { driver = "docker" config { image = "nginx" ports = ["http"] } } }}You have two options to deploy the job.
First, you can use the UI and paste in the code above.
If youd prefer to use the CLI, you can save the code above in an hcl file and use the nomad run command.
nomad run nginx.hclYoull now see that the job is running successfully.

That's how you can get started in just a few minutes with Nomad! Thanks for reading.
Original Link: https://dev.to/thenjdevopsguy/quickstart-getting-started-with-hashicorp-nomad-2f30
Dev To
More About this Source Visit Dev To