
An Interest In:
Web News this Week
- April 18, 2024
- April 17, 2024
- April 16, 2024
- April 15, 2024
- April 14, 2024
- April 13, 2024
- April 12, 2024
Some of Our Sources
- Joshua Blankenship
- The Logo Smith
- Fuel Your Creativity
- Web Designer Depot
- Noupe
- CSS Globe
- Stylized Web
- Wal You
- Design Modo
- Hashedout
Help Webnuz
Referal links:
Create a Paywall on a Next.js Blog Using FingerPrint and Sanity
This article was originally posted on Hackmamba
A Paywall is a system that restricts user access to a particular web content till the user subscribes to it. We can find paywalls on journals, blogs, and daily newspaper sites.
In this post, we'll implement a paywall on a blog using Fingerprint.js, Sanity, and Next.js. The paywall will block users from accessing the blog posts when the user has opened more than three posts.
Fingerprint is a browser fingerprinting software that accurately retrieves a user's browser information. Then use the information to assign a unique identifier to this user even in a private/incognito browsing mode.
We will fetch the blog page contents from Sanity; however, this post will not cover how to set up content in Sanity, but we can quickly watch this video resource about getting started with Sanity. Also, we will use Firebase to store visitor activities while on the page, learn how to get started with firebase quickly from this resource.
This is a live project Demo, and the complete source code can be found in this GitHub Repository.
Prerequisites
This post requires the following:
- Experience with JavaScript and React.js
- Installation of Node.js
- A Fingerprint account. Signup is free!
Getting Started with Next.js
Next.js is a React-based frontend development framework that supports server-side rendering and static site generation.
Run the following command in the terminal to create a new Next.js application:
npx create-next-app blog-paywallThe above command creates a starter next.js application in the blog-paywall folder.
Next, we'll navigate into the project directory and start the application with the following commands:
cd blog-paywall # to navigate into the project directorynpm run dev # to run the dev serverNext.js will start a live development server at http://localhost:3000.
Setting up Fingerprint.js
Login to fingerprint and click the + NEW APPLICATION button, choose the app name, provide a domain and click the CREATE button.

On the next screen, review the app details and proceed to create the app
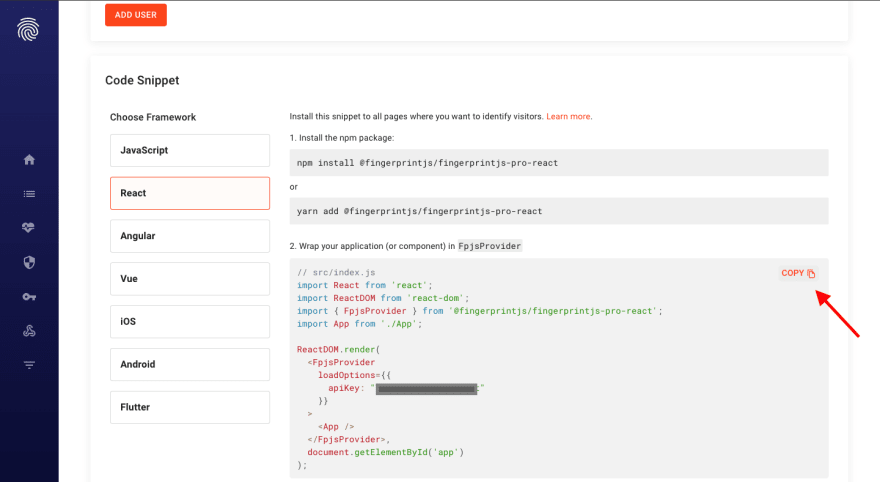
From the homepage, click on the **settings icon**, and select **Account settings**. On the next screen, scroll down, and navigate to **R****eact**; copy the snippets and save them it will come in handy when building our application.

Building the Blog Paywall
Well start by installing the following npm packages:
- fingerprint.js and firebase .
- @sanity/image-url and @sanity/block-content-to-react
- bootstrap and react-bootstrap.
Install the above dependencies with the command below:
npm install @fingerprintjs/fingerprintjs-pro-react firebase @sanity/image-url @sanity/block-content-to-react bootstrap react-bootstrap Next, in the root directory of our project, go to the pages folder and modify the _app.js file with the snippets we got from fingerprint like shown below:
// pages/_app.js import "../styles/globals.css"; import { FpjsProvider } from "@fingerprintjs/fingerprintjs-pro-react"; function MyApp({ Component, pageProps }) { return ( <FpjsProvider loadOptions={{ apiKey: "<Your API Key>", }} > <Component {...pageProps} /> </FpjsProvider> ); } export default MyApp;Here, we imported FpjsProvider, used to wrap our topmost component, and passed our API Key to it.
Fetching and Rendering Blog Posts
Let's clean up the index.js file and update it with the following snippets:
// pages/index.js import styles from "../styles/Home.module.css"; export const getStaticProps = async (pageContext) => { const allPosts = encodeURIComponent(`*[ _type == "post"]`); const url = `https://dlwalt36.api.sanity.io/v1/data/query/production?query=${allPosts}`; const getPosts = await fetch(url).then((res) => res.json()); if (!getPosts.result || !getPosts.result.length) { return { posts: [], }; } else { return { props: { posts: getPosts.result, }, }; } }; export default function Home({ posts }) { return ( <div className={styles.main}> <h1>Welcome to Blog Page</h1> </div> ); }In the snippets above, we fetched our blog post contents from Sanity with the getStaticProps() function and returned the response so that the Home component could access it.
Next, lets read the post contents with the following snippets:
// pages/index.js import styles from "../styles/Home.module.css"; import { useEffect, useState } from "react"; import { useRouter } from "next/router"; import imageUrlBuilder from "@sanity/image-url"; export default function Home({ posts }) { const [receivedPosts, setReceivedPosts] = useState([]); const router = useRouter(); useEffect(() => { if (posts.length) { const imgBuilder = imageUrlBuilder({ projectId: "<YOUR PROJECY_ID>", dataset: "production", }); setReceivedPosts( posts.map((post) => { return { ...post, mainImage: imgBuilder.image(post.mainImage), }; }) ); } else { setReceivedPosts([]); } }, [posts]); // return() function here }In the snippets above, we:
- Imported
useState,useEffect,useRouter, andimageUrlBuilder; used theuseStateand createdreceivedPostsstate constant. - Created a constant
router, called theuseRouter()function on it, looped through the posts data, and updated thereceivedPostsstate.
Lets display the blog post on the front end. Modify the index.js file with the following snippets:
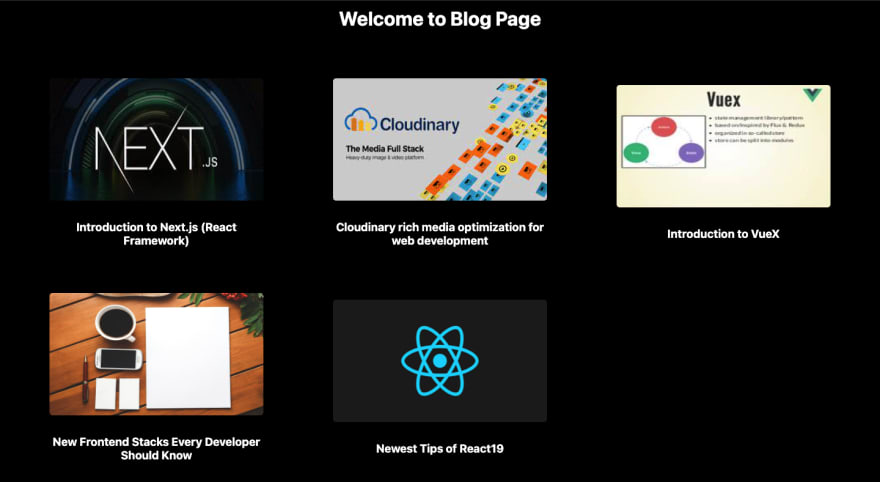
//pages/index.js //imports here export default function Home({ posts }) { const [receivedPosts, setReceivedPosts] = useState([]); const router = useRouter(); // useEffect() function here return ( <div className={styles.main}> <h1>Welcome to Blog Page</h1> <div className={styles.feed}> {receivedPosts.length ? ( receivedPosts.map((post, index) => ( <div key={index} className={styles.post} onClick={() => router.push(`/post/${post.slug.current}`)} > <img className={styles.img} src={post.mainImage} alt="post thumbnail" /> <h3>{post.title}</h3> </div> )) ) : ( <>No Posts</> )} </div> </div> ); }Here, we used conditional rendering, looped through the receivedPosts state, and displayed the blog posts in return() function.
In the browser, well have the application like the below:
Adding Dynamic Route
We want to open each post and view its content. In the pages directory, lets create a post folder and create a [slug].js file for dynamic routing with the following snippets:
// pages/post/[slug].js const BlockContent = require("@sanity/block-content-to-react"); import SyntaxHighlighter from "react-syntax-highlighter"; import { useEffect, useState } from "react"; import { useRouter } from "next/router"; import imageUrlBuilder from "@sanity/image-url"; import styles from "../../styles/Home.module.css"; import { useVisitorData } from "@fingerprintjs/fingerprintjs-pro-react"; import { updateDoc, doc, arrayUnion, setDoc, getDocFromServer, } from "firebase/firestore"; import { db } from "../../Utils"; export const getServerSideProps = async (pageContext) => { const pageSlug = pageContext.query.slug; const particularPost = encodeURIComponent( `*[ _type == "post" && slug.current == "${pageSlug}" ]` ); const url = `https://<YOUR PROJECT_ID>}.api.sanity.io/v1/data/query/production?query=${particularPost}`; const postData = await fetch(url).then((res) => res.json()); const postItem = postData.result[0]; if (postItem) { return { props: { title: postItem.title, image: postItem.mainImage, body: postItem.body, slug: postItem.slug.current, }, }; } else { return { notFound: true, }; } }; export default function Post({ title, body, image, slug }) { const [modal, setModal] = useState(false); const [updated, setUpdated] = useState(false); const [visitTimes, setVisitTimes] = useState(0); const [imageUrl, setImageUrl] = useState(); const { getData } = useVisitorData({ immediate: true }); const router = useRouter(); return ( <> <h1>Hello from single post </h1> </> ); }In the snippets above:
BlockContentandSyntaxHighlighter- to help us render the post contents and the code snippets.useStateanduseEffecthooks from "react" anduseRouterfrom "next/router."- We imported
imageUrlBuilderto handle the blog post images anduseVisitorDatato track users' information. - We imported different methods from "firebase/firestore" and
dbfrom our firebase configuration in theUtils.jsfile.
In the getServerSideProps() function, we fetched our blog content again from Sanity and returned the response.
We destructured the title, body, image, and slug and created modal, updated, visitTimes, and imageUrl constants with the useState hook in the Post component function.
Furthermore, we destructured getData from useVisitorData, created a constant router, and called the useRouter() function on it.
Next, we'll use the properties we destructured from the Post component function and implement the single post page. Update the [slug].js file with the following snippets:
//pages/post/slug.js const BlockContent = require("@sanity/block-content-to-react"); // imports here // getServerSideProps() function here function Post({ title, body, image, slug }) { // constants here useEffect(() => { const imgBuilder = imageUrlBuilder({ projectId: "<your project_id>", dataset: "production", }); setImageUrl(imgBuilder.image(image)); }, [image]); const serializers = { types: { code: (props) => ( <div className="my-2"> <SyntaxHighlighter language={props.node.language}> {props.node.code} </SyntaxHighlighter> </div> ), }, }; // return() function here } export default Post;In the snippets above:
- We used the
imageUrlBuilderto quickly generate image URLs from Sanity image records and set ourimageUrlto the generated image in theuseEffect()function. - Created
serializerobject inside it and usedSyntaxHighlighterto highlight code snippets in the post content.
Now in the return function, lets display the post contents and update the [slug].js file with the following snippets:
// pages/post/[slug].js const BlockContent = require("@sanity/block-content-to-react"); // imports here // getServerSideProps() function here function Post({ title, body, image, slug }) { // constants here // useEffect() function here // serializer object here return ( <> <div className={styles.postItem}> <div className={styles.postNav} onClick={() => router.push("/")}> ← </div> {imageUrl && <img src={imageUrl} alt={title} />} <div> <h1> <strong>{title}</strong> </h1> </div> <div className={styles.postBody}> <BlockContent blocks={body} serializers={serializers} imageOptions={{ w: 320, h: 240, fit: "max" }} projectId={"Your project_ID"} dataset={"production"} /> </div> </div> </> ); } export default Post;Here, we displayed the blog post title and Image, used BlockContent to show the post body, and passed serializers to it.
Now, a user can click on a particular post and view its contents in the browser.

Storing User Activity in Firebase
Well track the user information using fingerprint and save the user ID and posts visited on Firebase. Learn how to store and retrieve data and configure Firebase in this resource.
When a user visits up to three posts, a Paywall will block the user till the user subscribes. Update the [slug].js file with the following snippets:
// pages/post/[slug].js const BlockContent = require("@sanity/block-content-to-react"); // imports here // getServerSideProps() function here function Post({ title, body, image, slug }) { // constants here useEffect(() => { visitedTimes(); const imgBuilder = imageUrlBuilder({ projectId: "<your project_id>", dataset: "production", }); setImageUrl(imgBuilder.image(image)); }, [image, updated, modal]); // serializer object here const visitedTimes = async () => { await getData().then(async (visitor) => { const visited = { visitorId: visitor.visitorId, visitedPostId: slug, }; const { visitorId, visitedPostId } = visited; const visitorRef = doc(db, "visitors", `${visitorId}`); const documentSnap = await getDocFromServer(visitorRef); if (documentSnap.exists()) { await updateDoc(visitorRef, { visitedPosts: arrayUnion(visitedPostId), }); setUpdated(true); if (documentSnap.data().visitedPosts.length >= 3) { setModal(true); } setVisitTimes(documentSnap.data().visitedPosts.length); } else { setDoc(visitorRef, { visitedPosts: visitedPostId, }); } }); }; //return() function here } export default Post;Here, we created the visitedTimes() function that will get the user ID and posts visited and save them in firebase. When the user reads up to three posts, the function updates the modal state to true.
Adding a Paywall
In the return() function, lets conditionally render the paywall to block the user when more than three posts are visited.
// pages/post/[slug].js //Other imports here import Modal from "react-bootstrap/Modal"; import Link from "next/link"; //getSeverSideProps() function here function Post({ title, body, image, slug }) { // constants here // visitedTimes() function here // useEffect() function here //serializers object here return ( <> {visitTimes >= 3 && modal ? ( <Modal centered show={modal} onHide={() => window.location.href("/")} animation={true} > <Modal.Header> <Modal.Title>Modal heading</Modal.Title> </Modal.Header> <Modal.Body> Oops! Seems you have exceeded your allocated free articles. You can get back by subscribing </Modal.Body> <Modal.Footer> <Link role="button" className="btn btn-secondary" href="/"> Go Home </Link> <Link className="btn btn-secondary" href="#"> Pay Now </Link> </Modal.Footer> </Modal> ) : ( <div className={styles.postItem}> //single post here </div> )} </> ); } export default Post;In the snippets above, we imported Link from "next/link" and Modal from "bootstrap/Modal" and conditionally rendered the Modal in the components' return() function.
Now, the Paywall will block the user from reading the blog posts after the third one.

Conclusion
This post discussed adding a Paywall in a Next.js blog with fingerprint and firebase.
Resources
The following resources might be helpful:
Original Link: https://dev.to/hackmamba/create-a-paywall-on-a-nextjs-blog-using-fingerprint-and-sanity-4kf7
Dev To
More About this Source Visit Dev To