
An Interest In:
Web News this Week
- April 16, 2024
- April 15, 2024
- April 14, 2024
- April 13, 2024
- April 12, 2024
- April 11, 2024
- April 10, 2024
Some of Our Sources
- BoingBoing
- Techcrunch
- TutsPlus - Code
- Smashing Magazine
- You The Designer
- Fuel Your Creativity
- Web Design Ledger
- Specky Boy
- Android Headlines
- Willems Lab
Help Webnuz
Referal links:
Building a Full-Stack App With t3 [2023]
Hi everyone! Recently I was recommended to look into full-stack t3 to bootstrap my next project. I've already been exposed to most of these tech individually but I figured it'd be good practice to stay fresh with what's trending.
I decided to dive in and create a sample project by following some tutorials on dev.to only to notice that some tutorials created within the past year are already outdated.
So let's get start the new year right and create a full-stack blog where this article can live.
Getting Started
The t3 docs provide us npm, yarn, and pnpm installations, it doesn't matter which one you use but I'll be using yarn create t3-app
- titled: blog
- TypeScript
- nextAuth, prisma, tailwind, trpc

We're given the next steps:
cd blogyarn prisma db pushyarn dev
but wait! I plan on creating this project using postgresql, so I will be changing some settings first.
- change the provider to
postgresql - uncomment db.Text where listed (3 sections for next Auth)
// prisma/schema.prismadatasource db { provider = "postgresql" // NOTE: When using postgresql, mysql or sqlserver, uncomment the @db.Text annotations in model Account below // Further reading: // https://next-auth.js.org/adapters/prisma#create-the-prisma-schema // https://www.prisma.io/docs/reference/api-reference/prisma-schema-reference#string url = env("DATABASE_URL")}model Example { id String @id @default(cuid()) createdAt DateTime @default(now()) updatedAt DateTime @updatedAt}// Necessary for Next authmodel Account { id String @id @default(cuid()) userId String type String provider String providerAccountId String refresh_token String? @db.Text access_token String? @db.Text expires_at Int? token_type String? scope String? id_token String? @db.Text session_state String? user User @relation(fields: [userId], references: [id], onDelete: Cascade) @@unique([provider, providerAccountId])}Next we want to determine whether we want to work on a local database or create one on something like Railway.
For the sake of developing locally - I'll be creating a local db until it's time for deployment (Railway creation will be included at the bottom).
The final step before we run yarn prisma db push is to change our .env DATABASE_URL= to our local postgres database.DATABASE_URL=postgres://[USER]:[PASSWORD]@localhost:5432/blog
(I created a database titled blog)
Now we can finally run yarn prisma db push

Okay, that seemed like a lot, but there's a few more things we need to set up before we're able to get to the good stuff!
I'm not sure when Discord became the standard for auth - but it seems like the default for NextAuth - and we'll be sticking to it for this tutorial.
Navigate to Discord Developer Portal and create a new application.

Navigate to the newly created application and click OAuth2 on the left tab
copy the Client Id and Client Secret (click on reset secret to show the secret key) into our .env 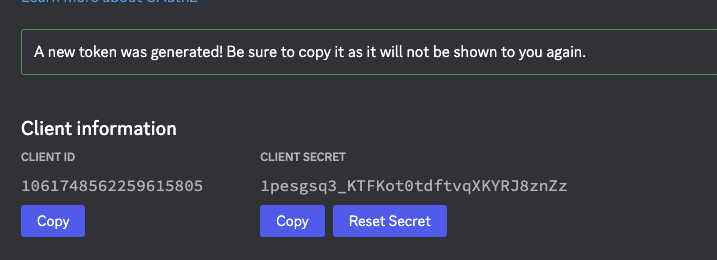

Set the redirect link as so - this is to let Discord know where the login requests are coming from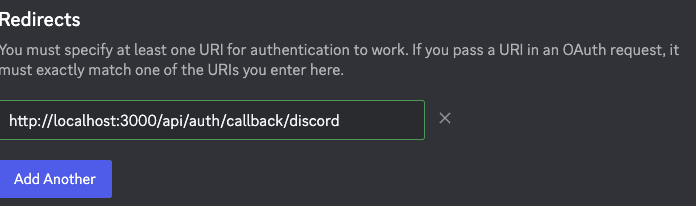
Lastly, we'll need to set NEXT_AUTH_SECRET to a random string (I just followed the openssl command provided in the .env file).
Alright, we're good to start coding now!
Database Setup
One of the tech I really wanted to get experience with was Prisma, so I wanted to approach this in the most thorough way possible.
First thing I did was remove the example entry and include a Post entry for a blog 
For a blog post - the only thing I'll really need are the body and title, but we'll need to create a one-to-many relation where a user can have many posts
We'll run npx prisma migrate dev --name removeExampleAddPostField in order to create the migration file and apply it to our database.
Frontend
The goal is to get a full-stack application working, not make it look beatiful, so I'm just going to focus on getting the app up and running.
Let's get the application started by running yarn dev
- I deleted the excess from /index.tsx and added some login tools
import { type NextPage } from "next";import { signIn, signOut, useSession } from "next-auth/react";const Home: NextPage = () => { const { data: session } = useSession(); return ( <main> <div className="flex justify-center pt-10"> <div className="text-xl">Rikes Blog Powered by t3</div> </div> <div className="flex justify-end pr-10"> {session?.user ? ( <button onClick={() => signOut()}> Log Out of {session.user.name} </button> ) : ( <button onClick={() => signIn()}>Login with Discord</button> )} </div> </main> );};export default Home;Now navigate to http://localhost:3000/ and check out our amazing website - go ahead and give it a shot and you should be able to login
If you want to see what the backend is doing - navigate to your terminal (make sure you're in your project directory) and in a new window enter npx prisma studio. Click on user and you should be able to see your newly created account!
Routes
Now that our frontend is working and we're able to login, let's start working with some route creation. For some basic CRUD operations, we need to be able to get all posts and create posts, so two major routes.
- Create a new file called 'Post.ts' under the routers folder
/server/api/routers/Post.ts - Create an initial getAll function
import { createTRPCRouter, publicProcedure } from "../trpc";export const postRouter = createTRPCRouter({ getAll: publicProcedure.query(({ ctx }) => { return ctx.prisma.post.findMany(); }),});- Create a newPost function
import { z } from "zod";import { createTRPCRouter, protectedProcedure, publicProcedure } from "../trpc";export const postRouter = createTRPCRouter({ getAll: publicProcedure.query(({ ctx }) => { return ctx.prisma.post.findMany(); }), newPost: protectedProcedure .input( z.object({ user: z.string(), title: z.string(), body: z.string(), }) ) .mutation(async ({ ctx, input }) => { try { await ctx.prisma.post.create({ data: { userId: input.user, title: input.title, body: input.body, }, }); } catch (error) { console.log(error); } }),});Note: we use zod as a validator so our data is clean :)
- Navigate to root.ts
server/api/root.ts
import { createTRPCRouter } from "./trpc";import { postRouter } from "./routers/Post";/** * This is the primary router for your server. * * All routers added in /api/routers should be manually added here */export const appRouter = createTRPCRouter({ post: postRouter,});// export type definition of APIexport type AppRouter = typeof appRouter;And voila, we've created functions to get all posts and create new posts! Time to plug them in.
Let's create some React components so that we're able to store and create new posts. Here's the simple way I did it to handle a text area, title input and submit
import { type NextPage } from "next";import { signIn, signOut, useSession } from "next-auth/react";import { useState } from "react";import { api } from "../utils/api";const Home: NextPage = () => { const { data: session } = useSession(); return ( <main> <div className="flex justify-center pt-10"> <div className="text-xl">Rikes Blog Powered by t3</div> </div> <div className="flex justify-end pr-10"> {session?.user ? ( <button onClick={() => signOut()}> Log Out of {session.user.name} </button> ) : ( <button onClick={() => signIn()}>Login with Discord</button> )} </div> <Blog /> {session?.user ? ( <Entry user={session.user} /> ) : ( <div>Please Login to make a new entry</div> )} </main> );};const Blog: NextPage = () => { const { data: blogPosts } = api.post.getAll.useQuery(); return ( <div className="p-20"> {blogPosts?.map((post, indx) => ( <div className="rounded-lg border p-10" key={indx}> <div className="flex justify-center pb-10 font-bold"> {post.title} </div> <div>{post.body}</div> </div> ))} </div> );};const Entry: NextPage<{ user: any }> = ({ user }) => { // const session = useSession() const [post, setPost] = useState(""); const [title, setTitle] = useState(""); const newPost = api.post.newPost.useMutation(); return ( <div> <form className="flex gap-2" onSubmit={(event) => { event.preventDefault(); // eslint-disable-next-line @typescript-eslint/no-unsafe-member-access newPost.mutate({ user: user.id, body: post, title: "yo" }); setTitle(""); setPost(""); }} > <input type={"text"} value={title} placeholder="title.." onChange={(e) => setTitle(e.target.value)} className="rounded-md border-2 border-zinc-800 bg-neutral-900 px-4 py-2 focus:outline-none" /> <textarea value={post} placeholder="Blog Here..." onChange={(event) => setPost(event.target.value)} className="w-full rounded-md border-2 border-zinc-800 bg-neutral-900 px-4 py-2 focus:outline-none" /> <button type="submit" className="rounded-md border-2 border-zinc-800 p-2 focus:outline-none" > Submit </button> </form> </div> );};export default Home;You should have something like this and you're good to go!
That's pretty much it - thank you to the legend @nexxeln for his initial tutorial as this was just modified for the most updated version of trpc/t3.
I wanted to include how to connect to railway but you can check out @nexxeln tutorial to plug in quicker.
Leave any questions you may have below and I'll get around to them!
Original Link: https://dev.to/rike/building-a-full-stack-app-with-t3-2023-2of5
Dev To
More About this Source Visit Dev To