
An Interest In:
Web News this Week
- March 20, 2024
- March 19, 2024
- March 18, 2024
- March 17, 2024
- March 16, 2024
- March 15, 2024
- March 14, 2024
Some of Our Sources
- Slashdot
- BoingBoing
- Techcrunch
- Team Treehouse
- Joshua Blankenship
- You The Designer
- Fuel Your Creativity
- FanExtra - PSD
- Willems Lab
- Dev To
Help Webnuz
Referal links:
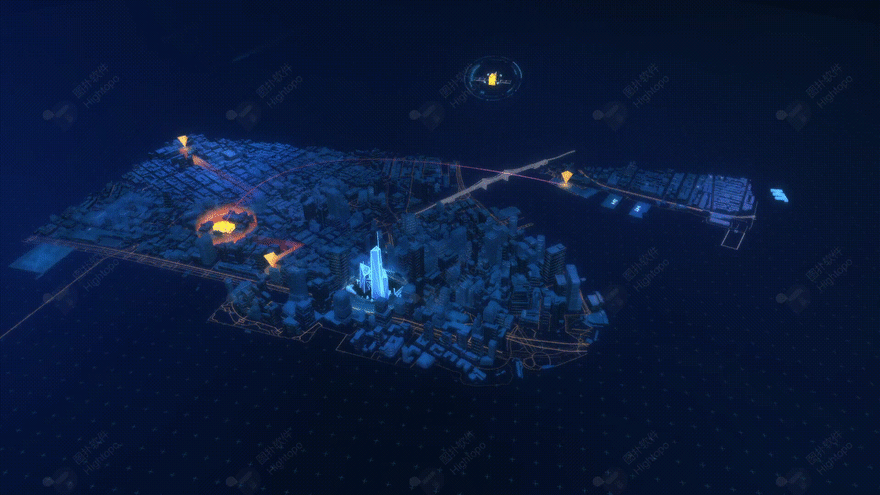
Building 3D Smart City Based on JavaScript and WebGL
With the enlargement of city size, it is difficult to thoroughly display the city panorama in traditional ways, but with the application of 3D technology, the way of 3D city group appears to present the city panorama dynamically and interactively. With the smart city system, through the way of Web visualization, city managers can more timely understand the traffic conditions, urban fire control, power management and other aspects of operation, and make processing.
This demo uses "HT for Web" graphic engine, a lightweight HTML5/WebGL modelling scheme. Traditional smart buildings/building automation/building security/smart parks often use BIM (Building information modelling) software, such as Revit or Bentley for Autodesk, but these BIM modelling data are often too bulky, with most of the detailed information on the building. Universal self-control has little meaning, but it affects the trend of industry Web SCADA or Web configuration monitoring. So we use the scheme of lightweight HTML5/WebGL modelling with Hightopos HT for Web products to achieve fast modelling, runtime lightweight and even mobile terminal browser to visualize operation and maintenance in 3D.
demo address: https://www.hightopo.com/demo/city/
Preview :
Code Implementation
Load 3d Scene
Create a new 3d scene and add it to the page.
const g3d = new ht.graph3d.Graph3dView();const dm3d = g3d.dm();g3d.addToDOM();The addToDOM function loads the scene into the HTML body by default and fills the window.
Next, the city scene json is deserialized, and the scenes perspective, center position, sky box are set in the callback of the deserialization function, and each meta-information is obtained, calling the startAnim function:
g3d.deserialize('scenes/ny.json', () => { g3d.setEye([1132.8386351821287, 1916.836416970022, 1479.5345608290288]); g3d.setCenter([519.9741236104874, 273.4741921410557, -319.58669041297884]); g3d.setSkyBox(dm3d.getDataByTag('skyBox')); // Primitives for obtaining diffusion effects scaleList.push( dm3d.getDataByTag('scaleBlue'), dm3d.getDataByTag('scaleRed') ); // Start animation startAnim();});Animation Implementation
The loaded city scene is as follows:
We can see the blue and yellow water ripple effect in the scene, the flow effect of roads, fire passages, the effect of floating up and down, and the rotating logo and satellite.
Animations are all implemented through ht.Default.startAnim. Lets start by understanding:
ht.Default.startAnim({ // Number of animation frames frames: 12, // Animation Frame Interval Milliseconds interval: 10, // Animation Slow Function, default to ht.Default.animEasing easing: function(t){ return t * t; }, // Functions called after the animation ends finishFunc: function(){ console.log('Done!') }, // The action function must be provided to implement property changes during animation action: function(v, t){ // This example shows animating a node node from position p1 to position p2 node.setPosition( p1.x + (p2.x - p1.x) * v, p1.y + (p2.y - p1.y) * v ); }});These are Frame-Based animations, in which the user controls the animation effect by specifying the number of frames in the frame animation and the interval animation frame interval parameter.
hts Animation Manual can be consulted: Animation Manual
The following describes the implementation of each effect in turn.
Ripple effect
Preview:
Code:
function waveScale(obj, dlt, max, min) { obj.forEach(node => { // Increase in diffusion radius let s = node.getScaleX() + dlt; // Reset to minimum when diffusion radius is greater than maximum if (s >= max) s = min; // Set zoom values in x,y,z direction node.setScale3d(s, s, s); });}function startAnim() { ht.Default.startAnim({ frames: Infinity, interval: 20, action: () => { // Diffuse Blue and Diffuse Red waveScale(scaleList, dltScale, maxScale, minScale); } });}Rotation effect
Preview:
Code:
function rotateAction(obj, dlt) { // Gets the value of the radius of rotation of the primitive, without zeroing it let rotation = obj.getRotation() || 0; // Radian increase per frame obj.setRotation(rotation + dlt);}function startAnim() { ht.Default.startAnim({ frames: Infinity, interval: 20, action: () => { // Satellite Rotation rotateAction(star, dltRoattion); } });}Flow effect
Preview map:
Flow effect is a very common effect, and the process of implementation is relatively simple, just need to change the offset value of the uv map dynamically. In this example, multiple flow effects are achieved by dynamically increasing or decreasing the U direction of the map on the six sides of the model:
function uvFlow(obj, dlt) { // Change map uv coordinates for flow effect let offset = obj.s('all.uv.offset') || [0, 0]; obj.s('all.uv.offset', [offset[0] + dlt, offset[1]]);}function startAnim() { ht.Default.startAnim({ frames: Infinity, interval: 20, action: () => { // Trail Flow Effect uvFlow(roadSmall, dltRoadSmall); } });}Floating effect
Preview map:
Code:
function blockFloat(obj, dis, dlt) { obj.forEach(node => { let startE = node.a('startE'); if (startE == null) // Gets the value of the primitive in the y (height) direction node.a('startE', startE = node.getElevation()); let float = node.a('float') || 0; // Set status as direction let status = node.a('status') || 1; node.setElevation(startE + dis * float); if (float > 1 || float < 0) // Change direction beyond threshold node.a('status', status = -status); float += dlt * status; // Reset Primitive Height node.a('float', float); });}function startAnim() { ht.Default.startAnim({ frames: Infinity, interval: 20, action: () => { // Floating effect of fire sign blockFloat(fireFloatList, fireFloadDis, fireFloatDlt) } });}In this way, a basic effect is achieved.
HTs 3D urban agglomeration scheme not only works well on the big screen, but also has a good experience on the mobile side, which enables city managers to get real-time monitoring information anytime and anywhere. Here are two preview maps on the mobile browser for you to experience:

HT contains hundreds of industrial Internet 2D 3D visualization applications. Click here to check more demos:
https://www.hightopo.com/demos/en-index.html
Original Link: https://dev.to/hightopo/building-3d-smart-city-based-on-javascript-and-webgl-e0l
Dev To
More About this Source Visit Dev To