
An Interest In:
Web News this Week
- April 2, 2024
- April 1, 2024
- March 31, 2024
- March 30, 2024
- March 29, 2024
- March 28, 2024
- March 27, 2024
Some of Our Sources
- Engadget
- Technology Review
- Crazy Leaf Design
- Reencoded
- Specky Boy
- Spyre Studios
- Web Resource Source
- Willems Lab
- Hashedout
- The Verge
Help Webnuz
Referal links:
Slack Next-gen Platform - External API Calls
In this tutorial, you'll learn how to make external API calls inside your own "function" that runs on Slack's next-generation platform app.
Specifically, you'll build a custom function that translates given text into a different language by leveraging DeepL's text translation API.
Prerequisites
If you're new to the platform, please read my The Simplest "Hello World" tutorial first. In a nutshell, you'll need a paid Slack workspace, and permission to use the beta feature in the workspace. And then, you can connect your Slack CLI with the workspace.
If all the above are already done, you're ready to build your first app. Let's get started!
Create a Blank Project
When you start a new project, you can run slack create command. In this tutorial, you will build an app from scratch. So select "Blank project" from the list:
$ slack create? Select a template to build from: Hello World A simple workflow that sends a greeting Scaffolded project A solid foundational project that uses a Slack datastore> Blank project A, well.. blank project To see all available samples, visit github.com/slack-samples.Once the project is generated, let's check if slack run command works without any issues. This command installs a "dev" version of your new app into your connected Slack workspace. Now your app's bot user is in the workspace, and your app has its bot token for API calls.
$ cd zealous-elk-261$ slack run? Choose a workspace seratch T03E94MJU App is not installed to this workspaceUpdating dev app install for workspace "Acme Corp" Outgoing domains No allowed outgoing domains are configured If your function makes network requests, you will need to allow the outgoing domains Learn more about upcoming changes to outgoing domains: https://api.slack.com/future/changelog seratch of Acme CorpConnected, awaiting eventsIf you see Connected, awaiting events log message, the app is successfully connected to Slack. You can hit "Ctrl + C" to terminate the local app process.
Create a Workflow and its Link Trigger
In this tutorial, I will skip the basics of custom functions. If you haven't read my "Custom Functions" tutorial, checking the tutorial in advance is highly recommended.
In this tutorial's instructions, you'll add the following two files to the blank project:
workflow_and_trigger.ts, which defines a workflow and its link triggerfunction.ts, which defines a custom function that performs external API calls
Let's start by creating workflow_and_trigger.ts with the minimum definition as below. We will add three function steps to the workflow later on.
// -------------------------// Workflow definition// -------------------------import { DefineWorkflow, Schema } from "deno-slack-sdk/mod.ts";export const workflow = DefineWorkflow({ callback_id: "translator-workflow", title: "Translator Workflow", input_parameters: { properties: { // The channel to post the translation result channel_id: { type: Schema.slack.types.channel_id }, // Need this to open a form interactivity: { type: Schema.slack.types.interactivity }, }, required: ["channel_id", "interactivity"], },});// TODO: Add function steps to the workflow// -------------------------// Trigger Definition// -------------------------import { Trigger } from "deno-slack-api/types.ts";// This trigger starts the workflow when an end-user clicks the linkconst trigger: Trigger<typeof workflow.definition> = { type: "shortcut", name: "Translator Trigger", workflow: `#/workflows/${workflow.definition.callback_id}`, inputs: { // The channel where an end-user clicks the link channel_id: { value: "{{data.channel_id}}" }, // This input is required for opening a form within the workflow interactivity: { value: "{{data.interactivity}}" }, },};// As long as the trigger object is default exported,// you can generate a trigger with this code:// $ slack triggers create --trigger-def ./workflow_and_trigger.tsexport default trigger;Before you forget, add the workflow to manifest.ts. Also, since your function will send HTTP requests towards external API endpoints, api-free.deepl.com (only when you go with their free tier) and api.deepl.com must be added to outgoingDomains as well.
import { Manifest } from "deno-slack-sdk/mod.ts";import { workflow as TranslatorWorkflow } from "./workflow_and_trigger.ts";export default Manifest({ name: "zealous-elk-261", description: "Translate text in Slack", icon: "assets/default_new_app_icon.png", // Add your workflow to this list workflows: [TranslatorWorkflow], // All the domains except slack.com must be listed outgoingDomains: [ "api-free.deepl.com", // only for free tier usage "api.deepl.com", ], botScopes: ["commands", "chat:write", "chat:write.public"],});After checking if there is no error in slack run outputs, you can generate a link trigger by running slack triggers create --trigger-def ./workflow_and_trigger.ts. You'll see two options on the screen. Select the latter one with (dev) suffix this time.
$ slack triggers create --trigger-def ./workflow_and_trigger.ts? Choose an app [Use arrows to move, type to filter] seratch T03E94MJU App is not installed to this workspace> seratch (dev) T03E94MJU zealous-elk-261 (dev) A04DHV08MPFIf everything goes well, you will get a link trigger to start your demo workflow:
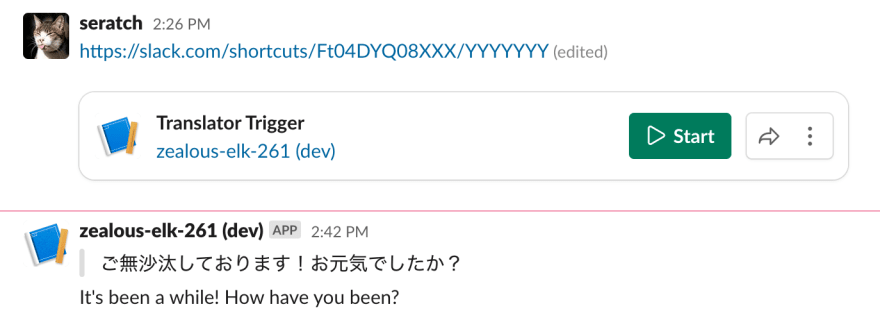
$ slack triggers create --trigger-def ./workflow_and_trigger.ts? Choose an app seratch (dev) T03E94MJU zealous-elk-261 (dev) A04DHV08MPF Trigger created Trigger ID: Ft04DEBXXXX Trigger Type: shortcut Trigger Name: Translator Trigger URL: https://slack.com/shortcuts/Ft04DEBXXXXX/YYYYYou can share the link in the connected Slack workspace by posting a message with the URL. You'll see a button to click as the attachment of the message.
Add Three Functions to the Workflow
Your workflow and its link trigger are now ready for running. However, the workflow does not have any meaningful functions. It's time to add three functions, including your custom one, to the workflow:
- Add the built-in
OpenFormto collect an end-user's inputs (the original text and the language to translate into) - Add your custom function
translate, which translates the given text - Add the built-in
SendMessageto post the result in the channel
The built-in ones are already available to use. The last remaining task is to add the custom translate function. Create a new file named function.ts with the following content:
import { DefineFunction, Schema, SlackFunction } from "deno-slack-sdk/mod.ts";import { FunctionSourceFile } from "https://deno.land/x/[email protected]/mod.ts";// The metadata definition for the translator functionexport const def = DefineFunction({ callback_id: "translate", title: "Translate", description: "Translate text using DeepL's API", // This example code uses a 3rd party module "deno_slack_source_file_resolver" // to automatically resolve the relative path of this source file. source_file: FunctionSourceFile(import.meta.url), input_parameters: { properties: { text: { type: Schema.types.string }, source_lang: { type: Schema.types.string }, // optional target_lang: { type: Schema.types.string }, }, required: ["text", "target_lang"], }, output_parameters: { properties: { translated_text: { type: Schema.types.string } }, required: ["translated_text"], },});export default SlackFunction(def, async ({ inputs, env }) => { // When running a dev version of your app, // placing `.env` file with variables is the way to configure `env`. // As for the deployed prod one, you need to run // `slack env add DEEPL_AUTH_KEY (value)` before running the app's workflow. const authKey = env.DEEPL_AUTH_KEY; if (!authKey) { // Since it's impossible to continue in this case, this function returns an error. const error = "DEEPL_AUTH_KEY env value is missing! Please add `.env` file for `slack run`. If you've already deployed this app, `slack env add DEEPL_AUTH_KEY (value)` command configures the env variable for you."; return { error }; } // Build an HTTP request towards DeepL's text translation API const subdomain = authKey.endsWith(":fx") ? "api-free" : "api"; const deeplApiUrl = `https://${subdomain}.deepl.com/v2/translate`; const body = new URLSearchParams(); body.append("auth_key", authKey); body.append("text", inputs.text); if (inputs.source_lang) { // this input is optional body.append("source_lang", inputs.source_lang.toUpperCase()); } body.append("target_lang", inputs.target_lang.toUpperCase()); // When there is no Deno library to perform external API calls, // simply using the built-in `fetch` function is recommended. const response = await fetch(deeplApiUrl, { method: "POST", headers: { "content-type": "application/x-www-form-urlencoded;charset=utf-8", }, body, }); const status = response.status; if (status != 200) { const body = await response.text(); const error = `DeepL API error (status: ${status}, body: ${body})`; return { error }; } // When the translation succeeds, the response body is JSON data. const result = await response.json(); if (!result || result.translations.length === 0) { const error = `Translation failed: ${JSON.stringify(result)}`; return { error }; } // When it's successful, the outputs must include "translated_text" as it's required. return { outputs: { translated_text: result.translations[0].text } };});This function uses a valid DeepL API auth key.
If you don't have a DeepL developer account yet (note that a developer account is different from the typical user account), visit their registration page to create a new one. Once your account is activated, you can get your "Authentication Key for DeepL API" at the account page.
You may desire to write the auth key in the code (as it's so easy!), but we don't recommend hard-coding it in the source code from a security perspective. Alternatively, you can use env variables to pass credentials and confidential information.
When you run a dev version of your app using slack run command, you can use .env file placed in your project's root directory. Create .env file and save the following content in it:
DEEPL_AUTH_KEY=[your auth key here]When you deploy the prod version of this app, you can run slack deploy command. As for the prod app, you don't use .env anymore. Instead, you can run slack env add DEEPL_AUTH_KEY [your auth key here] right after the deployment.
Next, add the function steps to the workflow. Open workflow_and_trigger.ts again and add the following code:
// Receive the original text and which language to translate intoconst formStep = workflow.addStep(Schema.slack.functions.OpenForm, {  title: "Run DeepL Translator",  // To use this built-in function,  // either a preceding function or the trigger of workflow  // must provide interactivity in inputs.  interactivity: workflow.inputs.interactivity,  submit_label: "Translate",  // The fields are similar to Block Kit, but some differences exist.  // Refer to https://api.slack.com/future/forms#type-parameters for details.  fields: {    elements: [      {        name: "text",        title: "Original Text",        type: Schema.types.string,      },      {        name: "target_lang",        title: "Target Language",        type: Schema.types.string,        description: "Select the language to translate into",        enum: [          "English",          "Japanese",          "Korean",          "Chinese",          "Italian",          "French",          "Spanish",        ],        choices: [          { value: "en", title: "English" },          { value: "ja", title: "Japanese" },          { value: "kr", title: "Korean" },          { value: "zh", title: "Chinese" },          { value: "it", title: "Italian" },          { value: "fr", title: "French" },          { value: "es", title: "Spanish" },        ],        default: "en",      },    ],    required: ["text", "target_lang"],  },});// Import your translator function and add it to this workflowimport { def as translate } from "./function.ts";const translateStep = workflow.addStep(translate, {  text: formStep.outputs.fields.text,  target_lang: formStep.outputs.fields.target_lang,});// Post the translation result using the built-in message functionworkflow.addStep(Schema.slack.functions.SendMessage, {  channel_id: workflow.inputs.channel_id,  message:    `>${formStep.outputs.fields.text}
${translateStep.outputs.translated_text}`,});
You may still be unfamiliar with the built-in OpenForm function. Don't worry about it for now! Using the form as an end-user should be intuitive. When you build different types of forms, there are a few things to learn. So I'll publish another article on how to create forms soon. Stay tuned!
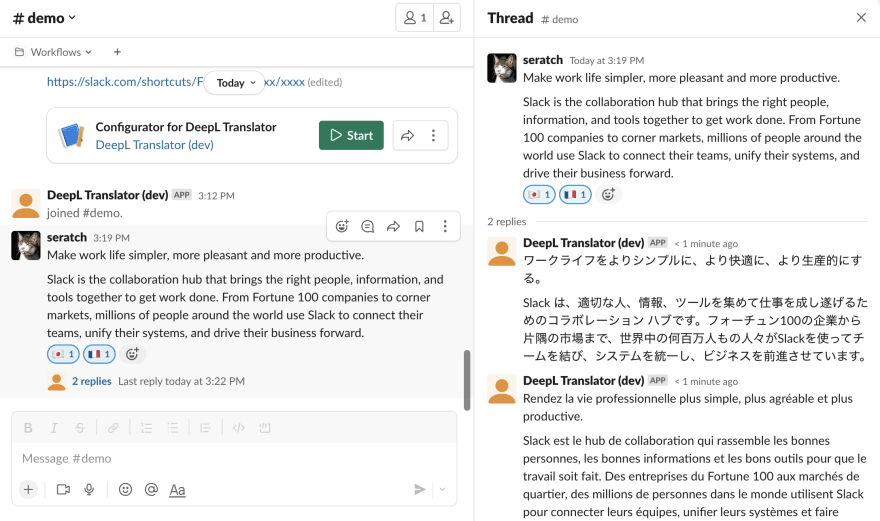
Now that the workflow is complete let's start with the link trigger. When you click it, you'll see a popup modal form like the one below.
If you're a non-English speaker, write a sentence in a different language and select "English" as the target language, as I do here. If you use English only, you can write an English sentence and select a different language in the select menu.

Once you submit the original text and the target language, the translation result will be posted shortly. If nothing happens, double-check that you have an active slack run command session. Also, you may receive a DM from @Slackbot if the workflow fails for some reason.
More Sophisticated Translator App
If you're looking for a more sophisticated translator app, take a look at the official sample app I've recently published.
https://github.com/slack-samples/deno-deepl-translator
How does it work? When an end-user adds a national flag emoji reaction to a channel message, the app translates the text into the language associated with the emoji and posts the results in its thread.
I do understand there may be different opinions on the relations between national flags and languages. If that's the case for you, changing the emoji mapping rules is possible by adjusting the relevant source code in the app.
Wrapping Up
You've learned the following points with this hands-on tutorial:
- Create a function that performs external API calls
- Enable external domain accesses in
manifest.ts - Add env variables for workflows and functions
The complete project is available at https://github.com/seratch/slack-next-generation-platform-tutorials/tree/main/03_External_API_Calls
I hope you enjoy this tutorial! As always, if you have any comments or feedback, please feel free to let me know on Twitter (@seratch) or elsewhere I can check out!
Happy hacking with Slack's next-generation platform
Original Link: https://dev.to/seratch/slack-next-gen-platform-external-api-calls-1i76
Dev To
More About this Source Visit Dev To