
An Interest In:
Web News this Week
- April 2, 2024
- April 1, 2024
- March 31, 2024
- March 30, 2024
- March 29, 2024
- March 28, 2024
- March 27, 2024
Some of Our Sources
- Abduzeedo
- You The Designer
- Creative Curio
- Inspiredology
- Noupe
- My Ink Blog
- Design Modo
- Web Resource Source
- Codrops
- Daily Now
Help Webnuz
Referal links:
Mastering Injectable Services: A Comprehensive Guide
In Angular, the @Injectable decorator is used to create services that can be provided to other components through Angular's dependency injection system. These services can then inject other services provided by the dependency injection system (DI) inside their classes.
To declare a service injectable, we simply add the decorator on top of our class:
@Injectable()class MyService {}However, just adding the @Injectable decorator does not automatically provide the service in Angular's DI system. Let's explore the various ways in which services can be provided in Angular.
ProvidedIn: 'root' VS Providing Services in bootstrap providerarray.
For developers still using NgModule, the bootstrap provider array located inside
main.tsis similar to the provider array in yourAppModule.
In both scenarios, our service is a singleton, meaning there is only one instance of the service in our entire application. We can inject the SAME instance anywhere.
The main difference is how and where Angular bundles our service. We will visualize this across 5 scenarios.
- Bootstrap provider array with the service being unused
- Bootstrap provider array with the service being used in one component
- ProvidedIn 'root' with the service being unused
- ProvidedIn 'root' with the service being used in one component
- ProvidedIn 'root' with the service being used in multiple components
For the purposes of this demonstration, we have created 3 components AppComponent, FooComponent and BarComponent. FooComponent and BarComponent are lazy loaded on route navigation. Angular will create 3 different bundles and we will use source-map-explorer to see which bundle MyService is in.
export const routes: Routes = [ { path: 'foo', loadComponent: () => import('./foo.component').then((x) => x.FooComponent), }, { path: 'bar', loadComponent: () => import('./bar.component').then((x) => x.BarComponent), },];The goal is to visualize how Angular compiler tree-shake our service.
Tree-shaking is the process of removing dead code from a bundle to reduce its size to a minimum.
1- Providing the Service in the Bootstrap Provider Array, even if it'sunused
Let's start by providing our service in our bootstrap application provider array. (Our service will stay unused)
bootstrapApplication(AppComponent, { providers: [ MyService, provideRouter(routes) ],});To use source-map-explorer, we need to create our sourceMap files by building our application:
ng build -c development
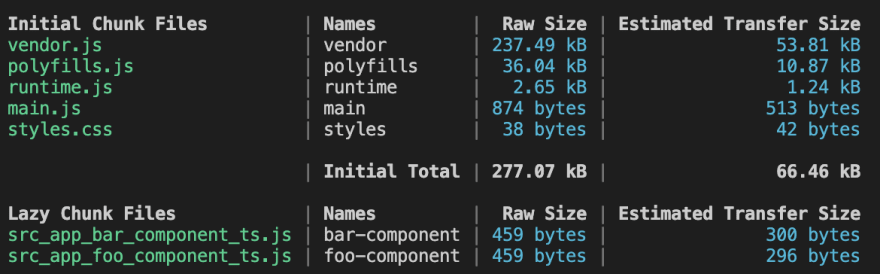
We can see the result of our build which shows that Angular created two lazy chunks and a classic build chunk for the web application. Our focus will be on the two lazy chunks and main.js
Let's visualize our bundle more closely with source-map-explorer:
source-map-explorer ./dist/[my-application-name]/*.js
We can see that our service is embedded inside our main bundle, even if the service is unused. This results in a code that the user will download but never use.
2- Providing the Service in the Bootstrap Provider Array and using the Service in one Lazy-loaded Component
We get the same result as previously. The service is bundled inside our main bundle even though we will only use it in one of our lazy-loaded components.
3- ProvidedIn 'root' with unusedService
We can use the ProvidedIn property inside the @Injectable decorator to specify which injector will provide our service..
@Injectable({ providedIn: 'root' })export class MyService {}Setting providedIn: 'root' will provide our service at the root level of our application. This may seem similar to the previous example, but the Angular compiler is capable of tree-shaking our service, depending on where it is injected.
If we compare this build result with the previous one, we can see that main.js bundle has dropped from 1018B to 874B while bar.js and foo.js bundles have not changed. Since MyService was not injected, the Angular compiler did not include it in any of the bundles.
4- ProvidedIn 'root' with service used in one component
Let's inject our service in BarComponent and rerun our build.
@Component({ selector: 'app-bar', standalone: true, imports: [], template: `bar`,})export class BarComponent { service = inject(MyService)}
We can see that bar.js bundle has increased in size, indicating that since MyService is only used by BarComponent, the compiler has bundled the service and the component together.
We can visualize it with map-source-explorer as well.

5- ProvidedIn 'root' with the Service being used in multiple lazy-loaded Components
What happens if we use our service in multiple lazy-loaded components. Let's inject the service inside FooComponent as well.

Angular has created a third chunk common.js where our service is included. This ensures that there is no duplicate code. The first Component is called in our application will download common.js.
Chunk size are a bit higher because we add the constructor declaration in our compiled js file now.
Conclusion:
Always use ProvidedIn: 'root' for every singleton service. Is easier to maintain, and the Angular compiler is doing an amazing job behind the scene to treeshake our bundles in the most optimal way.
Non singleton services
If we want multiple instances of the same service, we must set the ProvidedIn property to undefined (or remove it) and provide the service inside the Component providers Array.
@Component({ selector: 'app-bar', standalone: true, imports: [], providers: [MyService], // provide a service template: `bar`,})export class BarComponent { service = inject(MyService)}Our service instance is now connected to the life cycle of our component. When our component is instantiated or destroyed, our service will be instantiated or destroyed as well. If two components are created, two separate instances of MyService will be created.
Small Challenges:
Challenge 1:
@Injectable()export class MyService { title = 'No Title'; setTitle = (title: string) => (this.title = title);}@Component({ selector: 'child', standalone: true, template: `<div>{{ myService.title }}</div>`,})export class ChildComponent { myService = inject(MyService);}@Component({ selector: 'parent', standalone: true, imports: [ChildComponent], providers: [MyService], template: `<child></child>`,})export class ParentComponent { myService = inject(MyService).setTitle('Parent Title');}Question: What will be displayed on your screen?
Solution: Parent Title
Explanation: If we declare the service inside the providers array of the parent component, all of its child components will get the same instance of the service. This is useful for sharing information among a group of components.
Challenge 2:
@Injectable()export class MyService { title = 'No Title'; setTitle = (title: string) => (this.title = title);}@Component({ selector: 'child', standalone: true, providers: [MyService], // provide MyService in child component template: `<div>{{ myService.title }}</div>`,})export class ChildComponent { myService = inject(MyService);}@Component({ selector: 'parent', standalone: true, imports: [ChildComponent], providers: [MyService], template: `<child></child>`,})export class ParentComponent { myService = inject(MyService).setTitle('Parent Title');}Question: What will be displayed on your screen?
Solution: No Title
Explanation: If we provided MyService inside the both the parent and the child components, MyService will have two distinct instances. (I will explain how DI works in more detail in another article)
Providing inside route providerarray
Another way to provide a service is inside the route's providers array.
This is similar to providing it inside a lazy-loaded NgModule.
export const routes: Routes = [ { path: 'bar', providers: [MyService], loadChildren: () => import('./child/routes').then((r) => r.childRoutes), }, { path: 'foo', loadComponent: () => import('./foo.component').then((x) => x.FooComponent), },];with childRoutes being a subset of routes.
export const childRoutes: Routes = [ { path: '', pathMatch: 'full', redirectTo: 'bar-1' }, { path: 'bar-1', loadComponent: () => import('./bar-child-1.component').then((x) => x.BarChild1Component), }, { path: 'bar-2', loadComponent: () => import('./bar-child-2.component').then((x) => x.BarChild2Component), },];This behavior can be a bit confusing. MyService will get instantiated when we first navigate to one of te routes within the bar-child route. If we navigate away, the service won't be destroyed. If we navigate back to that route, the service will not be instantiated again, which means that there will be only one instance of MyService in memory.
However other components that are not children of this route will not have access to MyService.
At build time, MyService will be located inside main.js. (rather than in a lazy-loaded chunk where I thought it will be). Be caution, this is different from providing MyService in the parent or child components, where it would be instantiated and destroyed along with those components.


Bonus Tip: If we want to create a service that is instantiated when navigating to a specific route and destroyed when we navigate away, we can combine what we learned in the two previous sections.
To destroy a service, it needs to be provided inside a component decorator. But to instantiate it on route navigation, the service must be provided at the route level. The solution is to create a parent component that will hold the instance of our service.
{ path: 'bar', loadComponent: () => import('./my-service.component').then((x) => x.MyServiceComponent), loadChildren: () => import('./child/routes').then((r) => r.childRoutes),},@Component({ standalone: true, imports: [RouterOutlet], providers: [MyService], template: `<router-outlet></router-outlet>`,})export class MyServiceComponent {}In this example, the MyServiceComponent is provided with an instance of MyService. When we navigate to bar the child component is created and it will be provided with the same instance of MyService. When we navigate away, the child component is destroyed and the instance of MyService will be destroyed as well.
That's it for this article! You should now master and optimize injecting services in Angular.
I hope you learned new Angular concept. If you liked it, you can find me on Medium, Twitter or Github.
If you want to accelerate your Angular and Nx learning journey, come and check out Angular challenges.
Original Link: https://dev.to/this-is-angular/mastering-injectable-services-a-comprehensive-guide-3kjg
Dev To
More About this Source Visit Dev To