
An Interest In:
Web News this Week
- April 20, 2024
- April 19, 2024
- April 18, 2024
- April 17, 2024
- April 16, 2024
- April 15, 2024
- April 14, 2024
Some of Our Sources
- Techcrunch
- Just Creative
- Fuel Your Creativity
- Naldz Graphics
- Fudge Graphics
- Wal You
- Specky Boy
- Codrops
- Android Headlines
- TechPowerUp
Help Webnuz
Referal links:
Firebase Authentication: Build a Smooth Authentication Flow System with Firebase
Introduction
In this tutorial, we are going to follow a step-by-step guide on how to set up the Firebase authentication service, and then walk through how to implement the service in your application. An authentication service protects your website from unverified users having access to the websites features or contents. It ensures users are who they say they are. It proves users identity is genuine by verifying their credentials, which are usually the username/email and password. Weve all experienced this on platforms such as Facebook, Instagram or Twitter when we are trying to sign into our accounts.
Authentication service such as Firebase authentication provided by Googles Backend as a Service (BaaS) product, Firebase, makes the authentication process super easy for developers. It provides an array of authentication methods, ranging from native providers such as plain email and password or social providers like Facebook, Twitter, LinkedIn, GitHub & Google. Implementing the social sign-up/sign-in providers in the sign-up and sign-in flow improves the experience of users on your website. Signing up or signing in through this process is less stressful cognitively, users do not have to start trying to remember their password when they could just click on a social sign-in button, and be signed up or signed in seamlessly without any hassle whatsoever.
Setting Up Firebase Authentication Service
Step 1
Proceed to https://console.firebase.google.com
Sign into your Firebase account or sign-up if you dont have an account.
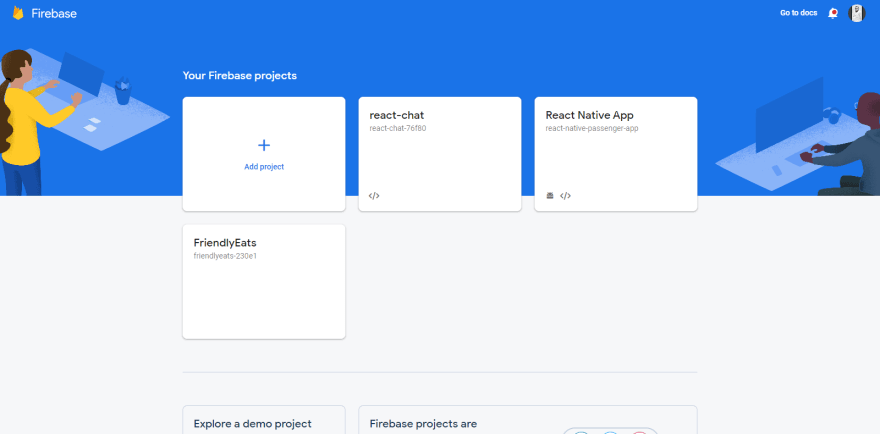
Click the Add project (+) box to set up a new project.

Step 2
Type your project name.
Disable the Google Analytics functionality on the next page, we dont need it for this project.
Click the Create project button.

Step 3
Click the </> icon button, since we are building a sign-in system for a web app.
Type a name for your web app.
Click the Register app button.
Step 4
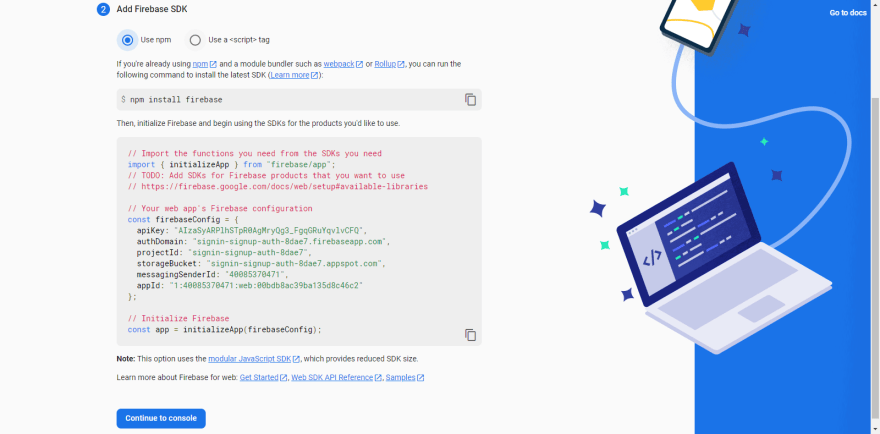
Create a
firebase.jsfile in your code editor.Copy the firebase configuration content in the blue box image above.
Paste it into the
firebase.jsfile
At this point your firebase.js file should look like this:
// Import the functions you need from the SDKs you needimport { initializeApp } from "firebase/app";// TODO: Add SDKs for Firebase products that you want to use// https://firebase.google.com/docs/web/setup#available-libraries// Your web app's Firebase configurationconst firebaseConfig = { apiKey: "*************************", authDomain: "**********************", projectId: "*****************", storageBucket: "****************", messagingSenderId: "*******", appId: "*************"};// Initialize Firebase and exportexport const app = initializeApp(firebaseConfig);The parts hashed out above should be replaced with your unique value provided by the Firebase SDK. It was hashed out for security purposes.

Step 5
Head back to the Firebase console.
Click the Continue to console button.
Now you just created a web app in your firebase project. Its possible to create another app as well like a mobile app if you are developing a mobile app, in this case, you will be clicking the android or iOS icon (depending on the operating system architecture for the mobile app) in the interface in step 3.
With this newly created web app, we can access any Firebase service available on the console like the authentication service we will be using shortly.
To avoid prolonging this article unnecessarily by focusing too much on setting the authentication process, you can follow the rest of the setup flow where you can work with a clear visual illustration of the steps. I would strongly advise you to visit the link above to complete the authentication setup on the firebase console.
As stated earlier in step 4, Firebase provides SDKs for any product that we want to utilize in our project. However, before we can have access to the authentication SDK we need to install it into our project. The SDK can be installed by running the following command in your CLI or terminal:
npm install firebaseMake sure you change the directory (cd) to the folder your project is sitting in before running the command above in your command line.
Sign-Up Flow
The sign-up process is a users introduction to a website, and before the user can be trusted to enjoy the resources or view the content of the website, they need to be authenticated, which is a way of ensuring a user is who they say they are on the internet.
Password-based Sign-Up
As stated earlier, we are going to be authenticating our users in two ways: via email/password and via Google, of course, there are more ways to authenticate too, Phone, Facebook, Twitter, Apple, and GitHub among others.
Before any serious coding commences, lets get the form interface design out of the way first.
import { Link } from "react-router-dom";import { createUserWithEmailAndPassword, getAuth} from "firebase/auth";import { useState } from "react";const PasswordSignUp = () => { const [email, setEmail] = useState(""); const [password, setPassword] = useState(""); const [error, setError] = useState(false); const [errorMessage, setErrorMessage] = useState(""); // instantiate the auth service SDK const auth = getAuth(); const handleChange = (e) => { const { name, value } = e.target; if (name === "email") setEmail(value); if (name === "password") setPassword(value); }; // Handle user sign up with email and password const handleSubmit = async (e) => { e.preventDefault(); try { // create a new user with email and password const userCredential = await createUserWithEmailAndPassword( auth, email, password ); // Pull out user's data from the userCredential property const user = userCredential.user; } catch (err) { // Handle errors here const errorMessage = err.message; const errorCode = err.code; setError(true); switch (errorCode) { case "auth/weak-password": setErrorMessage("The password is too weak."); break; case "auth/email-already-in-use": setErrorMessage( "This email address is already in use by another account." ); case "auth/invalid-email": setErrorMessage("This email address is invalid."); break; case "auth/operation-not-allowed": setErrorMessage("Email/password accounts are not enabled."); break; default: setErrorMessage(errorMessage); break; } } }; return ( <div className='signupContainer'> <div className='signupContainer__box'> <div className='signupContainer__box__inner'> <h1>Sign Up</h1> <form className='signupContainer__box__form' onSubmit={handleSubmit}> <input type='email' placeholder='Email' onChange={handleChange} name='email' value={email} /> <input type='password' placeholder='Password' onChange={handleChange} name='password' value={password} /> <button type='submit'>Sign Up</button> {error && <p>{errorMessage}</p>} </form> <div className='signupContainer__box__login'> <p> Already have an account? <Link to='/signin'>Sign In</Link> </p> </div> </div> </div> </div> );};export default PasswordSignUp;A lot is going on in the code above so we will dive into every aspect of the code and try to understand the message it is conveying. First off, we are importing the createUserWithEmailAndPassword method and the getAuth method in lines 4 to 6.
The createUserWithEmailAndPassword method aid in creating a new user account with the email and password from the input value which will be provided as arguments in the method along with the auth variable instantiated in line 16, auth variable is an authentication instance from the firebase authentication service. Then on successful creation of the user account (once the returned Promise is resolved), the user will be signed into the website or application. The returned Promise is the user credential object (userCredential), from this user credential (userCredential.user) we can pull out the email we provided to sign-up from the email property, the username, phone number and the image URL can be accessed as displayName, phoneNumber and photoURL properties respectively.
The input value we pulled from e.target is used to get the email and password the user typed, since we are using one handleChange function in lines 18 to 23 for the onChange prop for the email and password input fields we can decide which input value is needed based on what the input name attribute value (e.target.name)is equal to, email or password.
In the catch block, lines 39 to 64, we handle the errors gracefully with a switch statement. Firebase auth service provides error codes for developers to provide an appropriate contextual message for their users, like if err.code is equal to auth/invalid-email we can tell the user that the email address is invalid, improving the user experience and accessibility of our website in the process. The errorMessage state is updated with the right message according to the context of the error, then we do a conditional rendering in line 88 to check if there is an error, in that case, display a certain error message.

The moment any of your users signs up successfully their respective user account details will be saved onto Firebase authentication, you can access this by clicking the Users tab on the Authentication page. The users id together with the email address used, provider (email/password, Google or Twitter), date the user first signed up and their latest sign-in date will be provided and can be accessed in their interface above.
Google Authentication Sign-Up
Firebase Google authentication provider should be enabled before proceeding with this part. Follow the setup flow provided earlier to enable the Google authentication provider on your Firebase console.
import googleLogo from "../assets/images/googleLogo.webp";import { Link } from "react-router-dom";import { signInWithPopup, GoogleAuthProvider, getAuth} from "firebase/auth";import { useState } from "react";const GoogleSignUp = () => { const [error, setError] = useState(false); const [googleErrorMessage, setGoogleErrorMessage] = useState(""); // Instantiate the auth service SDK const auth = getAuth(); // Handle user sign up with google const handleGoogleSignUp = async (e) => { e.preventDefault(); // Instantiate a GoogleAuthProvider object const provider = new GoogleAuthProvider(); try { // Sign in with a pop-up window const result = await signInWithPopup(auth, provider); // Pull signed-in user credential. const user = result.user; } catch (err) { // Handle errors here. const errorMessage = err.message; const errorCode = err.code; setError(true); switch (errorCode) { case "auth/operation-not-allowed": setGoogleErrorMessage("Email/password accounts are not enabled."); break; case "auth/operation-not-supported-in-this-environment": setGoogleErrorMessage("HTTP protocol is not supported. Please use HTTPS.") break; case "auth/popup-blocked": setGoogleErrorMessage("Popup has been blocked by the browser. Please allow popups for this website.") break; case "auth/popup-closed-by-user": setGoogleErrorMessage("Popup has been closed by the user before finalizing the operation. Please try again.") break; default: setGoogleErrorMessage(errorMessage); break; } } }; return ( <div className='signupContainer'> <div className='signupContainer__box__google'> <button onClick={handleGoogleSignUp}> <span> <img src={googleLogo} alt='Google Logo' /> </span> Sign Up with Google </button> {error && <p>{googleErrorMessage}</p>} </div> <div className='signupContainer__box__login'> <p> Already have an account? <Link to='/signin'>Sign In</Link> </p> </div> </div> </div> </div> );};export default GoogleSignUp;From the code above in lines 3 to 7 you can see we imported signInWithPopup method which authenticates users using a popup-based OAuth authentication flow, GoogleAuthProvider which is an instance of the Google provider object and the getAuth instance to connect to the Firebase authentication service.
In lines 15 and 21 we instantiate the authentication service and the Google Authentication Provider respectively. We proceed to run an asynchronous operation with the signInWithPopup method in line 23, if the operation succeeds the signed-in user is returned along with the provider's credential in the result constant in line 23. To pull out the user's credentials like displayName, email and photoURL (this is the image attributed to the Google account the user used to sign-up) we implement result.user, we may want to use these credentials on the home page to display the user's name or image.
Its always a best practice to handle errors in your code gracefully to enhance the users experience while interacting with your website. Plus, it is necessary to deal with form validation on both the client side and server side to ensure consistency in the users data that was input in the form fields. Lines 37 to 53 implement a switch statement to handle various error messages provided by Firebase authentication when signing up with the Google provider is unsuccessful, with these error messages we create appropriate feedback for the user based on the action taken by the user.

Navigate to your Firebase console authentication page, and click the Users tab where all the users that have signed up on your website will be displayed showing the provider used for authentication under the Providers column. Google G icon will be displayed for users that sign up with Google.
Sign-In Flow
At this point, we will be implementing the sign-in authentication flow using password-based authentication and Google authentication provider to ease the sign-in process for the users without the constant pressure to remember their password.
Password-based Sign-In
import { Link } from "react-router-dom";import { useState } from "react";import { signInWithEmailAndPassword, getAuth} from "firebase/auth";const PasswordSignIn = () => { const [email, setEmail] = useState(""); const [password, setPassword] = useState(""); const [error, setError] = useState(false); const [errorMessage, setErrorMessage] = useState(""); // Instantiate the auth service SDK const auth = getAuth(); const handleChange = (e) => { const { name, value } = e.target; if (name === "email") setEmail(value); if (name === "password") setPassword(value); }; const handleSubmit = async (e) => { e.preventDefault(); try { // Sign in with email and password in firebase auth service const userCredential = await signInWithEmailAndPassword( auth, email, password ); // The signed-in user info const user = userCredential.user; } catch (err) { // Handle Errors here. const errorMessage = err.message; const errorCode = err.code; setError(true); console.log(errorCode) switch (errorCode) { case "auth/invalid-email": setErrorMessage("This email address is invalid."); break; case "auth/user-disabled": setErrorMessage( "This email address is disabled by the administrator." ); break; case "auth/user-not-found": setErrorMessage("This email address is not registered."); break; case "auth/wrong-password": setErrorMessage("The password is invalid or the user does not have a password.") break; default: setErrorMessage(errorMessage); break; } } }; return ( <div className='signinContainer'> <div className='signinContainer__box'> <div className='signinContainer__box__inner'> <h1>Sign In</h1> <form className='signinContainer__box__form' onSubmit={handleSubmit}> <input type='email' placeholder='Email' name='email' onChange={handleChange} /> <input type='password' placeholder='Password' name='password' onChange={handleChange} /> <button type='submit'>Sign In</button> {error && <p>{errorMessage}</p>} </form> <div className='signinContainer__box__signup'> <p> Don't have an account? <Link to='/signup'>Sign Up</Link> </p> </div> </div> </div> </div> );};export default PasswordSignIn;The code for the sign-in flow using email/password is not too different from the signup flow code, the only difference is the signInWithEmailAndPassword method imported in lines 4 to 9. We sign in the user in lines 26 to 30 with the email and password they entered in the form fields, and then we store the returned Promise inside the userCredential constant. From this userCredential constant, we get all the user's info using userCredential.user as in line 33 above. Afterwards, we handle any errors in the catch block if the sign-in process failed. The appropriate error message feedback will be displayed in crimson color under the Sign In button.

Google Authentication Sign In
The code that handles the sign-up and sign-in flow using the Google authentication provider is the same really since the users Google account email and password will always remain consistent considering the Google details were saved on the Firebase authentication during the sign-up process. The only thing that will change is just instead of a Sign Up With Google button it will be a Sign In With Google button.
Signing Out
The sign-out implementation is not complex, its pretty straightforward.
import { signOut, getAuth } from "firebase/auth";const Home = () => { // Instantiate the auth service SDK const auth = getAuth(); return ( <section className='home'> <div className='home__container'> <button onClick={() => signOut(auth)}>Sign Out</button> </div> </section> );};export default Home;From the code displayed above, we can see all we need to do is import the Firebase authentication SDKs, the signOut and getAuth method. The instantiated auth service SDK, auth will be provided as an argument to the signOut method we imported earlier. The current user will be signed out of the website and removed from the Firebase authentication user's account on clicking the Sign Out button.
Conclusion
Firebases suite of products has been valuable in building dynamic, efficient web and mobile applications among them being the authentication service, it also provides tools to monitor deployed applications performance like Crashlytics and Performance Monitoring. Firebase comes with a complete package of tools to aid companies, businesses and developers in creating top-value digital products that tackle their customers pressing needs. We will be introduced to Firebase Firestore in my next Firebase article. Cheers
Original Link: https://dev.to/adekolaolawale/firebase-authentication-build-a-smooth-authentication-flow-system-with-firebase-3h9l
Dev To
More About this Source Visit Dev To