
An Interest In:
Web News this Week
- April 19, 2024
- April 18, 2024
- April 17, 2024
- April 16, 2024
- April 15, 2024
- April 14, 2024
- April 13, 2024
Some of Our Sources
- Simplebits
- Joshua Blankenship
- The Logo Smith
- Six Revisions
- You The Designer
- Noupe
- My Ink Blog
- Fudge Graphics
- Web Design Ledger
- Specky Boy
Help Webnuz
Referal links:
NGINX: Advanced Load Balancer, Web Server, & Reverse Proxy
Concurrency
When it comes to making a request to the server, it usually happens that multiple users will be making requests. And Server needs to handle all the requests. This is where the important points to consider come into play like:-
- Is your server concurrent
- Is your backend architecture well designed (Monolithic, Microservices, etc)
- Is your server performing (Performance Testing) well in different network load (Load Balancing)

One of the methods to distribute the load is to use software load balancers. This is where Nginx comes into play. In general, Nginx is mainly used as a load balancer. Though Nginx can be used as a mail proxy, reverse proxy, HTTP cache, etc.
But what exactly the Nginx and How do we use it??

Nginx
Nginx is a web server that is capable of handling ~10k concurrent users or network load per second. It became the fastest available web server followed by Apache.
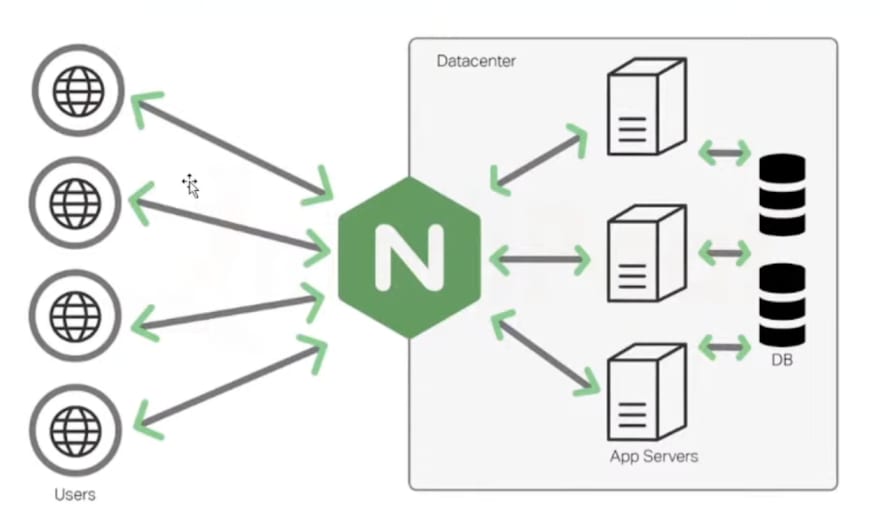
Image Reference:- Intellipath
How to setup Load Balancing with NGINX
Note:- Follow for more, Because we'll see the implementation of load balancers, Proxy, etc in our NodeJS app in our future blogs.
With Nginx we can use Simple (Round Robin), Weighted, and Least connections load balancing.
Steps that we'll follow:-
- Will use simple Node APIs and will run in two EC2 instances (EC2 instances are nothing but virtual servers or machines that can run our backend code)
- Then, we'll run Nginx in the third EC2 instance or a third machine
- Then we'll set up load balancing between the two EC2 servers running our Node App.
Note:- Don't worry follow along you'll get the most out of it.

Create an AWS account, Don't worry you can use it for free until you do not exceed free limits
Now, Go to the Amazon EC2 Service from the Homepage and Create an EC2 instance (Launch an EC2 instance)
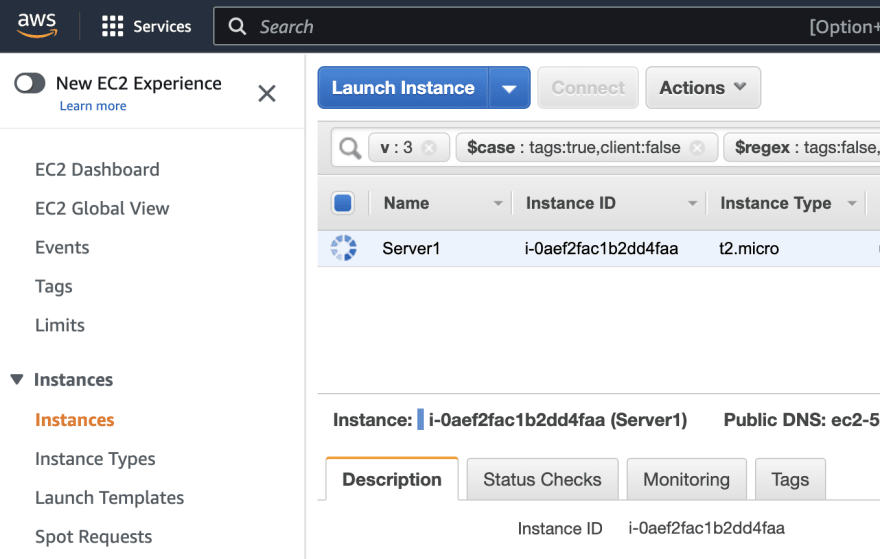
- Select the OS and Name of the server

- Select the key pair as .pem file and save the file on your local machine. Here you can see I have created two EC2 instances to run two Servers (Our NodeJS app)

Note:- Here Public IP is the one that we will need to SSH your EC2 machine from our local machine (Basically in layman's words SSH means you can control the EC2 virtual server from your local machine's Terminal)
- Now, go to the directory that is having your pem file. Enter a command like
ssh -i Server1.pem [email protected]where Server1.pem is the pem file that you saved while creating the instance and ubuntu@public_ip contains the public IP of your instance.
Note:- Before running the above command, do change the previlige of the pem file by entering
chmod 0400 Server1.pem
and
chmod 400 Server1.pem

- Now, Connect to your EC2 instance server and Deploy your NodeJS app on that server.

- I have deployed NodeJS apps on Server 1 and Server 2 as:-
NodeJS APIs code that is deployed for load balancing:-

Note:- In case your server is listening in the EC2 instance but you are not able to connect to the server from the local machine terminal then follow these:-
- In your SSH terminal of EC2 instance type kill -9 node
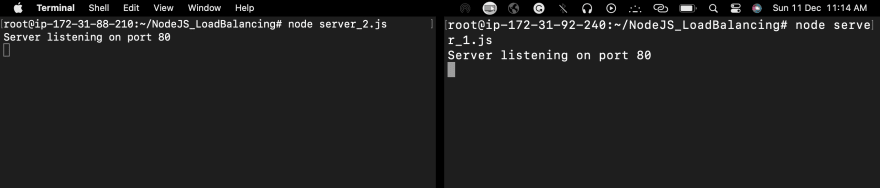
- Change the port of your server.js file to 80
Add HTTP security Group from this Link
- Now, here both servers are running server_1.js and server_2.js as:-
Now, we'll setup Nginx Webserver (As a load balancer) on the third ec2 instance
Launch New EC2 instance and install Nginx in your ubuntu Ec2
Now, in this new EC2 instance, after installing Nginx go to /etc/nginx/conf.d directory and create a file named lb.config
Enter Content in the file as:-

Here, endpoint1 is the name that you can give and the same name should be present in the location block. Servers here are the Private IPs of our Ec2 instances entered.
This is the simple load balancing (Round Robin) means the first request will route to server 1 and the second will to server 2 and so on...
Now, you can access Nginx EC2 instance public IP from browser URL and It will make requests like the first request will route to server 1 and the second will to server 2, and so on...
I hope you guys have enjoyed the Load balancing using Nginx. Follow for more practical tutorials
More Quality content will be coming on the core topics.
Original Link: https://dev.to/lovepreetsingh/nginx-advanced-load-balancer-web-server-reverse-proxy-4i23
Dev To
More About this Source Visit Dev To