
An Interest In:
Web News this Week
- April 24, 2024
- April 23, 2024
- April 22, 2024
- April 21, 2024
- April 20, 2024
- April 19, 2024
- April 18, 2024
Some of Our Sources
- Slashdot
- Mashable
- Techcrunch
- Team Treehouse
- Just Creative
- Vandelay Design
- Crazy Leaf Design
- Codrops
- Hashedout
- The Verge
Help Webnuz
Referal links:
Visual Testing Your Components With Chromatic
Visual testing your components is a crucial step in maintaining high-quality components. Chromatic, a visual regression testing tool, lets you do that practically for free.
In this post Im going to introduce Chromatic to a project of mine. I will show you how you can run Chromatic from your local env and how you can set it to run as an automated workflow/action on Github.
But first, lets get some background -
What is Chromatic?
From Chromatic introduction page:
Chromatic is a cloud-based toolchain for Storybook that helps teams ship UI components faster. Its made by the team behind Storybook.
It allows you to publish your Storybook so it can be made available for collaborators, run visual regressions on your components, and take part in the PR flow.
Its a pretty powerful tool, and gladly they offer a free plan which allows you to use most of the essential features with some restrictions (like 5000 snapshots per month). I would say that if your project contains up to 200 components, you should be good with this limitation. It all depends when and how you use it. This post will help you in achieving that.
Before we start, lets get our goals set, shall we?
Goals
- We would like to publish our Storybook and run Chromatic on every push to master branch (you normally would like to have it on any PR, but since were on the free plan, we would like to save our snapshot quota).
- We would like the workflow to trigger only when I merge changes to components, and nothing else.
- We would like to run Chromatic build on changed components only, so if a new code was introduced which does not affect a component, the workflow should not take a snapshot for any component.
Its a good place to stop and explain what a snapshot means in the Chromatic world - in general Chromatic will take a pixel snapshot for each story in your Storybook. We dont want that, since we will reach our snapshot quota fast. Instead, we would like to take snapshots only for the stories whose components have changed.
Disclaimer - Im going to apply the following steps on my Pedalboard monorepo. Working with monrepos is a bit different, and I will relate to that during the process, but be aware that applying Chromatic on a simple repo is even simpler.
So, are we good? Let's go!
You first need to create a Chromatic account (if you dont have one already).
As mentioned in the opening, we are going to use the free plan which allows you to have 5000 snapshots per month.
We log-in to Chromatic and create a new project under our account. If you use GitHub auth, Chromatic is kind enough to offer you the public and private repositories you have available.
I add my Pedalboard monorepo as the GitHub project I would like to have Chromatic for. When youre done, Chromatic will generate an auth token for you to later use when running its build.
The Next step is installing Chromatic CLI.
At this point let me stop and say that the project Im applying this on is a monorepo, which currently has several projects under it. The relevant project for Chromatic is the components package, which is the only one that has components and Storybook enabled for it.
For this reason I will install Chromatic CLI on the components package scope:
yarn add -D chromaticNow, for the kicks of it, lets try and run the chromatic build -
Before we run Chromatic, lets make sure that we have a build-storybook script under the npm scripts of the project, since Chromatic uses that to build Storybook.
In the terminal, under the components package, I run the following command:
npx chromatic --project-token=<your-chromatic-token>The script does several things, among which it authenticates with Chromatic, builds and deploys my Storybook and triggers visual tests over my components. It then offers a link to follow in order to see the result. Here is my only component on Chromatic:
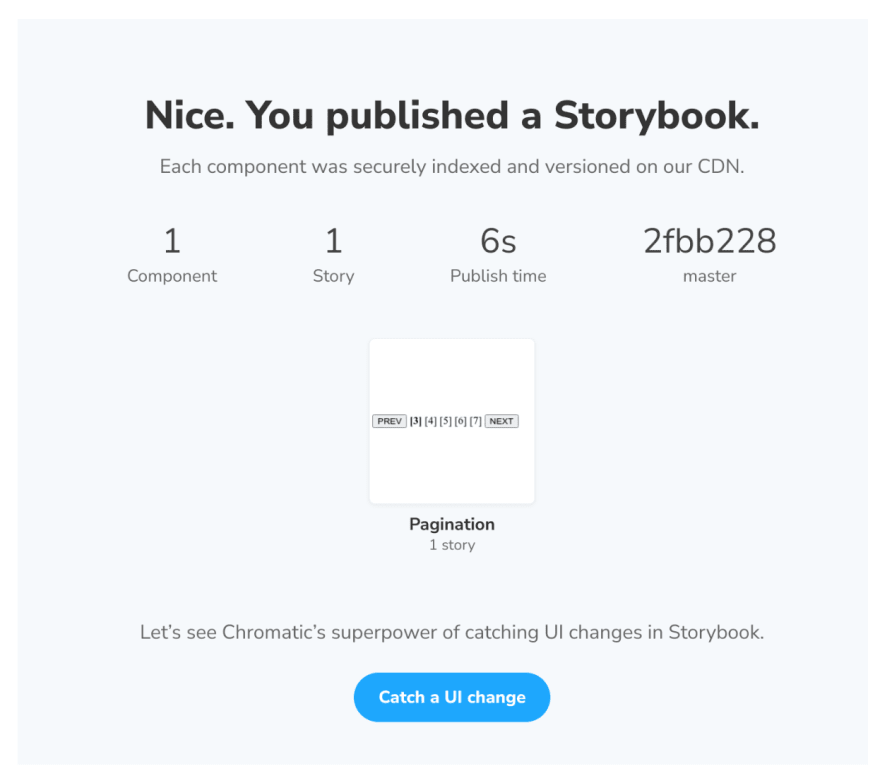
Above you can see the setup phase where you are asked to go back to you project, make some visual modifications and trigger Chromatic again to see the results, and I did just that - I added italics font-style to the font of the selected page in my Pagination component, like this:
.selected { font-weight: bolder; font-style: italic;}And then I launched Chromatic again, with the same command mentioned above. The result I got now was Chromatic detecting a visual change, which I could also see on Chromatic site:
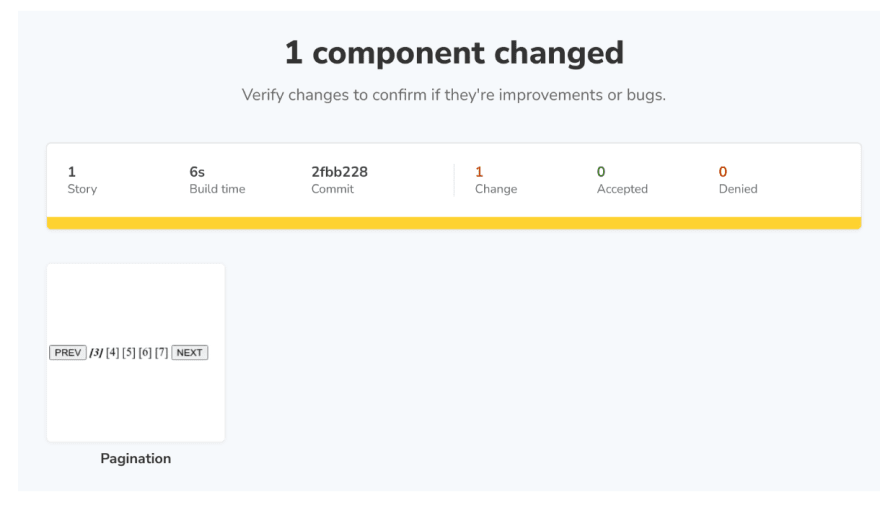
Those with the sharp eye can see that the selected 3 there is in italics font style. Clicking on that component tile I can see where the changes actually are:

Yeah, I accept the change.
And thats it for that - I have launched the Chromatic build successfully and completed a cycle of approving the changes made. Nice.
NPM script for Chromatic
When you run the script manually using npx like I did earlier, Chromatic offers to add an npm script to your project, but do not take that offer as is since the script the offer has your Chromatic token hardcoded. No thanks.
The preferred option is to use a token set on the environment, as mentioned here in their docs. So Im setting the CHROMATIC_PROJECT_TOKEN on my env and add the script to the package.json of the components package project:
"scripts": { . . . "chromatic": "chromatic" },Since we dont have many snapshots to spend, let's make sure that we run the tests only for changed components. We will use the --only-changed param and this will set TurboSnap on.
We just need to make sure that we dont track changes to files like package.json or lock files, and that we fail when Storybook has an error, using the exit-zero-on-changes.
Our script will then look like this:
"chromatic": "chromatic --only-changed --untraced=package.json --untraced=yarn.lock --exit-zero-on-changes"Yes, you need to set the
--untracedparam multiple times if you have multiple files paths you do not wish to trace. The docs are not very clear about it, so I hope I saved you a few frustrations right there.
Now we have means to run Chromatic with Yarn or npm, but what we really want is to trigger this Chromatic test when we push to master. For that we need a Github action/workflow.
Chromatic GitHub Action
Disclaimer - On Chromatic docs they suggest using the Chromatic GitHub action, which is great and works well, but when dealing with monorepo, some adjustments needs to be done. One option is to aggregate all the Storybooks of nested packages into a single one and run the action on it, but this is out of this post scope. Im going to do a different thing, and use my yarn script in order to launch Chromatic from GitHub workflow
Following the instructions Chromatic suggested, Im going to create a chromatic.yml file to represent the action, but I will make some modifications to it.
First of all, I would like the action to trigger when pushing to the master branch and also manually, but I have another condition here - only pushes from specific paths should trigger this workflow. In my case it is the components package path:
on: push: branches: - master paths: - 'packages/components/**' workflow_dispatch:In order for --changes-only to work we need to do a deep fetch for git, since it runs some diffs to resolve what was changed, so:
- uses: actions/checkout@v3 with: fetch-depth: 0And then it is time to launch Chromatic. I do that by navigating to the components package, and triggering the yarn chromatic command, with the token set on the environment:
- name: Publish to Chromatic run: | cd packages/components yarn chromatic env: CHROMATIC_PROJECT_TOKEN: ${{ secrets.CHROMATIC_PROJECT_TOKEN }}Note: As you can see, the action uses a GitHub Secret
secrets.CHROMATIC_PROJECT_TOKENfor chromatic token, which means that I had to make it available on my repository as a secret. I wont go into the details on how to define it, since you can find it easily on GitHub docs.
My final workflow yaml file looks like this:
## Workflow namename: 'Chromatic'# Event for the workflowon: push: branches: - master paths: - 'packages/components/**' workflow_dispatch:# List of jobsjobs: chromatic-deployment: # Operating System runs-on: ubuntu-latest # Job steps steps: - uses: actions/checkout@v3 with: fetch-depth: 0 - name: Install dependencies run: yarn # Adds Chromatic as a step in the workflow - name: Publish to Chromatic run: | cd packages/components yarn chromatic env: CHROMATIC_PROJECT_TOKEN: ${{ secrets.CHROMATIC_PROJECT_TOKEN }}I think were set. Im merging these changes to the repo and were done :)
Wrapping up
Lets go back to the goals we defined earlier in this post and see if we achieved them -
Whenever I push changes from the components package, and only from the component package, to the master branch, this workflow will trigger. This means it will publish a new Storybook and run visual regressions tests over it.
It will then make Chromatic snapshots only for components that were changed, and this will help us use our snapshots quota wisely.
All this will allow us to keep monitoring the visual aspects of our components and better handle the regressions when they occur. Happy testing :)
Hey! If you liked what you've just read check out @mattibarzeev on Twitter
Photo by Viktor Forgacs on Unsplash
Original Link: https://dev.to/mbarzeev/visual-testing-your-components-with-chromatic-157p
Dev To
More About this Source Visit Dev To