
An Interest In:
Web News this Week
- April 2, 2024
- April 1, 2024
- March 31, 2024
- March 30, 2024
- March 29, 2024
- March 28, 2024
- March 27, 2024
Some of Our Sources
- BoingBoing
- Mashable
- Just Creative
- Joshua Blankenship
- Smashing Apps
- Six Revisions
- TutsPlus - Design
- Stylized Web
- Android Dissected
- TechPowerUp
Help Webnuz
Referal links:
How to trigger an email on event confirmation with Netlify
Over the years, emails have been the go-to medium for developers to send event RSVPs, authentication codes, and application runtime notifications, among others. The implementation process is also daunting for developers as they need to cater to the adopted mail provider and deployment mechanism.
In this post, we will learn how to quickly build an event confirmation application with Netlify, Xata, SendGrid, and Cloudinary using Next.js.
Technology overview
Netlify is a platform for deploying and building highly-performant and dynamic websites, e-commerce stores, and web applications.
Xata is an HTTP API-based serverless database for building scalable applications. It supports a built-in search engine, branching, scalability, and durability without manually managing database configuration and deployment.
SendGrid is a cloud-based email marketing tool developers and marketers use to manage mailing lists, A/B testing, predefined templates, and image libraries used in campaign management and audience engagement.
Cloudinary is a visual media service for uploading, storing, managing, transforming, and delivering images and videos for websites and applications.
GitHub and Deployment link
The project source codes and deployment link are below:
Prerequisites
To follow along with this tutorial, the following requirements apply:
- Basic understanding of JavaScript and React
- A Netlify account for managing deployment. Signup is completely free
- A Xata account for storing data. Signup is completely free
- A Github account for saving source code. Signup is completely free.
- A SendGrid account for sending emails, Signup for a trial account is completely free
Getting started
We need to create a Next.js starter project by navigating to the desired directory and running the command below in our terminal.
npx create-next-app event-confirmation && cd event-confirmationThe command creates a Next.js project called event-confirmation and navigates into the project directory.
Installing TailwindCSS and Node-Fetch
TailwindCSS is a utility-first CSS framework packed with classes to help us style our web pages. To use it in our application, run the command below:
npm install -D tailwindcss postcss autoprefixernpx tailwindcss init -pThe command installs TailwindCSS and its dependencies and generates tailwind.config.js and postcss.config.js files.
Next, we need to update tailwind.config.js file with the snippet below:
module.exports = { content: [ './app/**/*.{js,ts,jsx,tsx}', './pages/**/*.{js,ts,jsx,tsx}', './components/**/*.{js,ts,jsx,tsx}', ], theme: { extend: {}, }, plugins: [],}Finally, we need to add TailwindCSS directives to our application. The directives give our application access to TailwindCSS utility classes. To do this, navigate to the styles folder and update the globals.css files in it with the snippet below:
@tailwind base;@tailwind components;@tailwind utilities;Lastly, we need to install node-fetch, a package for making HTTP requests. To do this, we need to run the command below:
npm i node-fetchSet up a Database on Xata
To create a database for storing our event confirmation data, we need to log into our Xatas workspace, click the Add a Database button, input events as the database name, and Create.


Next, we need to create a table in our database. To do this, click the Start from scratch menu, input confirmed as the table name, and Add table.

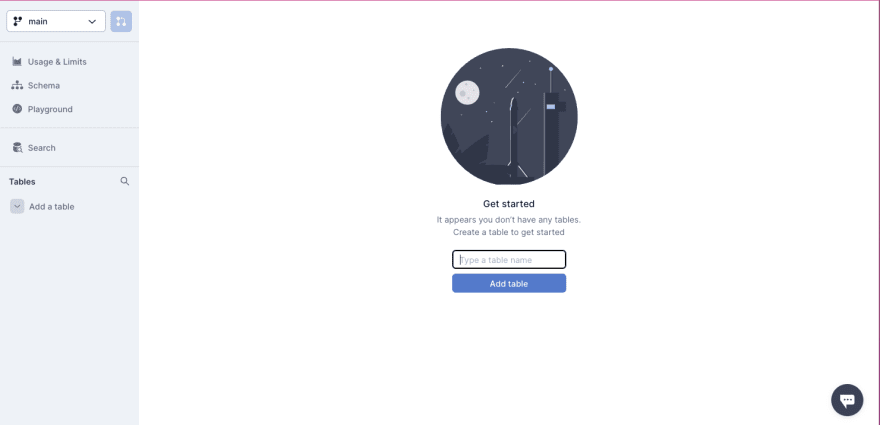
PS: Xata auto-generates an ID column (a unique identifier) for our table.
With that done, we need to add a name of type String and email of type Email columns to our table. To do this, click on the Plus icon, select type accordingly, input column name, and Create column.


After creating the columns, our updated table should be similar to the screenshot below:

Get Database URL and set up API Key
By default, Xata provides a unique and secure URL for accessing the database. To get our database URL, click the Get code snippet button, copy the URL, and then click the Set up API key button to generate API key. We need the API key for authentication when using the database.

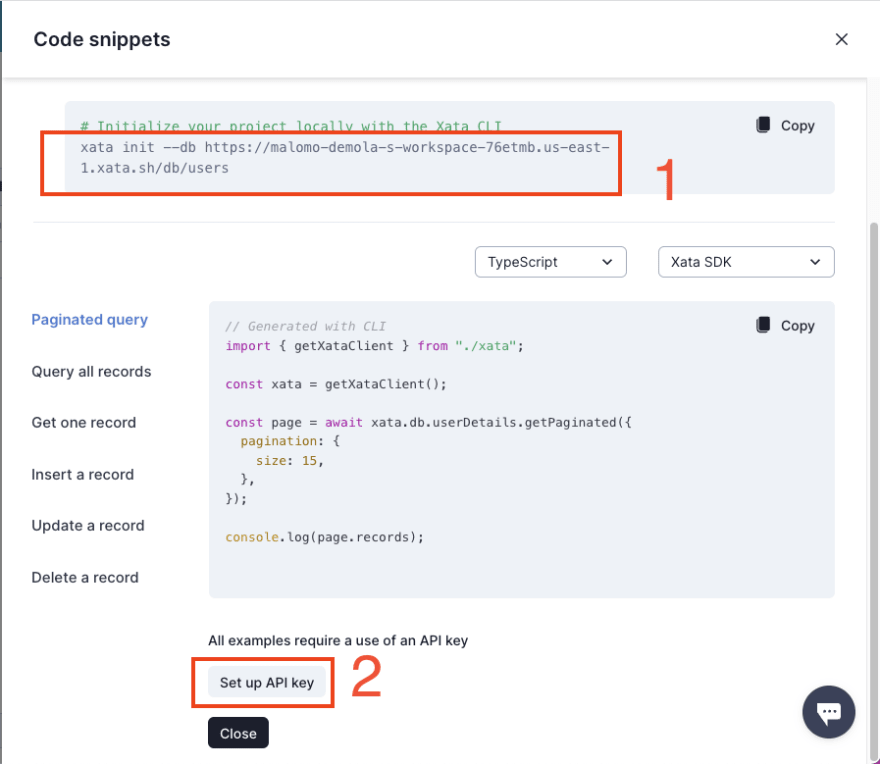
PS: The URL we need to copy starts from the *https://* section
Click the Add a key button, input xata-function as the name, and Save.


Both the URL and API key will come in handy when deploying our application.
Set up SendGrid as an email provider
To get started, we need to log into our Sendgrid account and create a sender identity for sending emails. To do this, click the Create a Single Sender button and fill in the required details.


PS: We will also be required to verify the email filled in as the sender's identity.
Next, we need to create an API Key to securely access our SendGrid account and send emails from a client. To do this, navigate to the API Key tab under the Settings menu and click the Create API Key button.
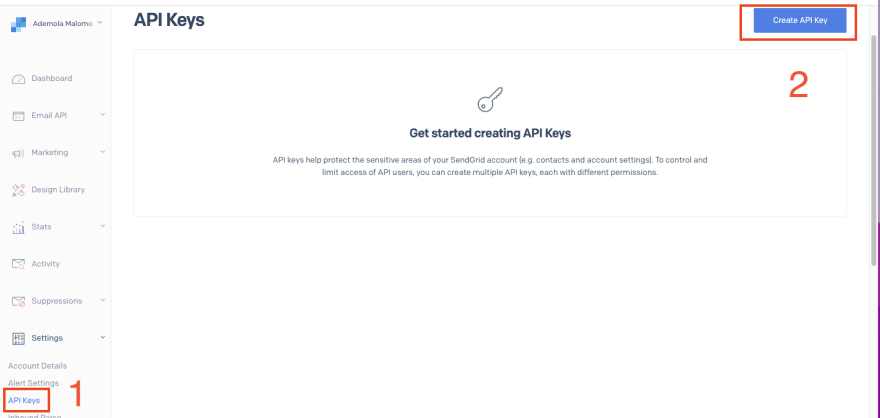
Input event-conf as the API Key Name and click the Create & View button.

SendGrid will generate an API Key. We also need to copy and keep the generated key, as it will come in handy later on.
Building the event confirmation application
Create email template
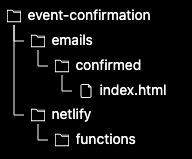
To get started, we need to create a reusable template for sending the event confirmation email to our users. To do this, first, we need to create an emails folder in the root directory, and in this folder create another folder confirmed.

Lastly, we need to create an index.html file inside the confirmed folder and add the snippet below:
<html> <body style=" font-family: 'Open Sans', 'Helvetica Neue', sans-serif; margin: 0 auto; " > <div style=" background-color: white; display: inline-block; text-align: center; padding: 10px; " > <img style="height: 200px; width: 100vw" src="https://res.cloudinary.com/dtgbzmpca/image/upload/v1667575091/photo-1498931299472-f7a63a5a1cfa.jpg" alt="mars" /> <h1>Welcome, {{name}}</h1> <p> We promised this will be the best sessions you have ever experienced! </p> <p>Thanks for subscribing!</p> </div> </body></html>The snippet above creates and styles a template by using an optimized image hosted on Cloudinary as the template header and accepts a name variable to personalize the registered users name.
Create Serverless Function
With that done, we need to create a function that saves the details of interested users on Xata and sends a confirmation email. To get started; first, we need to create a netlify folder and create a functions folder in this folder.
Secondly, we need to create a saveandconfirm.js file inside the functions folder and add the snippet below:
import fetch from 'node-fetch';exports.handler = async function (event, context, callback) { let bodyRequest = JSON.parse(event.body); const body = { name: bodyRequest.name, email: bodyRequest.email, }; //save user on the database await fetch(`${process.env.XATA_URL}:main/tables/confirmed/data`, { method: 'POST', headers: { 'Content-Type': 'application/json', Authorization: `Bearer ${process.env.XATA_API_KEY}`, }, body: JSON.stringify(body), }); //send confirmation email await fetch(`${process.env.URL}/.netlify/functions/emails/confirmed`, { headers: { 'netlify-emails-secret': process.env.NETLIFY_EMAILS_SECRET, }, method: 'POST', body: JSON.stringify({ from: process.env.SEND_FROM_EMAIL, to: body.email, subject: "You've been confirmed!", parameters: { name: body.name, }, }), }); return { statusCode: 200, body: JSON.stringify({ data: 'Email confirmation sent successfully!' }), };};The snippet above does the following:
- Imports the required dependency
- Lines 4-8: Gets the request body
- Lines 11-18: Creates a
POSTrequest to the Xata database by passing the URL as an environment variable with the database details and API key - Lines 21-34: Creates a
POSTrequest that sends a request with the required parameters to the email handler and creates the email body - Lines 36-39: Returns the appropriate response.
We also constructed the Xata database URL by passing in the branch, table name, and endpoint type.
process.env.XATA_URL:<BRANCH NAME>/tables/<TABLE NAME>/ENDPOINT TYPEWe can get the required details from our workspace

In our case, we filled it using an environment variable. We will add it when deploying our application to Netlify. An adequately filled URL is below:
process.env.XATA_URL:main/tables/userDetails/dataSimilarly, we appended our email directory confirmed to the email handler as shown below:
process.env.URL/.netlify/functions/emails/confirmedLastly, we need to add a deployment file that instructs Netlify to build our application effectively. To do this, we need to create a netlify.toml file in the root directory of our project and add the snippet below:
[functions] node_bundler = "esbuild"Building the User Interface
With that done, we can call the Serverless Function from our application UI. To do this, first, we need to update the index.js file inside the pages folder as shown below:
import Head from 'next/head';import { useState } from 'react';export default function Home() { const [value, setValue] = useState({ name: '', email: '', }); const [isLoading, setIsloading] = useState(false); const handleChange = (e) => { setValue({ ...value, [e.target.name]: e.target.value }); }; const handleSubmit = (e) => { setIsloading(true); e.preventDefault(); const body = { name: value.name, email: value.email, }; fetch('./.netlify/functions/saveandconfirm', { method: 'POST', body: JSON.stringify(body), }).then((_) => { alert('Confirmed successfully!'); setValue({ ...value, name: '', email: '' }); setIsloading(false); }); }; return ( <div> <Head> <title>Event confirmation</title> <meta name='description' content='Generated by create next app' /> <link rel='icon' href='/favicon.ico' /> </Head> <main className='py-4 px-4 lg:py-10 lg:px-10 w-full'> <section className='flex justify-center'> <div className='px-4 py-2 border rounded-lg w-full lg:w-2/4'> <div className='border-b h-8 mb-4'> <h3 className='text-gray-700'> Confirm Attendance </h3> </div> <form onSubmit={handleSubmit}> <fieldset> <label className='text-sm text-gray-400 mb-4 block'> Name </label> <input name='name' className='border w-full rounded-sm mb-6 p-2' required value={value.name} onChange={handleChange} /> </fieldset> <fieldset> <label className='text-sm text-gray-400 mb-4 block'> Email </label> <input name='email' className='border w-full rounded-sm mb-6 p-2' type='email' required value={value.email} onChange={handleChange} /> </fieldset> <button className='text-sm text-white px-8 py-2 rounded-sm bg-teal-600 hover:bg-teal-700' disabled={isLoading} > Submit </button> </form> </div> </section> </main> </div> );}The snippet above does the following:
- Imports the required dependencies
- Lines 5-9: Create state properties to manage application state
- Lines 11-13: Creates
handleChangeto control the input fields - Lines 15-30: Makes a
POSTrequest to the Serverless Function we created earlier and pass in the required parameter - Updates the UI accordingly
Putting it all together on Netlify
Pushing our source code to GitHub
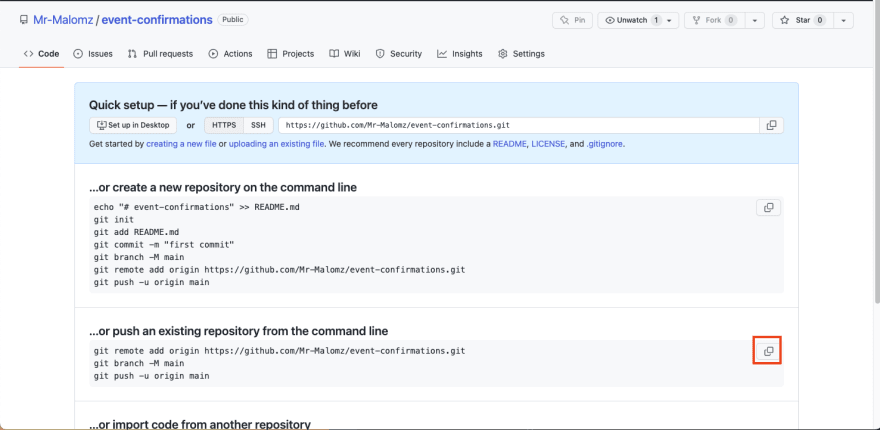
We need to push our source code to GitHub to enable a seamless deployment process. To get started, we need to log into our GitHub account, create a repository, input event-confirmation as the name and Create repository.
Next, we initialize a git project and save recent changes in our project by running the command below:
git initgit add .git commit -m "event confirmation source code"To push our changes, copy and run the highlighted commands on the terminal:
Deploying to Netlify
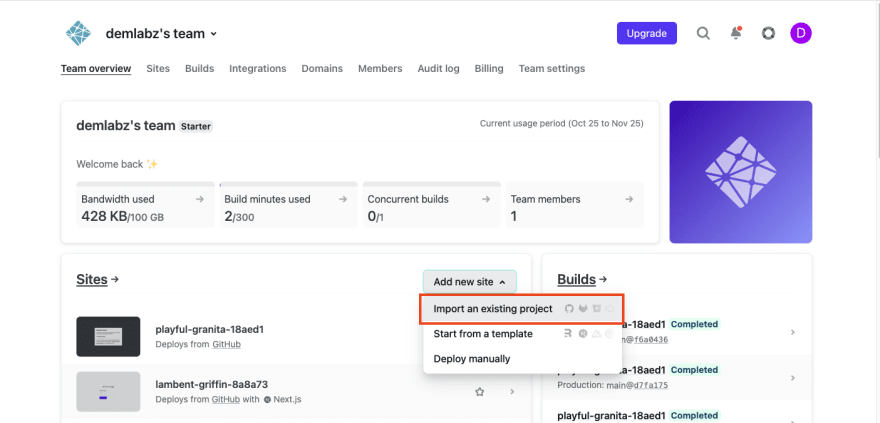
To get started, we need to log into our Netlify dashboard. Click on Add new site dropdown and select Import an existing project.
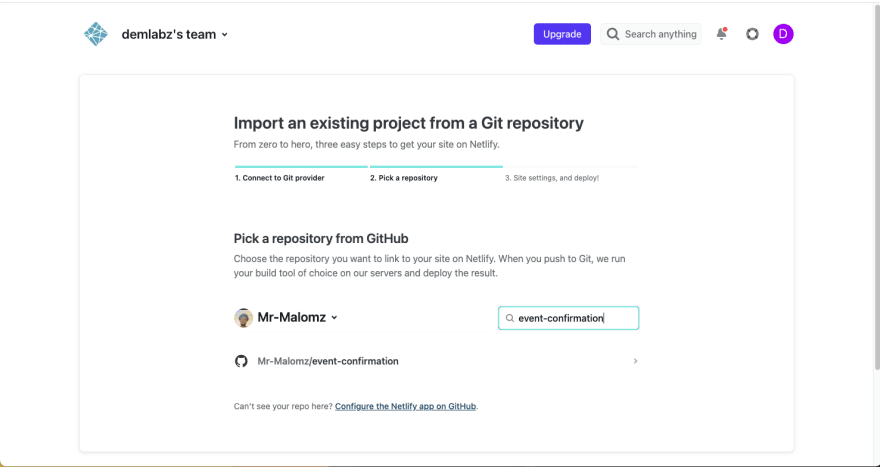
Select GitHub as the Git provider and authorize Netlify.

Search for event-confirmation and select the repository.
Click on Show advanced, click the New variable button and add the XATA_URL, XATA_API_KEY, SEND_FROM_EMAIL, and NETLIFY_EMAIL_SECRET environment variables as key and their corresponding values.

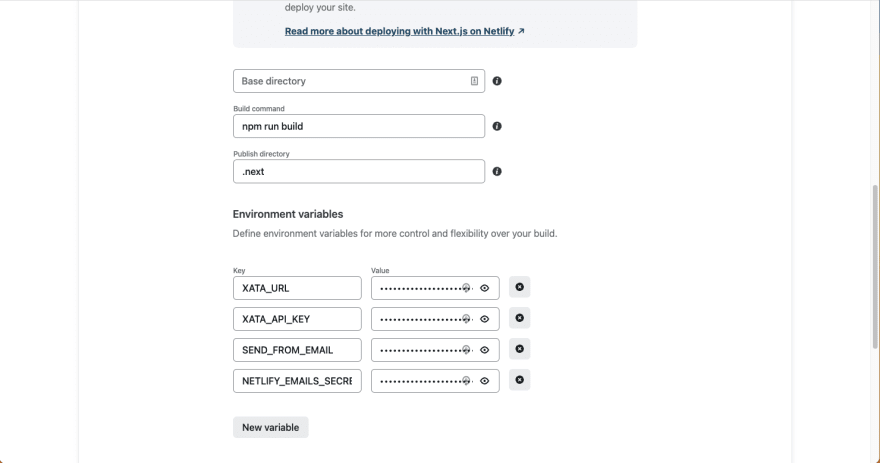
As earlier mentioned we can get the needed values from Xata workspace and SendGrid dashboard.


Click the Deploy site button to start deployment. It might take a few minutes.
Configure email integration
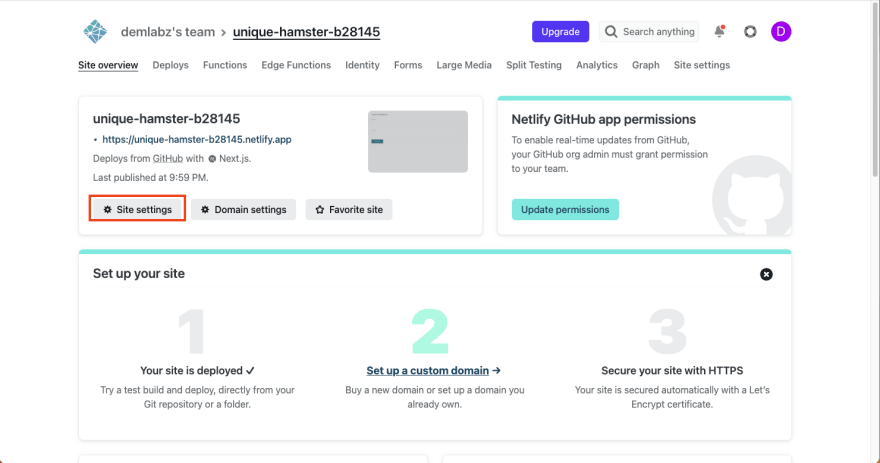
To do this, click the Site settings button to view the deployed site settings.
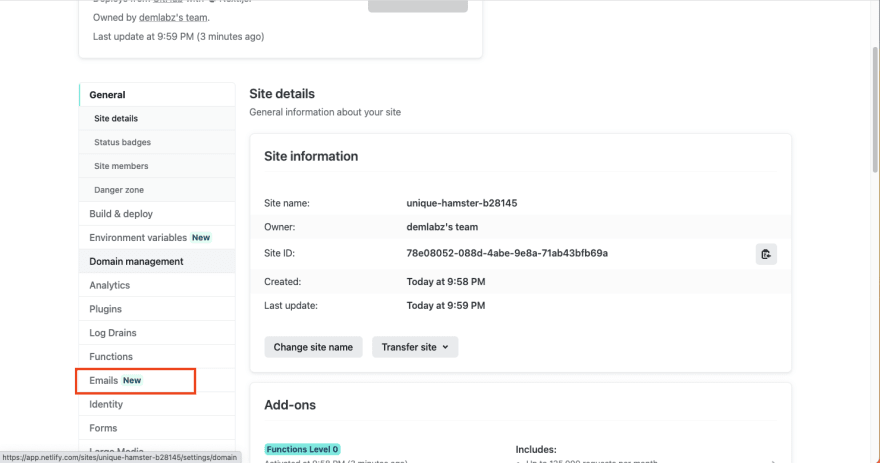
Navigate to the Emails tab and click the Enable emails button.

Select SendGrid as the email provider, input the API key we generated earlier on SendGrid, and Save.

Finally, to sync the latest changes with our deployed application, we need to navigate to the Deploys tab and trigger redeployment by clicking the Clear cache and deploy site option.

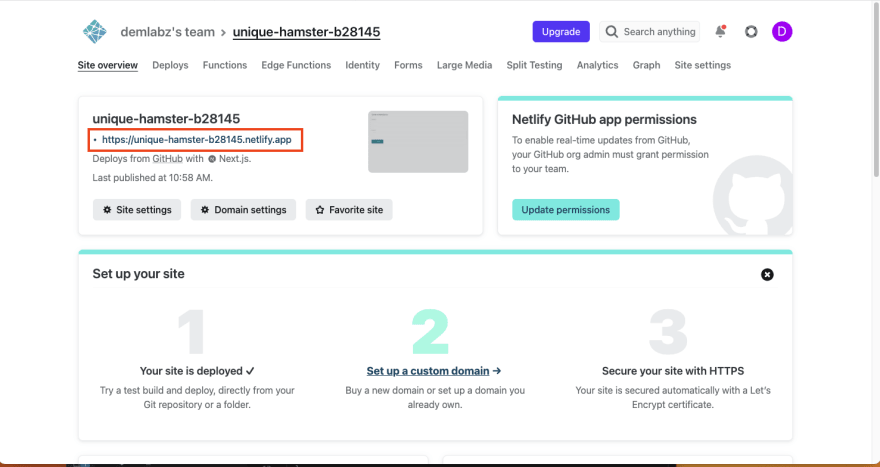
With that done, we can test our application by clicking on the deployed URL

https://media.giphy.com/media/ORKNdc9G18aDPzrjBw/giphy.gif
Conclusion
This post discussed how to save event details and trigger an email in a Netx.js application using Xata, SendGrid, and Netlify. With this approach, developers can streamline their architectural process by leveraging out-of-the-box solutions to cater to storing users' data and sending dynamic emails.
These resources might be helpful:
Original Link: https://dev.to/hackmamba/how-to-trigger-an-email-on-event-confirmation-with-netlify-2gmh
Dev To
More About this Source Visit Dev To