
An Interest In:
Web News this Week
- March 29, 2024
- March 28, 2024
- March 27, 2024
- March 26, 2024
- March 25, 2024
- March 24, 2024
- March 23, 2024
Some of Our Sources
- Web Designer Wall
- Team Treehouse
- Joshua Blankenship
- TutsPlus - Design
- Inspiredology
- Crazy Leaf Design
- Web Design Ledger
- CSS Globe
- Line 25
- Dev To
Help Webnuz
Referal links:
Deploy and maintain Kubernetes with Kubemarine - functional overview
In previous article we presented our first open source tool (Kubemarine) for Kubernetes cluster deployment and maintenance. In this text you'll find detailed overview of Kubemarine functionality and capabilities.
Delivery and deployment

Kubemarine has several methods of delivery and deployment to different environments, including closed ones. You can:
- take the source code as it is and run it through the python interpreter;
- take an already packed docker image with all the dependencies installed inside;
- for particular cases, you can take and run Kubemarine as a binary file without any dependencies;
- including python, that does not require installation, like kubeadm binary: just copy and run.Kubemarine functionality fully covers the lifecycle of the Kubernetes cluster. Kubemarine supports cluster installation, maintenance, upgrade, and validation.

Install procedure
The installation process is as simple as possible. First, you only need to specify the addresses and roles of the future cluster nodes. Then Kubemarine will install everything and configure the default plugins out of the box.
Kubemarine installation procedure will automatically install and configure a large number of services that ensure the cluster operation. Then it will automatically install and configure a new Kubernetes cluster, configure its Pod Security Policies, and then install the necessary set of plugins on a freshly deployed cluster. You will get a working cluster in just 10 minutes.
At the same time all services, parameters, and plugins are configurable, so you can change everything you need to.
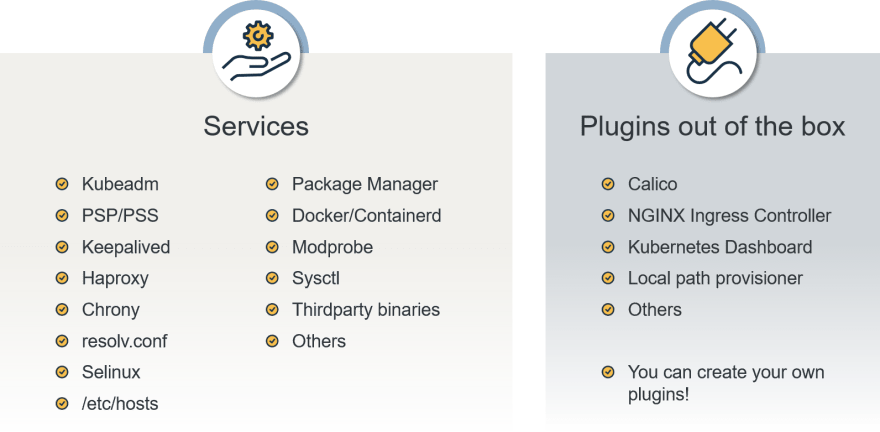
In addition to the standard installation process, you can write your plugins and run them during the installation procedure.
The structure of the custom Kubemarine plugin is like a mini-ansible, where you can declare the execution of certain commands, manipulate with the filesystem, apply YAML templates, download and unpack archives, wait for the start of pods, and even run Helm plugins.
Detailed instructions are here.
Add\remove Node
Kubemarine has maintenance procedures such as removing or adding nodes with minimal impact on the environment.
In case you need to expand the cluster, you can add a node using the appropriate procedure. You need to specify an inventory file and YAML procedure. Then everything necessary will be automatically installed on the new node, and the node will be entered into the cluster. You can add groups of nodes as well. After a while, appropriate pods will be launched on the new nodes.
If you need to remove a faulty node from the cluster, there is also a ready-made procedure for this. In the same way, specify the nodes that you need to remove, and then they will be excluded from the cluster. Moreover, the pods that were present on the excluded nodes will migrate to other nodes. Removing a node can be done even if the node is offline. And also, for this procedure, you can delete groups of nodes. The main thing to remember is that it is a dangerous action.

Backup\Restore
Kubemarine has a procedure for backing up a Kubernetes cluster, as well as its further restoration. For this, the Kubemarine will save the entire ETCD database, all descriptions of cluster resources, all basic configurations with nodes, an inventory file, and a list of all installed packages on the nodes to its backup copy.
To restore from a backup, first, you need to install an empty fresh cluster and restore your backup to it. During restoration, it is possible to specify what exactly needs to be restored - for example, you can make E2E restoration, restore the entire ETCD database as a whole, or you can restore only certain services.
If you have lost the inventory file, it's OK - only the backup file will be suitable for recovery. The inventory file is already there inside.
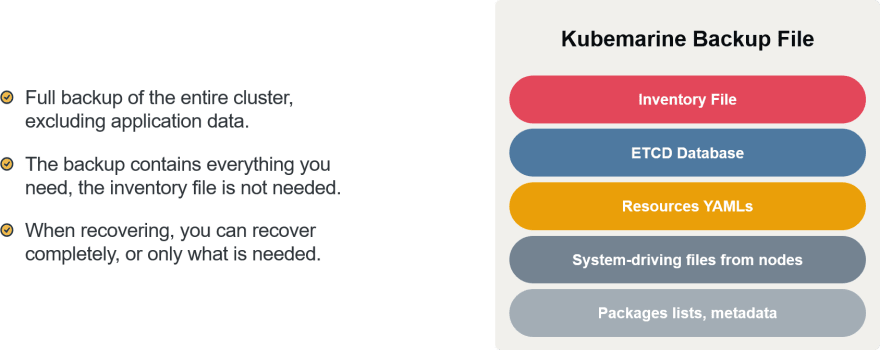
Note that Kubemarine does not manage backups of application data.
Upgrade procedure
Kubemarine can fully automatically upgrade deployed Kubernetes clusters without or minimal outage. To do this, for each node, one after another, it will drain pods, upgrade packages, upload files and configurations, and then upgrade the Kubernetes.
At the same time, Kubemarine supports automatic upgrades several versions ahead - in this case, the upgrades will occur gradually several times - from one to the next version.
The upgrade process can be customized with an additional procedure YAML inventory. For example, you can update only particular cluster nodes and change some inventory parameters if the original ones aren't relevant.
Check procedure
Kubemarine has built-in procedures for checking the environment and the cluster itself for problems. It is enough to run the procedure. Kubemarine generates a report with a list of tests results. Issues can be both warnings and errors. Warnings act like advisory, while errors signal incorrect work and require immediate fixing.

Each check procedure has its own set of tests. For example, the PAAS procedure will check the status of the cluster, its pods, the statuses of the daemons on the nodes, and the version of installed packages on the system.
While the IAAS procedure will check the network availability, the number of CPU cores, and the amount of RAM.

Also, check procedures can be run automatically and receive reports as CSV files that can be parsed. Besides, for users, there are HTML reports.
Cluster.yaml
Cluster YAML is an inventory file. It stores all descriptions of the entire cluster: nodes, services, plugins, and more. Based on it, Kubemarine connects to nodes, interacts with the environment, generates new files, and changes its behavior depending on the available parameters. It is a manually filled file by the user at the stage of preparation for installation. If changes are made manually on the already installed environment, they must also be in this file.
The inventory file contains a lot of parameters, and it is not necessary to enter all of them. It is enough to indicate only the most basic ones and all the others at your discretion. When starting the procedure, Kubemarine will automatically apply the default values to the missing parameters.
Also, the inventory file supports parameter values in the form of Jinja templates. It allows to refer to other variables of the inventory file and use formatting filters and other built-in functions directly from the inventory.
Kubemarine Tasks Tree
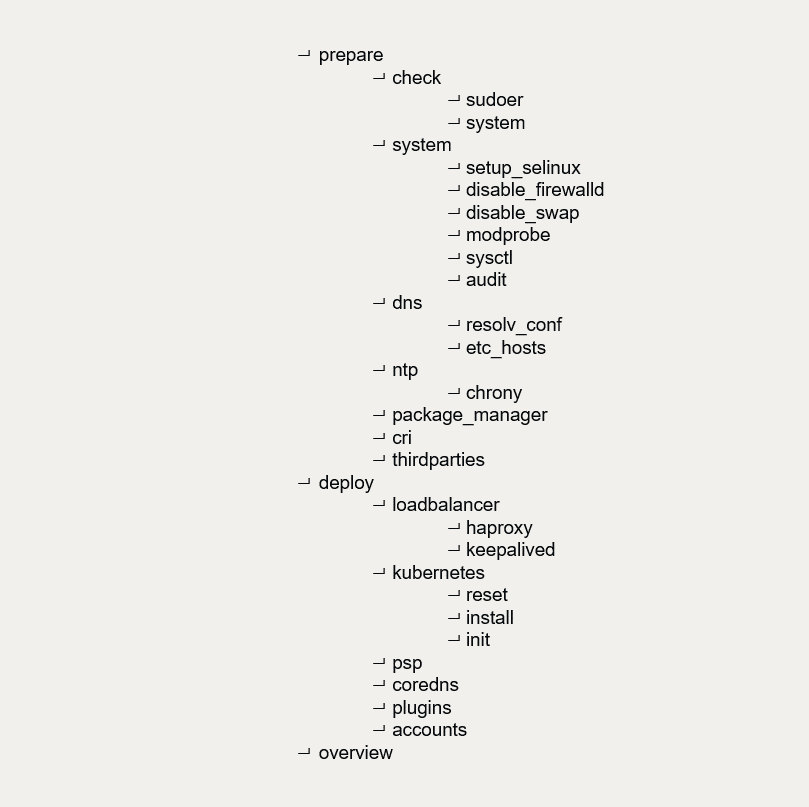
All Kubemarine procedures are divided into atomic tasks. Tasks are grouped and form a kind of tasks tree. It allows you to manipulate the procedure process - exclude some elements or run only selected tasks. You can exclude groups of tasks as excluding the node of a tree or run specific tree nodes. For example, if your installation crashes, you can continue from a certain step to save your time and skip the re-execution of the passed steps.
Kubemarine inventory Ansible compatible

A large number of IT engineers who need to run automated tasks in Ansible use Kubemarine. For these needs, Kubemarine automatically creates a configuration for Ansible based on its cluster YAML inventory file, which you can use immediately. Kubemarine always generates such files. The file exists in case of an error in the Kubemarine procedure.
Inventory Linting
Before starting the installation, Kubemarine carefully checks the correctness of filling in the parameters of the configuration file. If there are any mistakes or errors, the installation won't start. Instead, there will appear an error describing the cause of the problem

- Inventory is checked before installation
- All parameters are checked for correctness
- In case of problems, an error will be thrown and the work will be stopped
Errors Handling
If a problem arises during the work of Kubemarine, it will try to solve the problem itself. For example, if the connection to the node is lost, or if the ETCD leader changes, the installation will not fail, and Kubemarine will try to retry the remote task again. However, if the error is not possible for solving, Kubemarine will throw out an exception with a detailed description of the problem and a recommendation on what to do. Or, in case of an unknown exception, it will print a full stack trace for convenient debugging and searching for the error root cause.
Kubemarine Dumps
Kubemarine saves all configs created during its work on the deploy node. It is very convenient: you can inspect files locally without connecting to a remote cluster. You can also save locally the entire history of the cluster configuration for further inspection.
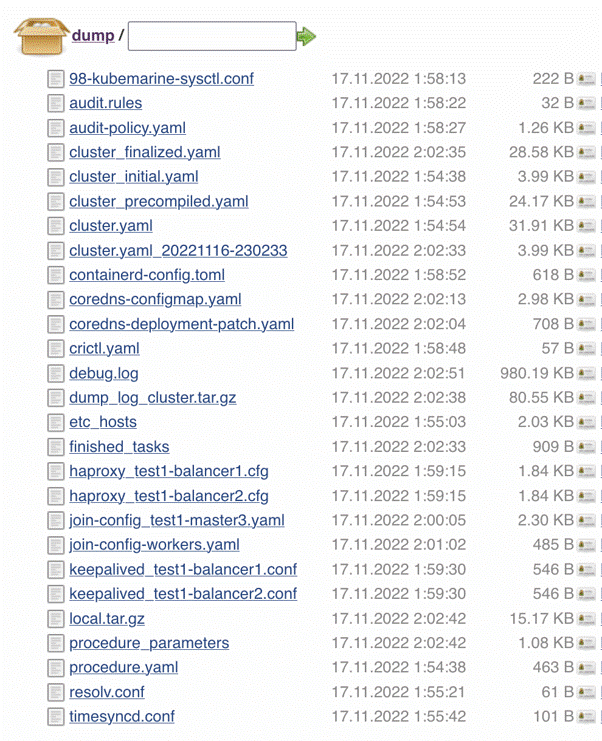
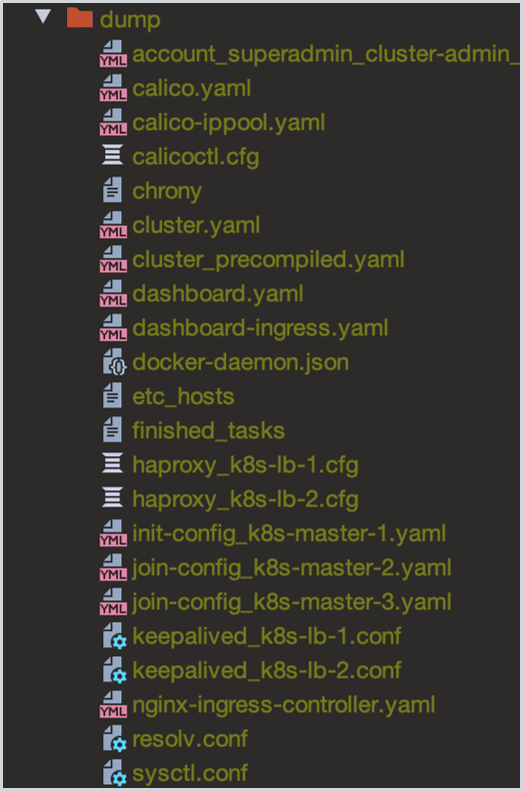
In addition to the usual dump, Kubemarine creates a finalized dump that contains all the calculated values and defaults. It is a dump that can be reused in the following procedures and stored in permanent storage to have the most actual inventory for each run.
Kubemarine Logging
Kubemarine can customize its logging. By default, logs are printed to stdout and saved to a file in the dump. However, you can change this behavior at your discretion: change the logging level, format, files destinations, and even send the logs to the Graylog. You can have an unlimited number of log destinations in any combination.
Performance
In addition, Kubemarine has an impressive speed of work. According to our measurements, it will take 10 to 15 minutes for Kubemarine to install a cluster from scratch.
Join our Slack Community
Follow us on github to use Kubemarine and make it better
Thanks for the Illustrations Woolly collection on icons8.com
Original Link: https://dev.to/netcracker/deploy-and-maintain-kubernetes-with-kubemarine-functional-overview-1mkm
Dev To
More About this Source Visit Dev To