
An Interest In:
Web News this Week
- April 2, 2024
- April 1, 2024
- March 31, 2024
- March 30, 2024
- March 29, 2024
- March 28, 2024
- March 27, 2024
Some of Our Sources
- Techcrunch
- Technology Review
- Six Revisions
- Crazy Leaf Design
- Web Design Ledger
- 24 Ways
- Wal You
- Web Resource Source
- Daily Now
- Hashedout
Help Webnuz
Referal links:
How to set up Google Tag Manager on Shopify (data layers)
This will be your go-to guide for understanding and setting up Google Tag Manager on on Shopify. We will be talking about Shopify but you can also apply these learnings to other platforms such as WordPress, Webflow, etc. You will just need to tweak some settings by yourself.
My team and I have completed Google Tag Manager setups for over 2000 Shopify stores. We have created a couple of open-source solutions used by 5000+ merchants. All of it to prove that - we know the drill. You are in the right place.
Google Tag Manager is a powerful tool and offers too much value - especially for e-commerce stores. I have created tons of content on this matter. You might be trying this first time (hey, new friend!), or you have used other tutorials of mine before, and youre looking to upgrade your setup (welcome, again!).
This complete guide on Shopify Google Tag Manager Integration has 3 main sections, 9 steps and 24 sub-steps. I know it sounds like a lot! But I promise you that it is not exhausting. Each section is designed to teach you something important; they are interconnected. It will be too easy to follow.
Some are small things you will almost automatically do or have already done. So once again, 17 shouldnt scare you. It will work like a charm; youll enjoy it.
Here is how we will set up Google Tag Manager on Shopify:
Section 1: Setting up GTM on Shopify
- Step 1: Add the GTM script to the Shopify theme files.
- Step 1.1: Copy GTM Script
- Step 1.2: Shopify Theme > Edit Code
- Step 1.3: Paste the script in theme.liquid
- Step 2: Add the GTM script to thank you page > Additional Scripts
- Step 3: Create a GA4 tag on GTM and validate the GTM setup
- Step 3.1 Create a GA4 Global tag on GTM
- Step 3.2 Verify with GTMs Preview Mode
Section 2: Setting up data layers on Shopify
- Step 4: Add product view data layer into the Shopify theme
- Step 4.1: Create a new snippet
- Step 4.2: Paste the Product View Data layer into the snippet
- Step 4.3: Include the snippet
- Step 5: Add purchase data layer on Shopify
Section 3: Set up Google Tag Manager Tags & Triggers & Variables
- Step 6: Set up e-commerce variables
- Step 6.1: Add new variable
- Step 6.2: Name and choose the Data layer variable
- Step 6.3: Add the DLV name & parameters
- Step 6.4: Create all the variables
- Step 7: Create GTM triggers for Shopify
- Step 8: Create the GA4 - View Item e-commerce event
- Step 8.1: Create a GA4 Event
- Step 8.2: Add event parameters.
- Step 9: Validate the Shopify GTM setup using Google Tag Manager debug mode.
- Step 9.1: Test GA4 View Item - Debug Mode
- Step 9.2: Test GA4 View Item - Tag details
Lets get started, shall we?!
Section 1: Setting up GTM on Shopify
In this section, we will add the GTM container scripts into Shopify theme files and additional scripts to be triggered in the thank you pages. Once again, this will work for both Shopify Plus and Shopify non-Plus. (Yes, you can set up Google Tag Manager also on Shopify non-Plus plans.)
Feel free to skip Step 1 and Step 2 if you are sure you set up GTM on your Shopify store and it is working well. I would strongly recommend taking the Ste3 action and validating the GTM working correctly on the store.
Step 1: Add the GTM script to the Shopify theme files.
It is quite classic. We will copy the GTM containers script from your Google Tag Manager account and then paste it into theme.liquid file and checkout.liquid file. Checkout.liquid is only for Shopify Plus merchants.
Step 1.1: Copy GTM Script
Go to your Google Tag Manager account. You can easily create a new account or a new container within an account if you dont have one. When you click the GTM ID (such as GTM-KL4TS23) on the right top of the menu section, it will show you the full code block.

Just copy it. We can ignore the second code block. It doesnt have much use in our case. If you are curious why we ignore it, ask the question in the comments and I will answer.
Step 1.2: Shopify Theme > Edit Code
We have to edit the theme files. You can use a duplicated theme or production theme. It is totally up to you.
Shopify Admin > Sales Channels > Online Store > Themes > Choose theme > Edit Code

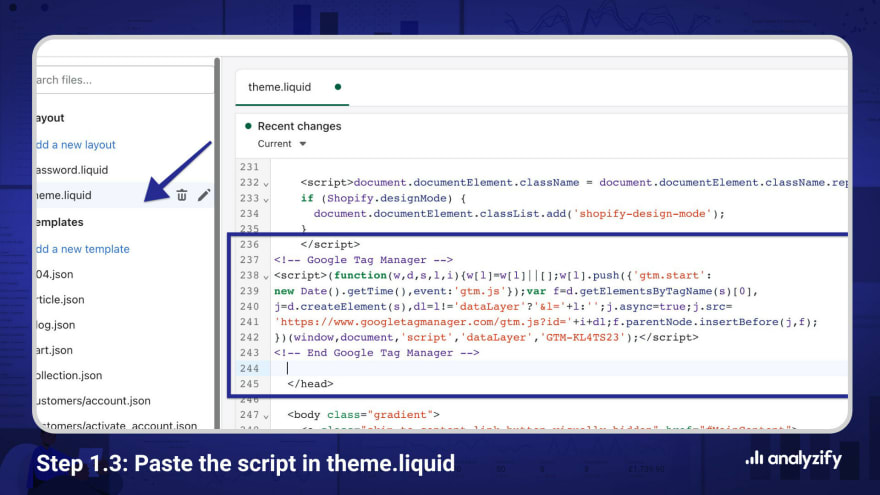
Step 1.3: Paste the script in theme.liquid
It is time to add this GTM script to Shopifys theme liquid. This script will reflect in all pages except for the checkout steps. Shopify Plus merchants should also add the code into the checkout.liquid file.
Just make sure to paste the code block above in the file. This is the best place for a Google Tag Manager script.
SAVE the code change. If you are using a duplicated theme, you will need to either PUBLISH or PREVIEW the theme while doing tests. We have had lots of merchants who complain that the solution is not working - yet they just test out the wrong theme.
And once again, the Google Tag Manager setup on Shopify works for non-Shopify plus merchants as well. You are just missing out on the checkout events. The purchase will still be covered in the next step. The great news is that I will soon publish another tutorial where you can also track the checkout events using Shopifys new features Shopify Customer Events and Shopify Pixels.
Step 2: Add the GTM script to thank you page > Additional Scripts
You must be familiar with this section as well. Shopify allows you to manage the scripts on your Order status page (aka thank you) page.
Visit Shopify Admin > Settings > Checkout > Order status page > Additional Scripts
Just paste the GTM code here as well. Ideally, it should be at the top. As you are here, you can also clean up this section if there are redundant scripts. Dont delete anything you are not aware of.

Now it is time to test our GTM installation.
Step 3: Create a GA4 tag on GTM and validate the GTM setup
This step has two purposes:
Creating a Google Analytics 4 configuration tag. This will track all the page views and also help us with the next events.
Testing out the GTM integration. Yes, even though you are sure your GTM is up and running on your store; we never move on without testing so that we know where the problem is.
Step 3.1 Create a GA4 Global tag on GTM
Now we will create a Google Analytics 4 configuration tag (aka global tag).
Google Tag Manager > Tags (Left menu) > Add New > Name it as: GA4 - Global.
Add your GA4 measurement ID. It should look like this: G-Y5VMTEWR8V. You can create a new Google Analytics property if you dont have one.
Then choose ALL PAGES from the Triggering section and then SAVE the Tag.

Step 3.2 Verify with GTMs Preview Mode
Go back to GTM and click PREVIEW on the right top corner. Type your store URL and click CONNECT. It should show the GA4 Global tag on the debugging screen.
If you have installed the GTM container script into a duplicated Shopify theme; then you will need to use a theme preview link here.

We can safely move to the next phases if we have seen Google Tag Manager and Google Analytics 4s Global tag worked on your Shopify store.
Section 2: Setting up data layers on Shopify
We need data layers to properly process and send the data through Google Tag Manager. We will set up data layers for the product page and purchase on your store.
Oh, gosh - I love data layers.
Data layers carry out the data in a standardized, structured format so that GTM can read and process it correctly.
As an example, in the single product page; we need to send:
- Product ID
- Product Name
- Product Price
- Currency
- Product Category, etc
So, all these will be formatted within the Product View data layer. The same will apply the Shopifys Order Status page. We will add the purchase data layers.
I will, of course, share the code blocks, as well as most of you, are here for that purpose, huh?
Step 4: Add product view data layer into the Shopify theme
We will now add a new snippet on your theme files and put the data layers there.
It is possible to add the data layers directly on your theme.liquid file but I choose more organized method. We will create a new snippet for this.
As you will see in the code blocks, we will have the following events on the Shopify Product data layers:
- Product ID
- Product Name
- Product Price
- Product Brand
- Product Collection
- Product Type
- Product SKU
- Variant ID
- Variant Title
- Currency
All of these Shopify product data layers will be available on Google Tag Manager after we set this up correctly.
Step 4.1: Create a new snippet
Just like in Step 1.2, go to your Shopify Themes Edit Code page. This time, we will do something differently. Scroll down and find the section called Snippets.
Click Add New Snippet and then name it as: analyzify-product-datalayer. You can name it however you like but it is better to name it this way to be able to track the changes later on.

Step 4.2: Paste the Product View Data layer into the snippet
You got the point! We will use Analyzifys open-source Product data layer script. Just copy the code below, paste it into the new snippet, and then SAVE it.

{% comment %} Product view data layer v2.1 - part of "Shopify GA4 Kit" by AnalyzifyVisit https://analyzify.app/shopify-google-analytics/ga4 for complete tutorial {% endcomment %}{% assign template_name = template.name %}<script type="text/javascript">window.dataLayer = window.dataLayer || [];window.appStart = function(){ window.productPageHandle = function(){ var productName = "{{ product.title | remove: "'" | remove: '"' }}"; var productId = "{{ product.id }}"; var productPrice = "{{ product.price | money_without_currency }}"; var productBrand = "{{ product.vendor | remove: "'" | remove: '"' }}"; var productCollection = "{{ product.collections.first.title | remove: "'" | remove: '"' }}"; var productType = "{{ product.type | remove: "'" | remove: '"' }}"; var productSku = "{{ product.selected_or_first_available_variant.sku | remove: "'" | remove: '"' }}"; var productVariantId = "{{ product.selected_variant.id | default: product.variants[0].id }}"; var productVariantTitle = "{{ product.selected_variant.title | default: product.variants[0].title }}"; window.dataLayer.push({ event: "analyzify_productDetail", productId: productId, productName: productName, productPrice: productPrice, productBrand: productBrand, productCategory: productCollection, productType: productType, productSku: productSku, productVariantId: productVariantId, productVariantTitle: productVariantTitle, currency: "{{ shop.currency }}", }); }; {% case template_name %} {% when "product" %} productPageHandle(); {% endcase %}}appStart();</script>Make sure to SAVE the snippet.
Step 4.3: Include the snippet
Now we will include (render) the snippet using the theme.liquid file. Again open the theme edit section.
Find theme.liquid file under the Layout section on the left bar. Open the theme.liquid file and search "/head" in the file. Paste the following code just above it:
{% render 'analyzify-product-datalayer.liquid' %}At final, it should look like in the screenshot. We are ready to move on setting up the purchase data layer.

Step 5: Add purchase data layer on Shopify
We will now add the Purchase data layer into the Order Processing > Additional scripts - just like we have done in Step 2.
Go to your Shopify Admin > Settings (Left bottom) > Checkout and then Navigate to Order Processing > Additional Scripts.
Copy the code below and then paste it right under the Google Tag Manager script that we have recently added.
{% comment %} Purchase data layer v2.1 - part of "Shopify GA4 Kit" by AnalyzifyVisit https://analyzify.app/shopify-google-analytics/ga4 for complete tutorial {% endcomment %}{% assign template_name = template.name %}<script type="text/javascript">window.dataLayer = window.dataLayer || [];{% if first_time_accessed and post_purchase_page_accessed != true %} var shippingPrice = "{{shipping_price | money_without_currency }}".replace(",", "."); var totalPrice = "{{checkout.total_price | money_without_currency }}".replace(",", "."); var taxPrice = "{{tax_price | money_without_currency }}".replace(",", "."); var orderItemsName = []; var orderItemsId = []; var orderItemsCategory = []; var orderItemsBrand = []; var orderItemsType = []; var orderItemsPrice = []; var orderItemsSku = []; var orderItemsvariantId = []; var orderItemsQuantity = []; var orderItemsvariantTitle = []; var totalQuantity = 0; {% for line_item in checkout.line_items %} orderItemsName.push("{{ line_item.product.title | remove: "'" | remove: '"'}}"); orderItemsId.push("{{ line_item.product_id }}"); orderItemsPrice.push("{{ line_item.price | times: 0.01 }}"); orderItemsSku.push("{{ line_item.sku | remove: "'" | remove: '"' }}"); orderItemsQuantity.push("{{ line_item.quantity }}"); orderItemsvariantId.push("{{ line_item.variant_id }}"); orderItemsvariantTitle.push("{{ line_item.variant.title }}"); orderItemsCategory.push("{{ line_item.product.collections.last.title | remove: "'" | remove: '"' }}"); orderItemsBrand.push("{{ line_item.vendor | remove: "'" | remove: '"' }}"); orderItemsType.push("{{ line_item.product.type | remove: "'" | remove: '"' }}"); totalQuantity += {{ line_item.quantity }}; {% endfor %} window.dataLayer.push({ page_type: "purchase", event: "analyzify_purchase", currency: "{{ shop.currency }}", totalValue: totalPrice, totalValueStatic: totalPrice, currencyRate: window.Shopify.currency.rate, shipping: shippingPrice, tax: taxPrice, payment_type: "{{order.transactions[0].gateway}}", {% if order.name %} transaction_id: "{{order.name | remove: "'" | remove: '"'}}", {% else %} transaction_id: "{{checkout.id | remove: "'" | remove: '"'}}", {% endif %} productName: orderItemsName, productId: orderItemsId, productBrand: orderItemsBrand, productCategory: orderItemsCategory, productVariantId: orderItemsvariantId, productVariantTitle: orderItemsvariantTitle, productSku: orderItemsSku, productType: orderItemsSku, productPrice: orderItemsPrice, productQuantity: orderItemsQuantity, });{% endif %}}appStart();</script>Now our data layers are ready and already should be sending the data pieces and events. The fun part is about to begin!

Section 3: Set up Google Tag Manager Tags & Triggers & Variables
Google Tag Manager is my favorite tool and I am happy to show you around. We will create Tags, Triggers, and Variables. In this section, we will make the variables and events ready on your GTM account.
We will set up GA4 E-commerce events through GTM for your Shopify store. You can use this knowledge and set up other tags as well.
Step 6: Set up e-commerce variables
Do you remember the data layers we added above? Now we will take their variables one by one and then define them into GTM. In this way, your Shopify store data will flow into GTM.
There are too many variables to set. I will do this for one of them, and you will repeat the process for all others.
Step 6.1: Add new variable
Visit Google Tag Manager, Click VARIABLES from the left menu and then ADD NEW.

Step 6.2: Name and choose the Data layer variable
The naming convention is quite important here as we will have too many data layer variables. Name the first variable as: dlv - productId
You can actually choose the name you like - but I strongly recommend following this practice:
dlv - variable-name
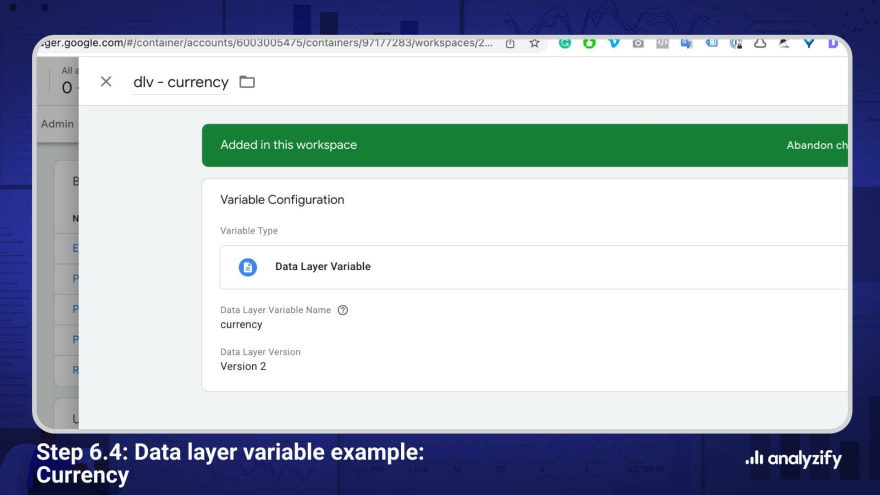
Step 6.3: Add the DLV name & parameters
So in this case, the variable name will be: dlv - productId, and we will add productId in the Data Layer Variable Name section.
This section is case-sensitive, so make sure to add it totally matching your data layer variables from the code blocks. You can refer to the image below to make sure.

SAVE this one and then move on to create all the rest.
Step 6.4: Create all the variables
Now it is time to create all the variables. You can check your data layer codes to make sure about the variable names.

These are the ones that we should be creating:
- totalValue
- totalValueStatic
- currencyRate
- shipping
- tax
- payment_type
- transaction_id
- productName
- productId
- productBrand
- productCategory
- productVariantId
- productVariantTitle
- productSku
- productType
- productPrice
- productQuantity
- productVariantId
- productVariantTitle
- currency
The bad news is that you have to create all of them one by one. I could provide you with a pre-built file. I have only created the ones that I will use in the next steps.
Feel free to create the ones that you want to use as well. But I really want you to practice and learn, sorry about it :)
Here is how I do it:
And the final result should look like this:

Step 7: Create GTM triggers for Shopify
We will create the following custom events as triggers:
- Product View
- Purchase
The triggers will get the data from the custom data layer events that we have recently added on Shopify themes & order processing scripts.
The event section, right under dataLayer.push on our code block refers to the custom event I mention above.
window.dataLayer.push({page_type: "purchase",event: "analyzify_purchase"So our triggers will be custom events named as:
- Analyzify Shopify Purchase: analyzify_purchase
- Analyzify Shopify Product View: analyzify_productDetail
Here is how you should create the Purchase trigger. 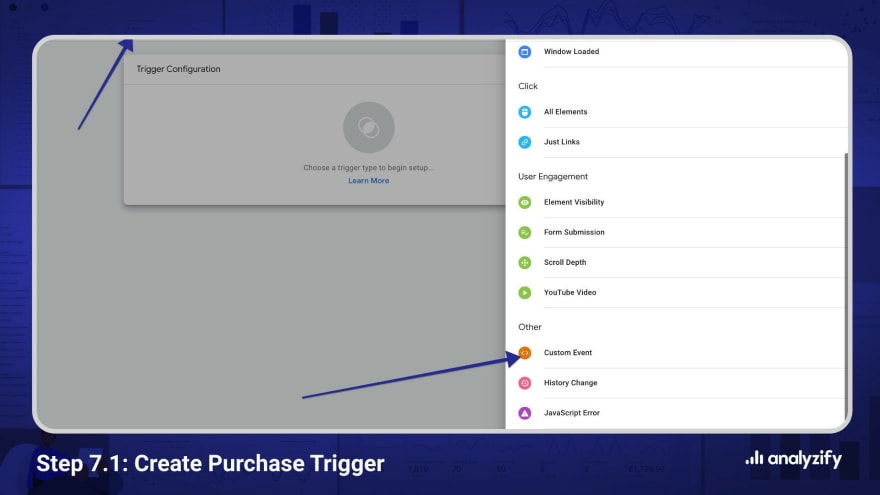
And here is how it should look like in the final: 
Step 8: Create the GA4 - View Item e-commerce event
It is time to use the variables and triggers in action. We will create a Google Analytics 4 - View Item event for Shopify.
Step 8.1: Create a GA4 Event
Click Tags > Create a New Tag (Just like in Step 3). Name the tag as GA4 - View Item. This time, choose GA4 Event from the Tag types.
The event name should match GA4s guideline, so it should be view_item

Step 8.2: Add event parameters
Now we have to attach event parameters. The parameter name should match GA4s documentation again so it will be item_name instead of product_name.
And the second field is where we will choose the VARIABLES that we have recently added. The brackets refer to variables.

Here is the full list I have used in the image.
'item_name': {{dlv - productName}},'item_id': {{dlv - productId}},'item_brand': {{dlv - productBrand}},'item_category': {{dlv - productCategory}},'item_variant': {{dlv - productVariantTitle}},'price': {{dlv - productPrice}},'quantity': {{dlv - productQuantity}},We have now completed the Product View event. You can do the same with Purchase event if you are seeking a GA4 E-commerce setup. As the topic here is installing GTM on Shopify; I will not lose more time with GA4.
Step 9: Validate the Shopify GTM setup using Google Tag Manager debug mode.
Now we will use Google Tag Managers debug mode - just like we have done in Step 3.2. We will try the product view event.
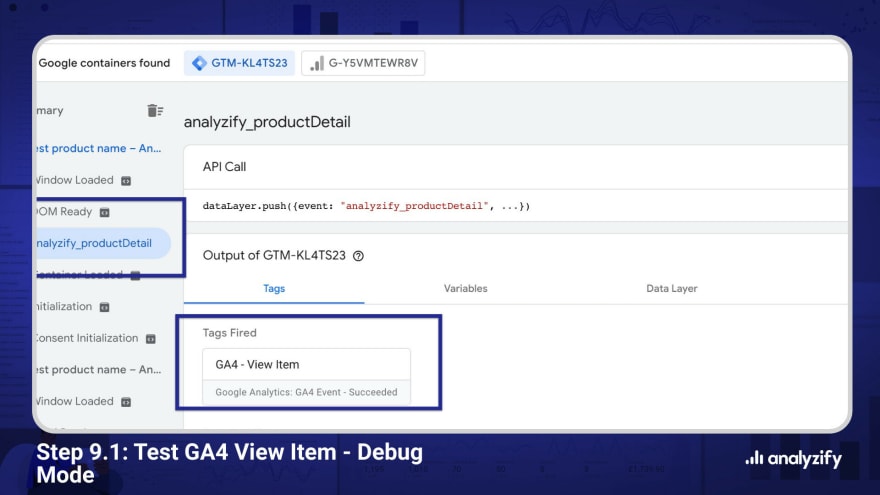
Step 9.1: Test GA4 View Item - Debug Mode
Follow the steps same as Step 3.2 and this time type a product URL instead of the homepage. Once again, make sure to use a theme preview link if you are not using your production theme.
The GTM Debug mode should show the events on the left, and the tags on the right. If you are seeing analyzify_product detail and GA4 View Item tag; it is correctly done and time to celebrate.
Step 9.1: Test GA4 View Item - Tag details
Lets deep dive here for those who want to understand and debug more. Click the event name on the left and then the tag name on the right. You will not see the details if you dont click the event name first.

You should be seeing all the parameters that are sent along with this event.
It looks like we are all set. If something went wrong, make sure to double-check your data layers and GTM container. You must have done something wrong while connecting your Shopify store with data layers or the GTM.
This is a bulletproof tutorial. Feel free to challenge me in the comments - and Im happy to answer and make edits if needed.
FAQ on Shopify & Google Tag Manager Integration
Well, you can imagine we receive tens of questions every day on this topic. I will try to cover the commonly asked questions and answers here. Feel free to ask if you have an additional question on Shopify & GTM topics.
Can I use GTM on Shopify without the Shopify Plus plan?
Yes, you can definitely set up GTM on Shopify with a Shopify Basic or Advanced plan as well. Shopify Plus offers you additional checkout.liquid file - where you can also add the Google Tag Manager snippet on your Shopify Checkout steps. However, checkout.liquid is also now going away with Shopifys recently launched Shopify Checkout Extensions.
Can I install Google Tag Manager on Shopify Checkout?
Yes but it requires a Shopify Plus plan. While you can set up GTM on Shoify with all plans; editing the checkout process is only available for the Shopify Plus plan - using the checkout.liquid file.
However, Shopify announced that it wont be possible adding scripts including GTM with the latest Shopify Checkout Extensions updates.
Do I need Shopify data layers for Google Tag Manager?
You can install Google Tag Manager on Shopify without data layers as well but you can not use it much. You need data layers if you want to pass any specific data such as Product ID, name, price, Order ID, etc. The data layers will allow you to pass the parameters with specific tags. You can check the article above to find the full answer with examples.
How can I set up enhanced e-commerce on Shopify using Google Tag Manager?
Enhanced E-commerce is a Universal Analytics feature. You dont need to install Google Tag Manager on Shopify to use enhanced e-commerce. Shopifys native Universal Analytics integration already covers it. You can use the tutorial above and Shopify GA4 Kit to set up Google Analytics 4 e-commerce events on Shopify.
What is the difference between Google Tag Manager vs Google Analytics?
Google Analytics is a tracking and reporting tool. You can see your visitor and user behavior data in Google Analytics. Google Tag Manager is a connector between your website and the tracking tools. GTM allows you to set up the tracking scripts easily on your website and pass the relevant data along with them.
Do I need a Shopify app to set up Google Tag Manager?
Technically no. You can install the GTM scripts on Shopify without using an app. This in-depth tutorial is all about setting up GTM without using an app. However, apps like Analyzify offers you more in-depth tracking. The Analyzify data layers cover many other parameters and it offers full e-commerce tracking. Shopify GTM Apps also offer many built-in integrations. So you dont have to tweak the code and play around with GTM to set up the complete tracking.
I hope it was all helpful! More questions? Send them along through the comments.
Original Link: https://dev.to/ekuplu/how-to-set-up-google-tag-manager-on-shopify-data-layers-16j5
Dev To
More About this Source Visit Dev To