
An Interest In:
Web News this Week
- March 20, 2024
- March 19, 2024
- March 18, 2024
- March 17, 2024
- March 16, 2024
- March 15, 2024
- March 14, 2024
Some of Our Sources
- Pearsonified
- Abduzeedo
- You The Designer
- Inspiredology
- CSS Globe
- 24 Ways
- Wal You
- Freelance Switch
- Android Dissected
- Android Headlines
Help Webnuz
Referal links:
gitPanic - Interactive Rebase
There is no squash rebasing because you can use an interactive rebase to rewrite your commit history. Once you understand this powerful tool, people will think you're a git wizard.
This blog assumes you have a basic understanding of git or have read Git 101 and Merging and Rebasing.
- Warnings
- SHA
- git log
- Starting the Rebase
- Finishing the Rebase
- Practical Examples
- Advanced: Rebase Onto
- Other Helpful Commands
Warnings
I really mean it when I say interactive rebasing is rewriting your commit history.
If you're working in a public repo, and you're rebasing commits that have already been pushed to the remote, you can literally delete commits. Keeping an accurate commit history can be important. It is recommended only to interactive rebase your local commits for this reason.

The exception to this rule is commits in your branch intended for development. If you're opening a PR to merge your work into develop, I'd say they're still fair game.
Deleting commits with interactive rebase also means you can lose work. If you rebase a lot of commits and have a lot of merge conflicts, it is also quite easy to accidentally remove work that way.
I'll be covering how to recover lost work in a future blog. It's almost always recoverable.
SHA
I've touched on a commit's SHA in a couple of the other blogs in this series. It's a unique identifier for the commit made using the SHA-1 hash algorithm. It's essentially the name of the commit, and we'll be passing it to the rebase command.
It's also referred to as reference and hash. I'll be using SHA.
You may see people passing a short SHA - anywhere from 5 - 12 characters. This will definitely work in a small project, and git is pretty smart about matching SHAs. Be forewarned - as the number of commits increase, so does the likelihood that you may have 2 commits with the same first few digits. When the Linux kernel hit 875,000 commits, they found they needed 12 characters. The git reference docs recommend using 8 - 10.
git log
Before you start interactive rebasing, you want to understand your commit history. You can do this by running git log. This command has many options and things you can configure to get the most out of it.

The log will print out the entire commit history, with the latest commits at the top. Without any configuration or passing any options, each commit in the log will have its SHA, the branches it's in, the author, the date, and the commit message. You can always enter q to quit.
Like you're manually merging, you want to find the last commit before the commits you want to edit. It was called the last common commit when merging, and it's often referred to as the parent commit when rebasing. This is the SHA we will pass to the rebase command.
Instead of a SHA, you can use HEAD shorthand like HEAD^3 instead.
Starting the Rebase
This will open an editing window. If you want to do it in the terminal, have the vim command cheatsheet ready. Otherwise, check out your other options.
We start by running
git rebase -i <SHA>This will print out a list of commits you can edit with the oldest at the top. All of them will have the keyword pick in front of them. If you want to change a commit, you will replace the keyword.

Replacing characters in the vi window takes some getting used to. First, you'll move your cursor left with the h key, right with l, down with j, and up with k. To insert characters, you use i to enter insert mode. To get out of insert mode and be able to move your cursor again, you use esc.
When you're done editing on this screen, every commit should have the short or long version of one of these keywords next to it:
- p, pick = use commit
- r, reword = use commit, but edit the commit message
- e, edit = use commit, but stop for amending
- s, squash = use commit, but meld into previous commit
- f, fixup = like "squash", but discard this commit's log message
- x, exec = run command (the rest of the line) using shell
- d, drop = remove commit
If you needed to re-order commits, just put the commit where you want it in this list.
Finally, when you're done, you can exit with :wq, which tells the vi window to write (add) all your edits and then quit.
Finishing the Rebase
If the only keywords you use are pick and drop, you'll be done except for resolving any conflicts.
Just like merge, you can continue by running git rebase --continue or escape by running git rebase --abort.
If you used reword, edit, or squash, you'll be transported into another edit window to rewrite or write your commit messages using insert mode and ending with :wq just like before. Then you'll have to resolve any conflicts.
Once all of that is done, you'll have a shiny new commit history. Run git log again to make sure you like it. Because you changed commits, which changes their SHAs, you'll have to git push --force-with-lease to get your changes into the remote branch.

Practical Examples
Disclaimer: these are terrible commit messages meant only to provide an example commit history. Read more about writing good commit messages.
Change an Old Commit Message
Running git commit --amend will allow you to change the last commit message, but what if you realized you committed a typo a while ago?
First I run git rebase -i b95b221368b028816c7af3cc1eee4ea5eb5eec50, because that's the last common commit for main and fix--button. I enter interactive mode with i, replace "pick" with "reword" for the commit with a typo in the commit message (e24d7d6). Next, I exit interactive mode with esc, and run :wq.

A new edit window opens and I fix the typo in interactive mode and run :wq again.

I run git log and see there's no more typo in my commit history!

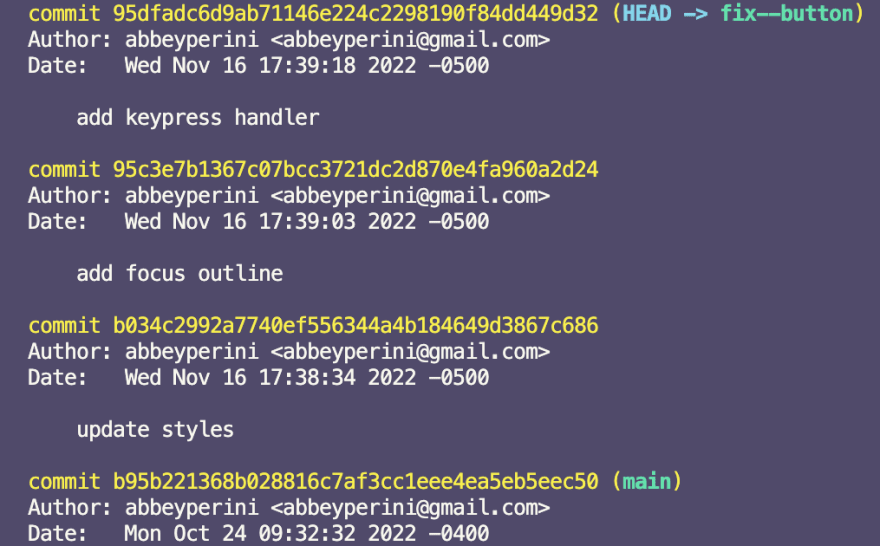
Squash Some Commits
Ideally, the commit messages in your PR should tell a story. Here's how to convert three commits with useless commit messages into one meaningful message.
First I run git rebase -i b95b221368b028816c7af3cc1eee4ea5eb5eec50.

I know there are 3 commits I want to squash into one. While in interactive mode, I replace "pick" with "squash" for the most recent two (601d5b0 and 943f2e2 in this case). After exiting interactive mode with esc, I enter :wq and a new edit window opens.
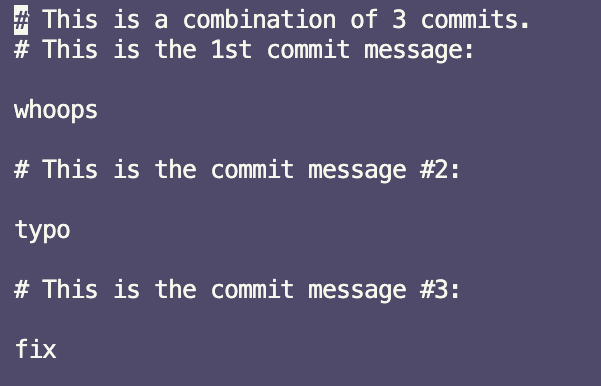
In interactive mode, I edit the three messages down to one, and run :wq again.

Finally, I run git log and see my beautiful new commit history!

Remove a Commit You Don't Need
Whoops! I went down the wrong path and committed changes I eventually rewrote completely. Instead of including that commit in my PR, let's remove it.
First I run git rebase -i b95b221368b028816c7af3cc1eee4ea5eb5eec50. Then, I add the drop keyword next to the commit I don't need anymore (2d93dd9) in interactive mode. Finally, I run :wq.

Running git log shows I've gotten rid of that commit I didn't need!

Advanced: Rebase Onto
Help! My coworkers have pushed commits into the develop branch! I based my fix--button branch off of the develop branch weeks ago!
There's a button in the Github PR UI that will appear in this situation. It gives you two options - merge and rebase. If a fast-forward merge isn't possible, the merge button will create a merge commit and possibly conflicts.
The rebase option is running git rebase --onto.
Your PR is comparing the fix--button branch to the develop branch. The develop branch is the new base. The fix--button branch based off of the old version of develop is the old base.
So if we wanted to do this in command line, we'd run:
git rebase --onto develop fix--buttonThis takes all of the commits in fix--button and puts them after all the commits in develop. In other words, this changes the last common commit for develop and fix--button to the most recent commit in develop. You may still have to resolve conflicts, but as far as git is concerned, your fix--button is now based off the current version of develop. When you go to merge fix--button into develop, you may even be able to do a fast-forward merge.

Manually moving the commits from develop to fix--button, with git cherry-pick and using interactive rebase to do this would change the commit SHAs. When you went to merge the branches, git would consider the same commits with different SHAs as different commits, and you'd have quite the merge on your hands.
Other Helpful Commands
There are a couple git commands that aren't necessary for understanding how to interactive rebase, but can be really helpful if you need more information.
git diff
The git diff command will give you even more information about the changes in the branch.
I talked about unified vs split diffs in the context of merge conflicts. This allows you to look at the diff without running git merge or opening a PR. In addition to comparing branches, you can compare commits and files.
git show
The git show command allows you to view the information git has stored about your repo. You can view changes by file, commit, and branch. You can view commits or ranges of commits. You can view file versions from a specific commit. You can format all of this information by passing options to the command. It's basically an interactive wiki for your repo.
Conclusion
Like most things git, there's a whole lot more you can do with interactive rebase. This should give you a decent understanding so you can practice and eventually learn those fancy tricks.
This whole #gitPanic series started because I wanted to write a guide for interactive rebasing after I finally understood it. Big thank you to my coworkers, Anastasia and Rachael, for patiently walking me through interactive rebasing when it came up at work.
Original Link: https://dev.to/abbeyperini/gitpanic-interactive-rebase-48fe
Dev To
More About this Source Visit Dev To