
An Interest In:
Web News this Week
- April 20, 2024
- April 19, 2024
- April 18, 2024
- April 17, 2024
- April 16, 2024
- April 15, 2024
- April 14, 2024
Some of Our Sources
- Engadget
- Simplebits
- Team Treehouse
- Smashing Magazine
- Abduzeedo
- Naldz Graphics
- Reencoded
- Android Dissected
- Codrops
- Hashedout
Help Webnuz
Referal links:
Nhost: The Perfect Backend 101: The Essential Guide
Introduction to Nhost
Nhost is the GraphQL open source development and backend platform. Nhost does for the backend, what Netlify and Vercel do for the frontend. Nhost provide a modern backend with the common building blocks needed to create great digital products.

It simplify the creation and deployment of the backend by using nhost platform that takes care of configuration, security and performance. Things work and automatically scale so you can focus on your product and business.

Architecture
Nhost is a backend service built with open source tools to provide developers with the common building blocks needed to create great apps and digital products.
Here is a high-level diagram of the Nhost stack:

As you can see in the image above, Nhost provides endpoints for:
- GraphQL (/ graphql)
- Authentication (/ auth)
- Archiving (/ archiving)
- Functions (/ functions)
The data is stored in Postgres and the files are stored in S3.
Open source
The open source tools used for the entire Nhost stack are:
- Database: Postgres
- GraphQL: Hasura
- Authentication: Hasura Auth
- Storage: Hasura storage
- Features: Node.js

Introduction to the Nhost command line interface
The Nhost command line interface (CLI) allows you to locally run a complete Nhost development environment with the following services:
- PostgreSQL database
- Hasura
- authentication
- Archiving
- Serverless functions
Installation
- Install the binary globally. To install Nhost CLI, run this command from any directory in your terminal:


On MacOS and Linux, this installs the Nhost CLI in / usr / local / bin. If you prefer to install in a location other than / usr / local / bin, set the INSTALL_PATH variable accordingly:

On Windows, this downloads and extracts the nhost.exe binary available in Assets from the latest version from the GitHub release page: https://github.com/nhost/cli/releases.
You can move the executable to another location and add the path to the PATH environment variable to make nhost globally accessible.
Finally, you can verify that everything installed successfully by typing:

![]()
Requirements
Before using the Nhost CLI, make sure the following dependencies are installed on your local computer:
- Git
- Docker
Access to the Nhost CLI
- After installing Nhost CLI, you can log into your Nhost account by running the following command:

This will ask you to enter your Nhost account information (email / password). After successfully logging in, you are authorized to manage your Nhost projects using the Nhost CLI.
- You can also logout at any time by doing the following:
Configure your project
Create a new Nhost project
First of all, we need to create a new Nhost project.

Then log into the Nhost dashboard and click the Create your first project button. Then, name your new Nhost project, select a geographic region for your Nhost services, and click Create Project.

After a few seconds you should get a PostgreSQL database, GraphQL API with Hasura, file storage and authentication.
Create a new GitHub repository
A typical workflow also involves creating a Github repository for your Nhost project. It will simplify your development workflow as Nhost can integrate with Github to enable continuous deployment.
Then go to your Github account and create a new repository. You can make your repository public or private.

Connect the Nhost project to Github
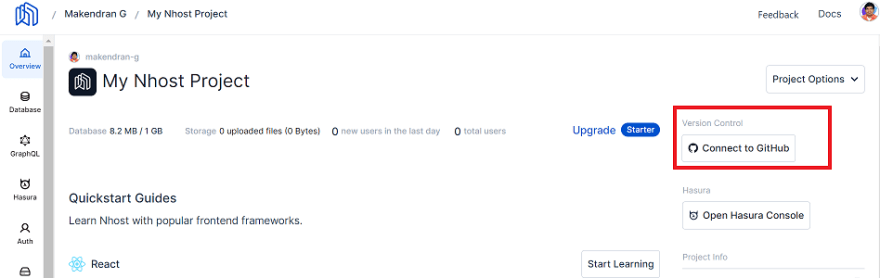
- Finally, connect your GitHub repository to your Nhost project. This will allow Nhost to deploy new versions of your project when you push new commits to your connected Git repository. From your project workspace, click Connect to GitHub.
- Install the Nhost app on your GitHub account.

- Connect your GitHub repository.

Local development
Initialize your Nhost project
Nhost CLI brings the functionality of your Nhost production environment directly to your local computer. It deploys Docker containers to run backend services that match your production environment in an on-premises environment. This allows you to make changes and test your code locally before deploying those changes to production.
Initialize your Nhost project locally with the following command:

Finally, be sure to link your current working directory to your GitHub repository:
echo "# my-nhost-app" >> README.mdgit initgit add README.mdgit commit -m "first commit"git branch -M maingit remote add origin https://github.com/makendrang/my-nhost-app.gitgit push -u origin mainStart a local development environment
Run the following command to start a local development environment for your Nhost project:

Running this command will start all core services provided by Nhost. It also runs a web server to serve the Hasura console for the GraphQL engine, allowing you to manage the database and test the GraphQL API.
Hasura console will automatically open at http: // localhost: 1337.
Make changes
There are three things that the Nhost CLI and GitHub integration follow and apply to production:
- Database migrations
- Hasura metadata
- Serverless functionality
Demo
Below are the steps required to create a simple Nhost-based React app for the backend. It Contains:
- Database: PostgreSQL
- Snapshot GraphQL API: Hasura
- Authentication: Hasura Auth
- Storage: Hasura storage
At the end of this demo, you will have a full-stack app that allows users to log in to access a secure dashboard and update their profile information.
Requirements
Before we begin, we make sure your development environment is ready.
You need Node.js version 14 or later
Project configuration
- Create a new Nhost project
Initialize the application
Create a React app
The easiest way to create a new react app is to use the tool called create-react-app which will start a react app for you without you having to configure everything yourself.
Then open your terminal and run the following command:

You can now switch to your project directory:

Run the development server with the following command:

If everything is working fine, your React dev server should be running on port 3000. Open http://localhost:3000 in your browser to check this.

Configure Nhost with React
To work with Nhost from within our React app, we will use the React SDK provided by Nhost. It's a wrapper around the Nhost JavaScript SDK that gives us a way to interact with our Nhost backend using react hooks.
You can install the Nhost React SDK with:

Next, open your App.js file as we will now configure Nhost in our app.
The Nhost React SDK includes a React provider called NhostReactProvider that exposes the authentication state and any provided React hooks in our application.
Use the following code to instantiate a new nhost client and link it to your nhost backend:

Finally, make sure you create an environment variable called REACT_APP_NHOST_SUBDOMAIN and REACT_APP_NHOST_REGION to store your nhost domain details:

You can find the subdomain and region of your Nhost project in the project overview:

Build the application
Add authentication
Sign-up
The next step is to allow our users to authenticate with our application. Let's start implementing the login process.
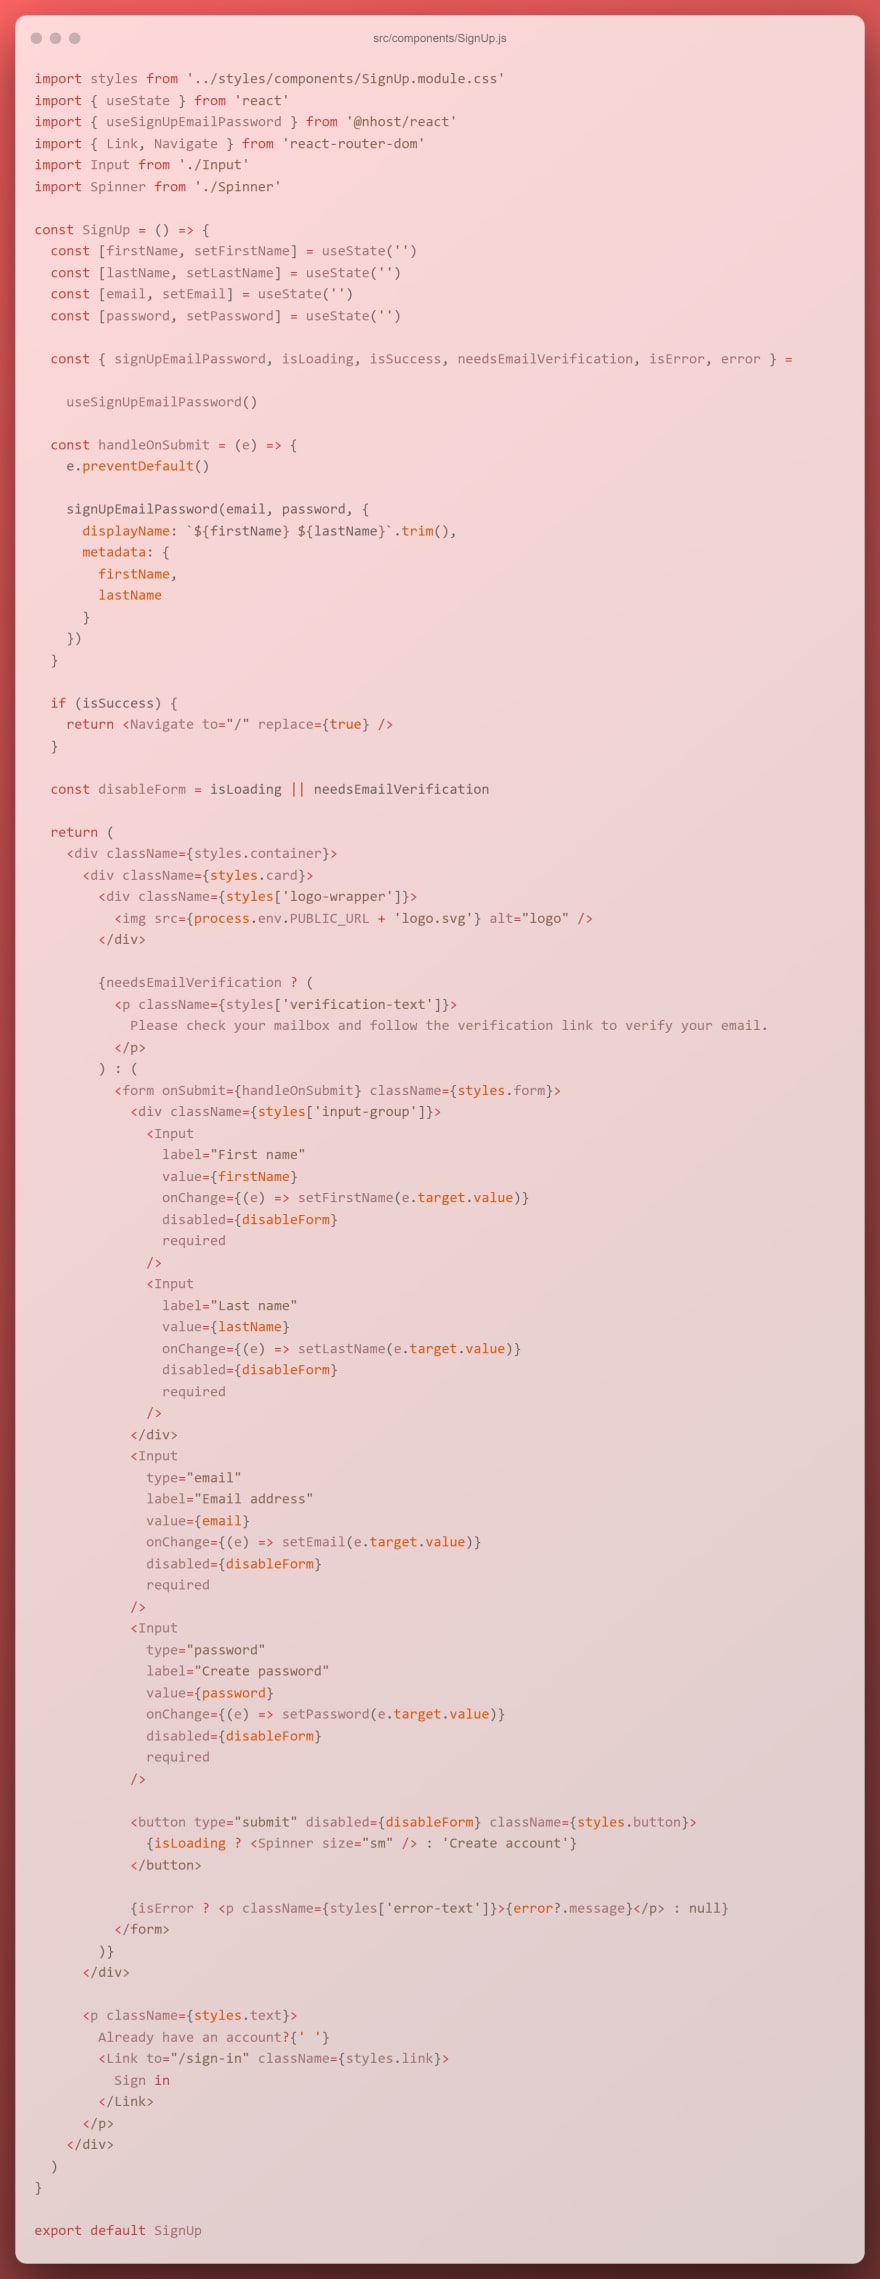
To do this, we use the useSignUpEmailPassword hook provided by the Nhost React SDK in our SignUp component.
So open the corresponding file of your project and use the following code:
By default, the user must verify their email address before fully signing up. You can change this setting in your Nhost dashboard.
Sign-in
Now that new users can register for our application, let's see how to authorize existing users to log in with an email address and password.
To do this, we use the nhost hook called useSignInEmailPassword in our SignIn component the same way we did in our SignUp component. This is what your component should look like after applying the login logic changes:

Sign-out
Finally, to allow users to sign out of the application, we can use the Nhost useSignOut hook:

Protect routes
Now that we've implemented authentication, we can easily decide who can access certain parts of our application. In our case, we only allow authenticated users to access the / and / profile paths. All other users should be redirected to the / sign-in page if they attempt to access such locations.
To do this, we can create a wrapper component (ProtectedRoute) to check the authentication status of the current user using Nhost SDK:

Then we can use a layout path in our App.js file to wrap the ProtectedRoute component around the paths we want to protect:

Retrieve user data
Finally, we show the information of the verified user on their dashboard to make the app more personal.
Getting the current verified user data is quite simple. In fact, we can use the useUserData hook provided by Nhost to do this. So open the component / layout.js file and use this socket like:

That's it! The JSX code for rendering user data (E -Mail, advertising name, etc.) is already included in your components as part of the model you designed at the start of this manual.
User data update
Nhost offers a graphql -Api via Hasura so that we can immediately query and mutate our data.
We use the Apollo Graphql client for interaction with this graphql -Api.
So start to install the following dependencies:

Then add the nhostapollophovider of @ nhost / react-Apollo to your app.js.

From there, we can create our graphql request and use the Apollo Usemutation hook to make this request if the user submits the form on the profile page:

Finally, since Hasura authorizes a standard directive and we have not yet defined any authorization, our Graphql changes would fail. So, open the Hasura console from your project's "Data" tab in your Nhost dashboard.

Next, go to the Permissions tab of the users table, enter the user in the role cell and click the edit icon on the select operation:

To restrict the user to reading their own data only, specify a condition with the user ID and session variable X-Hasura-User-ID passed with each request.

Next, select the columns you want users to have access to and click Save Permissions.

Repeat the same steps for the user role update process to allow users to update only their display name and metadata.

Finally, to add caching, synchronization, and server state updating into your React application, let's instead refactor user data retrieval using the Apollo client and our GraphQL API.
Then first add the following GraphQL query to get the current user data from the layout component:

Then replace the useUserData hook with the useUserId hook to get the current user ID.
 Finally, we can execute our GraphQL query using the useQuery hook and the current user ID.

You now have a fully functional React application. Congratulations!
Gratitude for perusing my article till end. I hope you realized something unique today. If you enjoyed this article then please share to your buddies and if you have suggestions or thoughts to share with me then please write in the comment box.
Original Link: https://dev.to/makendrang/nhost-the-perfect-backend-101-the-essential-guide-3m34
Dev To
More About this Source Visit Dev To