
An Interest In:
Web News this Week
- April 2, 2024
- April 1, 2024
- March 31, 2024
- March 30, 2024
- March 29, 2024
- March 28, 2024
- March 27, 2024
Some of Our Sources
- TutsPlus - Code
- Smashing Magazine
- You The Designer
- Inspiredology
- Naldz Graphics
- Noupe
- Web Design Ledger
- Stylized Web
- Willems Lab
- Daily Now
Help Webnuz
Referal links:
A Practical Guide to Providers in Angular
When creating apps with Angular, you can add and configure dependencies for the application youre building using something called "providers. You use the built-in Dependency Injection (DI) system to create providers. This post will cover Angulars powerful DI system at a high level and demonstrate a few practical use cases and strategies for configuring your dependencies. Lets get practical!
Table of Contents
- Quick overview of Dependency Injection
- Angular's Dependency Injection system
- The
Injector - Providing to different injectors
- Injection tokens in Angular
- Configuring providers in Angular's Dependency Injection system
- Configure providers with
useClass - Configure providers with
useExisting - Configure with
useValue - Configure with
useFactory
- Configure providers with
- Learn more about Angular Dependency Injection
Quick overview of Dependency Injection
Dependency Injection decouples the creation of a dependency from using that dependency. When you use DI, it promotes loose coupling within our code - a foundation for creating well-architected software. Practicing good software design patterns yields flexible, maintainable software that allows our applications to grow with new features more quickly. And by using DI, we can change the dependent code without changing the consuming code! Seamless code switches are nearly impossible with tightly coupled code, where you might have to touch everything to make a small change.
The cool thing is Angular has DI built-in and helps set us up for success. How handy!
Angulars Dependency Injection system
When you use the Angular CLI to generate a service, it automatically adds the code to register the service within Angulars DI system for us. Services contain business logic code that we want to keep separate from view logic.
When Angular CLI generates a service, it adds an @Injectable() TypeScript decorator, which is the bit of code that registers a service within the Angular DI system:
@Injectable({ providedIn: 'root'})export class MyService {}Without doing anything else, we can use our dependency in the application by injecting it into the consuming code as a constructor parameter:
@Component({ // standard component metadata here})export class MyComponent { constructor(private myService: MyService) { }}In Angular v14, you have a new option to use the
inject()function instead of injecting the service into the consumer as a constructor parameter.
Angular CLI is ! The generated service allows you to start using your service immediately, and the Injectable() TypeScript decorator is tree-shakeable so it's an all-around win!
Another way to register dependencies is to provide them manually through the providers array. Different Angular building blocks accept providers in the metadata. So you can register a provider like this:
@NgModule({ imports: // stuff here declarations: // stuff here providers: [ MyService ]})export class AppModule {}Theres something else to note, though. Angulars DI system allows you to provide a dependency to different places within the application. We saw this example in the first code snippet of the @Injectable() TypeScript decorator. Angular CLI automatically generates:
@Injectable({ providedIn: 'root'})export class MyService {}The configuration option providedIn: 'root' specifies where within the application to provide the service. In this case, were saying provide to root, which means the application's root. When you provide at the root of the application, it a single instance of the service is available across the entirety of the app.
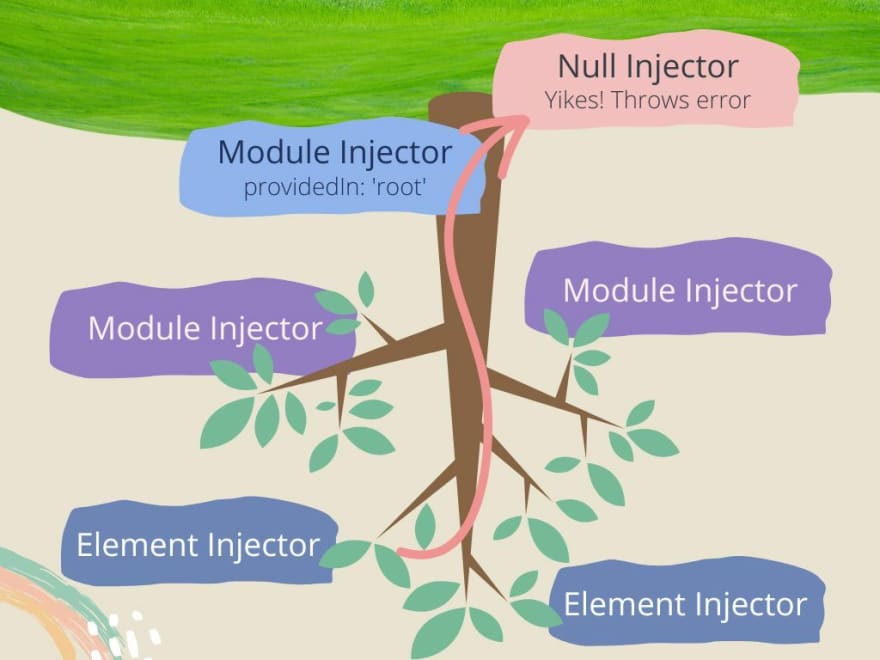
The Injector
The Injector is the mechanism for handling DI. It manages the dependencies and gives you the dependency you request. Angular has multiple injectors, and the injectors are hierarchical. There are different categories of injectors - Module Injectors, Element Injectors, and a special fallback injector called the Null Injector. Whenever I think of a hierarchy, I can't help but think about a tree. So we can visualize the injector hierarchy like this.

Going back to the example we had above when we use the instruction providedIn: 'root', what we're doing is providing to a particular module injector, the Root Injector.
Providing to different injectors
You can configure the providers array in other modules and Angular building blocks, such as components and directives. This means you can create an instance of a dependency available to your module and everything in it or only to your component. You might consider these options if you need a 1:1 relationship between an instance of the dependency and the consumer, such as if you maintain state specifically for a module or component within your dependency. Be careful to avoid causing unnecessary complexity, though!
In Angular v14, you can provide to routes as part of your route paths definitions! Angular v15 deprecates a confusing option for the
providedInconfiguration calledanyused explicitly for lazy-loaded modules, as well as assigning specific modules in the configuration.
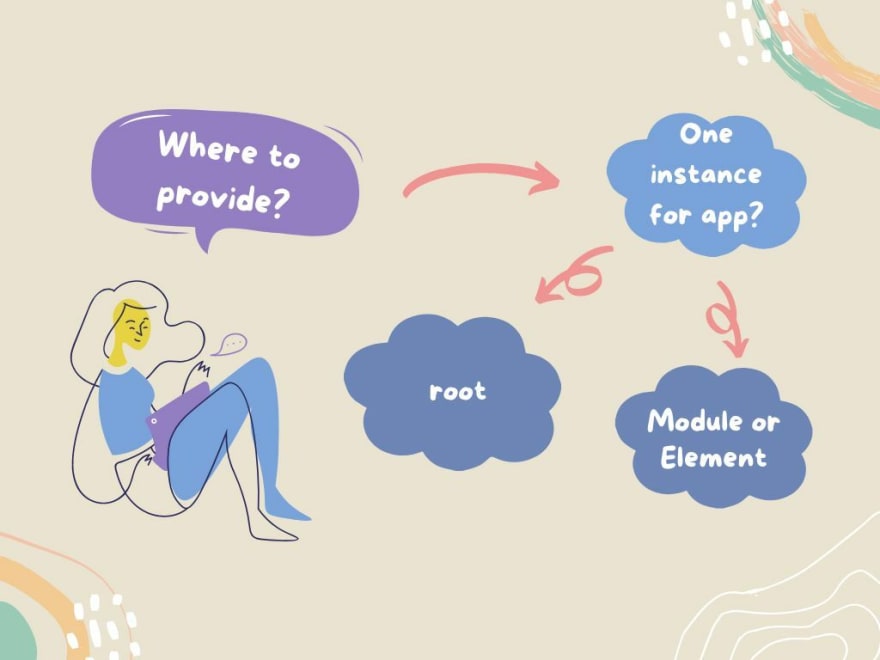
Because you can provide to so many different places, Angular has to resolve which instance of a dependency you get when you consume it. Youll get the provider you configured closest to the consuming code as a general rule, and move up the tree to find the requested dependency.
Still, this resolution process is complex, and it can be difficult to figure out what's going on when using a dependency with such a complicated setup. Fortunately, the Angular team announced plans for better debugging tools that help us understand where a dependency comes from.
As with most things, the most straightforward, simplest approach is best. If you can get away with providing to the Root Injector so that you only have one instance of dependency for your application, then you should.
While having this level of configurability sounds unnecessarily complicated, it allows you to fine-tune which dependency to use in your consuming code. Now that we have a quick overview of how and where to provide dependencies lets review an integral piece of Angulars DI system, injection tokens.
Injection tokens in Angular
Injection tokens allow us to have values and objects as dependencies. This means we can depend on strings, such as Hello world! and objects, which include configuration objects and global variables, such as Web APIs. But injection tokens are even more remarkable because we can also create dependencies to constructs that dont have a runtime definition, such as interfaces! Lets take a look at an example using an injection token.
Let's say you work on a language learning application with a user configuration that includes the language the user is learning. You have an interface definition of the configuration as well as a concrete instance of the configuration:
export interface UserConfig { language: string;}export defaultUserConfig: UserConfig = { language: 'en'}You can register the token to Angular's DI system and return the default configuration by providing the type, a description, and options like this:
const export USER_CONFIG_TOKEN = new InjectionToken<UserConfig>('userconfig', { providedIn: 'root', factory: () => defaultUserConfig});When you want to use the USER_CONFIG_TOKEN, you will use the @Inject decorator:
@Component({ // standard component metadata here})export class MyUserProfileComponent { constructor( @Inject(USER_CONFIG_TOKEN) private config: UserConfig ) { }}Now we can access the user config from within the component! Accessing a config might not seem like a big deal, but we used injection tokens to inject an interface into the component! Having injection tokens as a means to represent values and interfaces as dependencies are enormous! And it sets us up to leverage the power of Angulars DI system.
We can use injection tokens and configure providers within Angulars DI system for more power and fine-grained control.
Configuring providers in Angulars Dependency Injection system
You can configure the providers array to add fine-grained control to your providers. When combined with injection tokens, we can unleash a lot of power. But first, its essential to know when it makes sense to do so. Always prefer the most straightforward, default way of registering a dependency and then use fine-grained control as needed.
To configure the providers array, you add an object containing the instructions like this:
@NgModule({ imports: // stuff here declarations: // stuff here providers: [{ provide: MyService, howToProvide: OtherDependency }]})export class AppModule {}The how to provide gives Angular-specific instructions on this dependency configuration. Then you can provide the other new dependency. Angular supports the following options for how to provide:
useClass- Replace the current dependency with a new instance of something elseuseExisting- Replace the current dependency with an existing dependencyuseValue- Replace the current dependency with a new valueuseFactory- Use a factory method to determine which dependency to use based on a dynamic value
Next, lets walk through examples of each configuration option to understand how to use them.
Configure providers with useClass
The useClass option replaces the current dependency with a new instance of another class. This is a great option if youre refactoring code and want to substitute a different dependency in your application quickly. Lets say you have a language learning app and an Angular service that wraps the authentication calls you delegate to an auth library and an auth provider. Well call this service AuthService, and keep the code straightforward like this:
@Injectable({ providedIn: 'root'})export class AuthService { public login(): void { } public logout(): void { }}In a stroke of luck, a large tech company decides to buy your language learning app, requiring you to authenticate using their social login only. You can create a new authentication service that wraps the calls to their auth provider and keeps the same member names; well call it NewAuthService. (Note, you should not name your services with these terrible generic names. Be a bit more descriptive. )
@Injectable({ providedIn: 'root'})export class NewAuthService { public login(): void { /* new way to login */ } public logout(): void { /* new way to logout */ }}Because both classes have the same public members, you can substitute the original AuthService with the new NewAuthService by configuring the provider:
@NgModule({ imports: // imports here declarations: //declarations here providers: [ { provide: AuthService, useClass: NewAuthService } ]})export class AppModule { }The cool thing about having the same public members is that theres no need to change the consuming code. Angular instantiates a new instance of NewAuthService and provides that dependency to consuming code, even if they still refer to AuthService!
It might not make sense to keep the original AuthService around, so you might want to consider transferring all the code references to use the NewAuthService only. However, the useClass configuration option is a fast way for us to quickly substitute one instance of a class for another, which means proofs-of-concept and quick checks can be super-fast!
Configure providers with useExisting
The useExisting option replaces the provider with a different provider already existing within the application. This option is a great use case for API narrowing, that is, decreasing the surface area of an API. Lets say your language learning application has an unwieldy API. Well call this API LanguageTranslationService, and it looks like this:
@Injectable({ providedIn: 'root'})export const LanguageTranslationService { public french(text: string): string { /* translates to French */ } public japanese(text: string): string { /* translates to Japanese */ } public elvish(text: string): string { /* translates to Elvish */ } public klingon(text: string): string { /* translates to Klingon */ } // so on and so forth, but you see the problem here}And you consume the service like this:
@Component({ // standard component metadata here})export class ElvishTranslationComponent implements OnInit { private elvish!: string; constructor( private translationService: LanguageTranslationService ) { } public ngOnInit(): void { this.elvish = this.translationService.elvish(someText); }}Oops The LanguageTranslationService looks a bit unwieldy. Lets narrow the API surface by creating a new class called FictitiousLanguageTranslationService and move the translation methods for the fictitious languages there. Well use an abstract class for this:
export abstract class FictitiousLanguageTranslationService { abstract elvish: (text: string) => string; abstract klingon: (text: string) => string;}Now we can add FictitiousLanguageTranslationService as a real dependency in the application by adding it to the providers array, but use the existing LanguageTranslationService implementation of the code:
@NgModule({ imports: // imports here declarations: // declarations here providers: [{ provide: FictitiousLanguageTranslationService, useExisting: LanguageTranslationService }]})export class AppModule { }Next, well update the consumer to use the new dependency:
@Component({ // standard component metadata here})export class ElvishTranslationComponent implements OnInit { private elvish!: string; constructor( private fltService: FictitiousLanguageTranslationService ) { } public ngOnInit(): void { this.elvish = this.translationService.elvish(someText); }}Only the methods defined in the FictitiousLanguageTranslationService are available now. Pretty sweet!
Configure with useValue
The useValue option replaces the provider with a value. This option is a great use case for configurations and mocking services in automated tests where you need to control the inputs and outputs. Lets go back to the USER_CONFIG_TOKEN in this example and override it to show a different language instead.
We can override the token:
@Component({ providers: [{ provide: USER_CONFIG_TOKEN, useValue: { language: 'jp' } }]})export class MyUserProfileComponent { constructor( @Inject(USER_CONFIG_TOKEN) private userConfig: UserConfig ) { }}Now when we use this in the MyUserProfileComponent well see the user's language is Japanese instead of English!
Configure with useFactory
The useFactory option allows us to use a factory method to create a dependency. This option is a great use case if you have dynamic values to consider when creating the dependency. Its also how we can use a factory pattern for creating our dependencies.
In this example, lets say in your Language Learning application, if the user is learning Japanese, we want to show the Japanese flag in the MyUserProfileComponent instead of the default - a checkered flag. The users language selection is in the users config, so the example code looks like this:
@NgModule({ imports: // imports here declarations: // declarations here providers: [{ provide: USER_CONFIG_TOKEN, useFactory: (config: UserConfig) => config.language === 'jp' ? '' : '', deps: [UserConfig] }]})export class AppModule { }Notice we were able to pass in a dependency to the configuration option. The useClass and useFactory options support passing in dependencies.
Now when we use the configuration in the MyUserProfileComponent well get the Japanese flag instead of a checkered flag only if the users configuration has Japanese as their language!
@Component({ // standard component metadata here})export class MyUserProfileComponent { constructor( @Inject(USER_CONFIG_TOKEN) private config: UserConfig ) { // flag is either or based on the language setting }}Learn more about Angular Dependency Injection
This article offers a high-level overview of Angulars DI system. As you can already see, its a powerful system with many different configuration options and complexity. As a result, even though Angular has these configuration options, using the most straightforward approach will make troubleshooting and maintenance easier!
Angular's documentation has great resources! There are many docs on Dependency Injection since it's such a broad topic. Here's where to get started - Dependency injection in Angular.
This post was originally published on the Okta Developer blog. I am the original author and made modifications.
Original Link: https://dev.to/angular/a-practical-guide-to-providers-in-angular-3c96
Dev To
More About this Source Visit Dev To