
An Interest In:
Web News this Week
- April 3, 2024
- April 2, 2024
- April 1, 2024
- March 31, 2024
- March 30, 2024
- March 29, 2024
- March 28, 2024
Some of Our Sources
- Techcrunch
- Pearsonified
- Vandelay Design
- Inspiredology
- Web Designer Depot
- Crazy Leaf Design
- Web Design Ledger
- Wal You
- Web Resource Source
- Willems Lab
Help Webnuz
Referal links:
ZMotion Application Development Tutorial -- Motion Control Card & VC6.0
" Teach support again ! "
--Today, ZMotion Technology shares application development of motion control card in VC6.0--
This article is edited by ZMOTION, here, share with you, let's learn together. ZMOTION: DO THE BEST TO USE MOTION CONTROL.
Note: Copyright belongs to ZMotion Technology, if there is reproduction, please indicate article source. Thank you.
ZMOTION Technology has attracted experienced talents from famous companies or institutions, such as Huawei, ZET, Huazhong University of Science and Technology etc. ZMOTION insists self- innovating and collaborating with comprehensive universities, to research basic knowledge of motion control. Due to its concentration and hard work in motion control technology, ZMOTION already become one of the fastest growing industrial motion control companies in China, and is also the rare company who has managed core technologies of motion control and real time industrial control software completely.
ZMotion Technology provides motion control card, motion controller, vision motion controller, expansion module and HMI. (more keywords for ZMOTION: EtherCAT motion control card, EtherCAT motion controller, motion control system, vision controller, motion control PLC, robot controller, vision positioning...)
I: Motion Control Card VC6.0 Development Process
Open VC++6.0, build one new project.
Select "MFC APPWizard(exe)", and choose the position where the project is saved, set project name, and click "ok" ( )
For application program type, select "basic dialog" ( ) , then finish project new built.

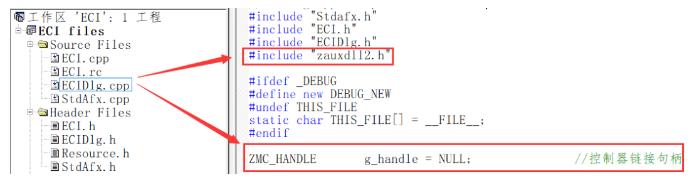
- Copy dynamic link library "zmotion.dll", "zauxdll.dll", "head file" and "zauxdll2.h" of "..\function library\dll and "zauxdll.lib" of lib file into project folder. (folder -- E: [email protected])

Select "Project" -- "Settings...".
Switch to "Link" page, and enter lib file name "zauxdll.lib" in bar "Object\library modules".

- Add the declaration of function library head file into application program file, such as, "#include "zauxdll2.h".
At this time, users can call all functions of function library in VC6.0, and can start to edit application program. Note: for detailed function usage, please refer to ZMotion PC Function Library Program Manual.
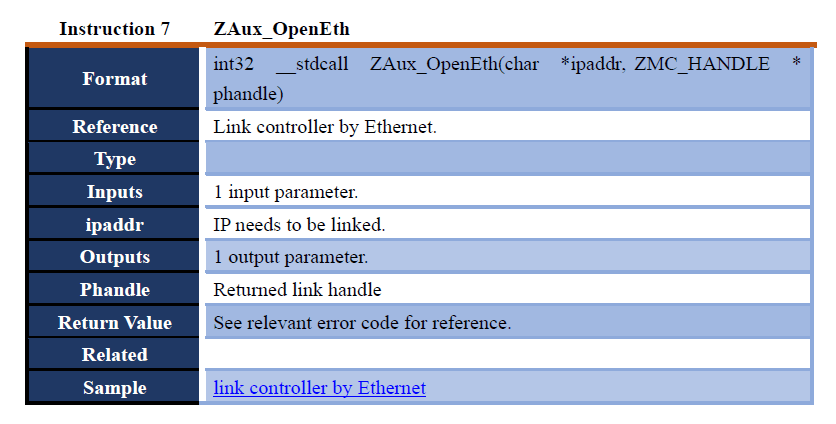
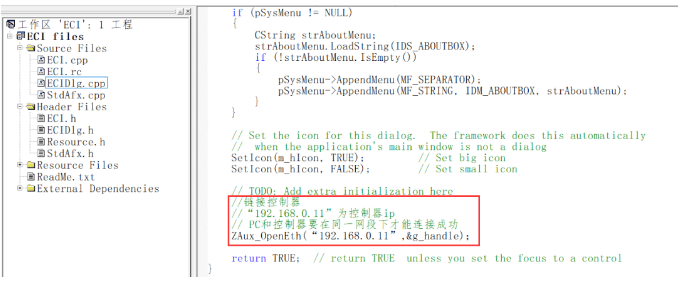
According to ZMotion PC Manual -- function description of "Link to Controller". Specifically, add link controller code "ZAux_OpenEth(192.168.0.11,&g_handle)" into function "ECIDlg:OnInitDialog()", then controller can be linked.
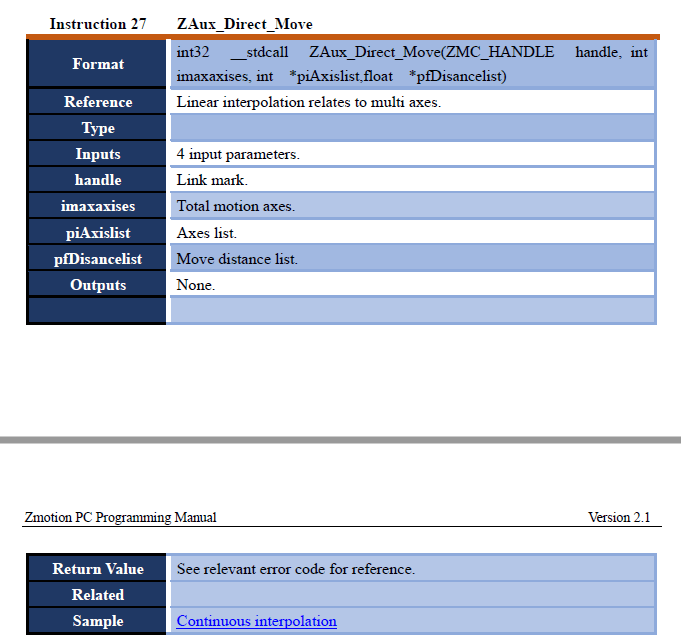
- Control controller do interpolation motion through MOVE button.
(1) right click MOVE button, select property and set button ID.

(2) right click MOVE button and select event.
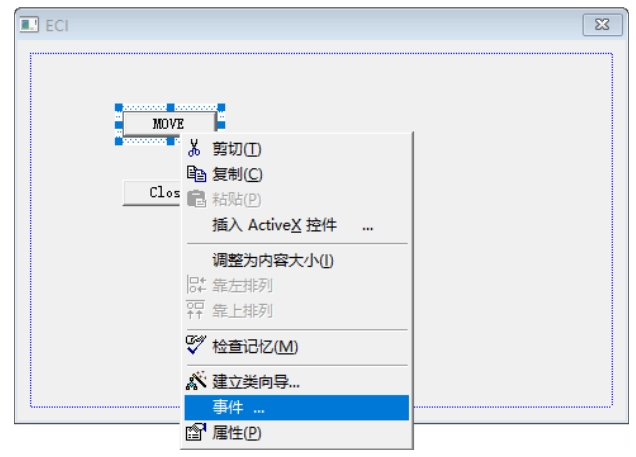
(3) new build relative event.
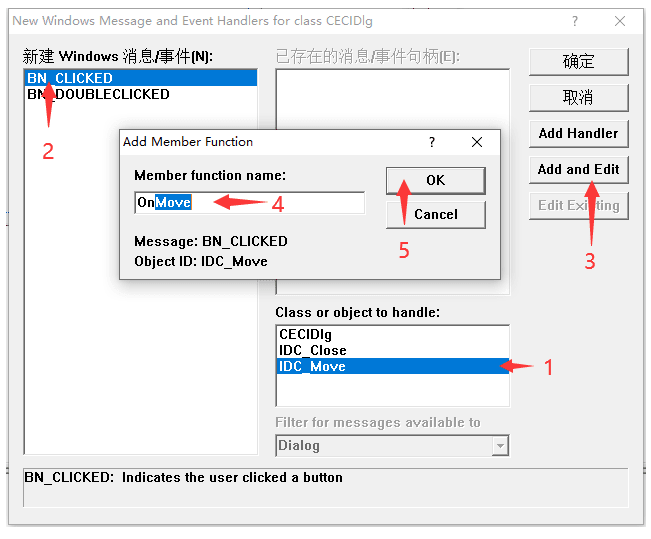
(4) add interpolation motion function in event processing function

- Compile and run, then controller can be controlled through PC.
If compile reports error "precompiled head file can't be opened" "no exist file or content".
Please select "Project" -- "Settings..." -- C/C++, then do below configuration.

II: VC6.0 Routine
There are many VC6.0 routines, which make motion control easily of ZMotion motion controller, such as, routines of single-axis motion, homing, IO configuration reading, interpolation of linear, circular and continuous, manual motion, bus motion control, customized instruction encapsulation, etc. -- Need? -- E: [email protected]
single-axis motion routine
a. link to controller of assigned IP through Ethernet.
b. set motion axis parameters.
c. select the object for motion axes
d. select motion method, achieve continuous motion and inching motion.

- Realization Steps
(1) search IP, link to controller.
A. drag relative widgets to UI interface, and set corresponding event processing function.
B. drop-down the box of event processing function to realize automatic IP search.
According to ZMotion PC Manual, add controller IP searching function "ZAux_SearchEthlist()" into event processing function, then resolve got IP character string (exact resolve method, refer to routine).
//automatically search IP void CECIDlg::OnDropdownIPList() { /*search IP address automatically*/ char buffer[10240]; int32 iresult; /*search IP address in current net segment. For details: please refer to ZMotion PC Program Manual*/ iresult = ZAux_SearchEthlist(buffer, 10230, 100); if(ERR_OK != iresult) { return; } CComboBox *m_pEthList; m_pEthList = (CComboBox *)GetDlgItem(IDC_IPList); if(NULL == m_pEthList) { return; } /*convert character tring to IP*/ int ipos =0; const char * pstring; pstring = buffer; for(int j= 0; j< 20;j++) { char buffer2[256]; buffer2[0] = '\0'; /*jump over blank space*/ while(' ' == pstring[0]) { pstring++; } ipos = sscanf(pstring , "%s", &buffer2); if(EOF == ipos) { break; } /*jump over character string*/ while((' ' != pstring[0]) && ('' != pstring[0]) && ('\0' != pstring[0])) { pstring++; } if(CB_ERR != m_pEthList->FindString(0, buffer2)) { continue; } if('\0' == buffer2) { return; } /*join in*/ m_pEthList->AddString(buffer2); } return; }`C. click "link" button to connect to controller.According to ZMotion PC Manual, add the function "ZAux_OpenEth()" for connecting with controller through net port into event processing function when pressing "link" button, then linking controller function can be achieved. 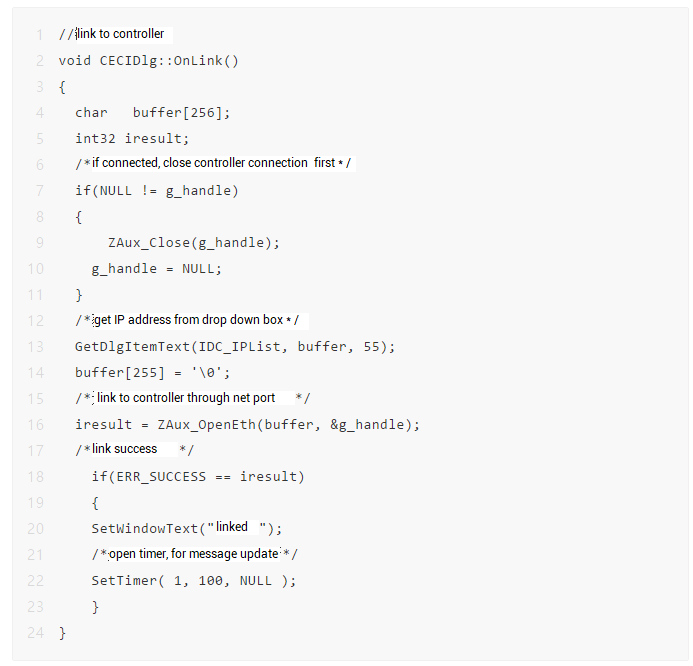D. click "disconnect" button to break controller connection.According to ZMotion PC Manual, add the function "ZAux_Close()" for disconnecting with controller into event processing function when pressing "disconnect" button, then controller disconnection function can be achieved.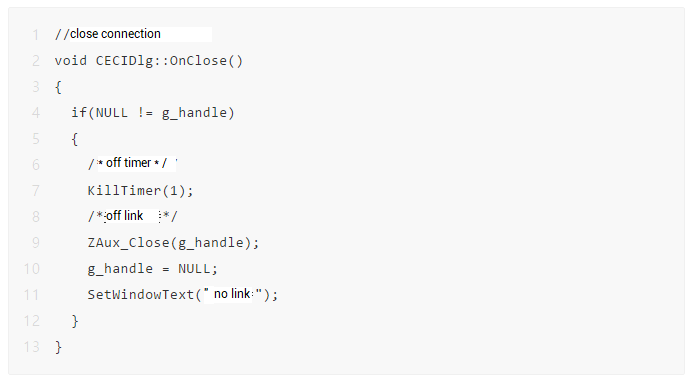(2) select axis, and watch selected DPOS, current speed and motion status.A. drag relative widgets to UI interface, and set corresponding event processing function.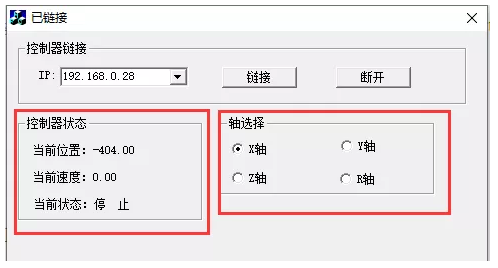B. select axis through event processing function of X, Y, Z, R 4 radio buttons.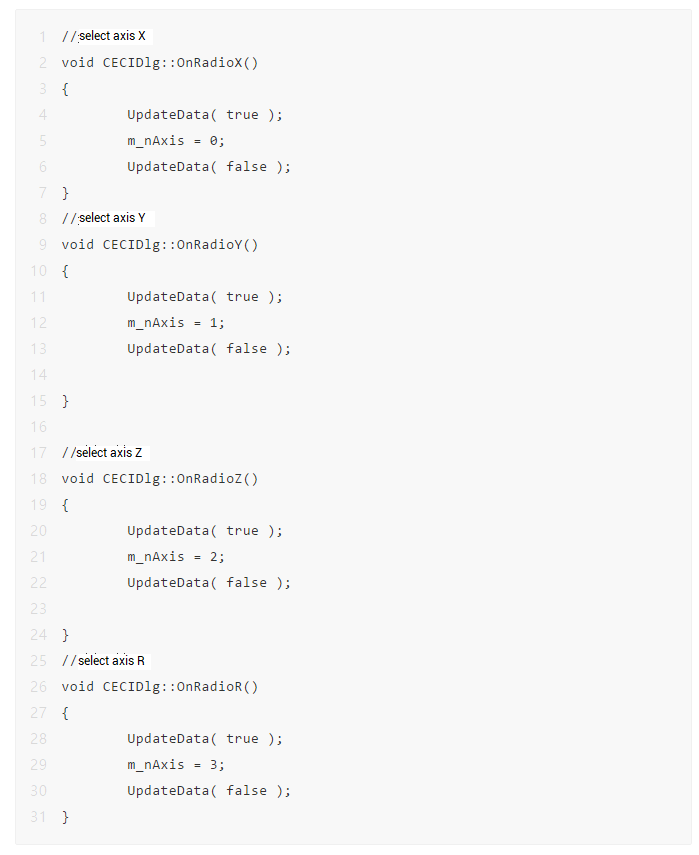C. update axis status in real time through timer.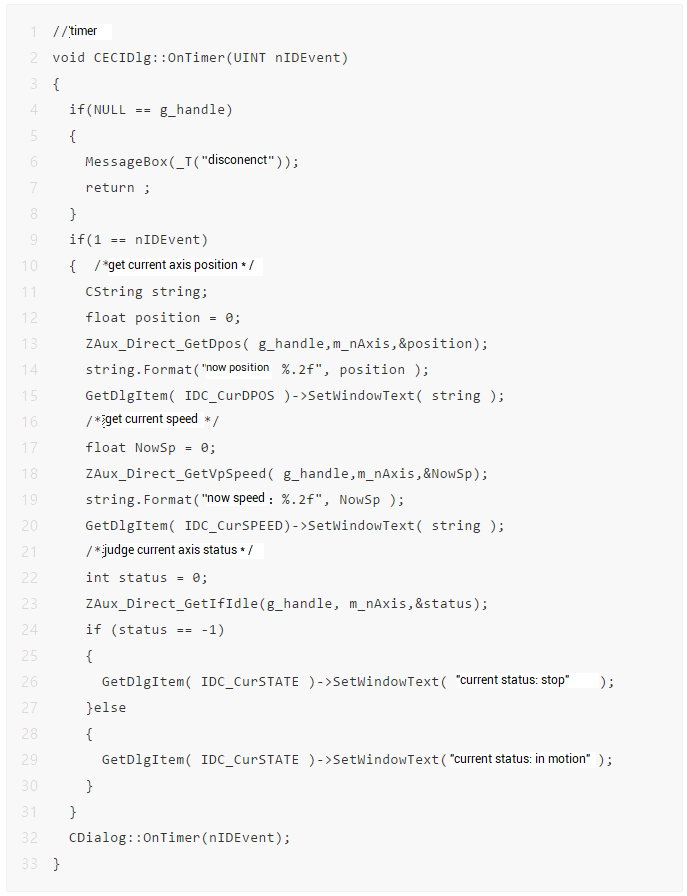(2) read the state of in0-in7, out0-out7.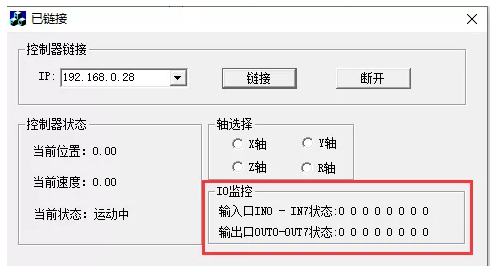Get IO status by using ZAux_GetModbusIn() and ZAux_GetModbusOut() interfaces. And encapsulate as one subprogram, then add that function into timeout processing function of timer for upgrading IO status. //IO watch void CECIDlg::IOGet() { uint8 in, out, i=0,j=0,k=0; char buff[128]={0}; /*read input status*/ ZAux_GetModbusIn (g_handle, 0, 7, &in); //read the status of in0-in7 /*from decimalism to binary system*/ itoa(in, buff, 2); j=0; for( i=0; i<8; i++) { if((48 == buff[i])||(49 == buff[i])) { j++; } } for(i=0 ; i<(8-j); i++) { for(k=7; k>0; k--) { buff[k] = buff[k-1]; } buff[0]=48; } sprintf(buff, "status of IN0-7 :%c %c %c %c %c %c %c %c", buff[7], buff[6],buff[5],buff[4],buff[3],buff[2],buff[1],buff[0]); GetDlgItem( IDC_IN )->SetWindowText( buff ); /*get outputs status*/ ZAux_GetModbusOut (g_handle, 0, 7, &out);//get status of out0-7 /* from decimalism to binary system*/ itoa(out, buff, 2); j=0; for( i=0; i<8; i++) { if((48 == buff[i])||(49 == buff[i])) { j++; } } for(i=0 ; i<(8-j); i++) { for(k=7; k>0; k--) { buff[k] = buff[k-1]; } buff[0]=48; } sprintf(buff, "status of OUT0-7:%c %c %c %c %c %c %c %c",buff[7], buff[6],buff[5],buff[4],buff[3],buff[2],buff[1],buff[0]); GetDlgItem( IDC_OUT )->SetWindowText( buff ); }(4) set controller parameters
A. drag relative widgets to UI interface, and set event processing function of parameter validity button.
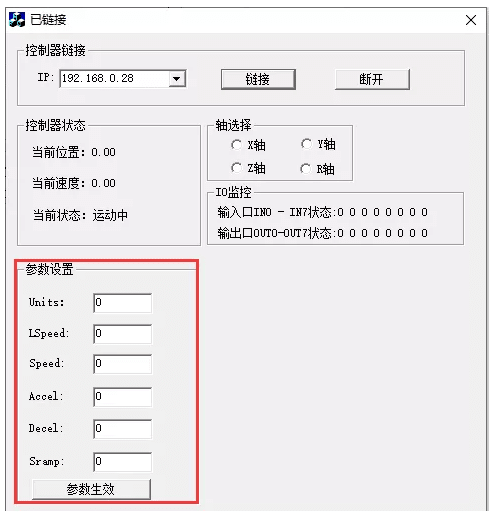
B. set member variables of each edit box, right click edit box first to select "establish class orientation" ( )

C. add function interface that relates to parameters configuration into event processing function of parameter validity button.

(5) Control controller motion
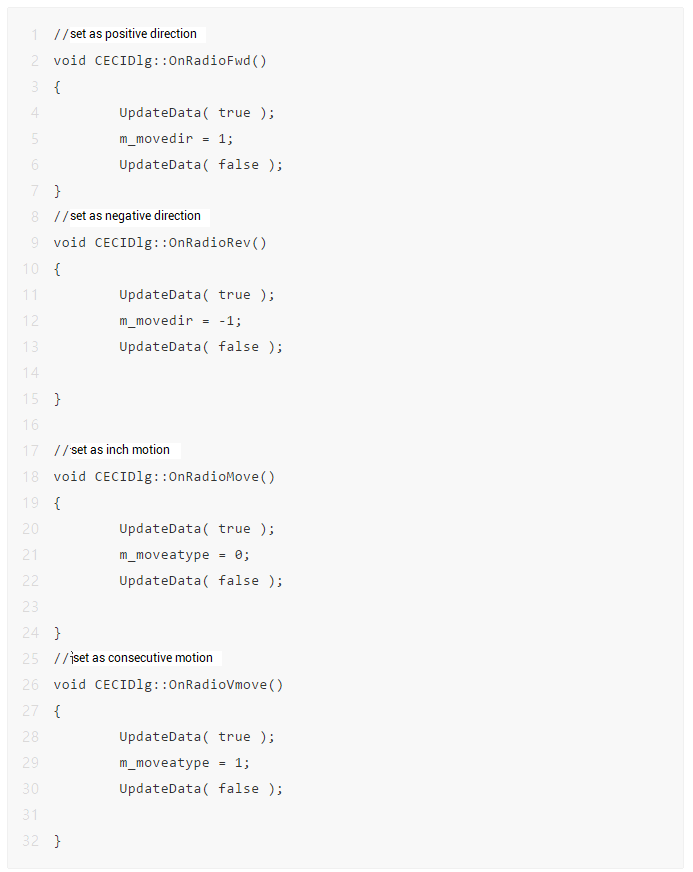
A. add two groups of radio buttons, inching distance edit box and 2 buttons into UI interface.

B. Two radio buttons are used for setting motion direction and motion method, and for setting mark bit variable m_moveatype and m_movedir through their event processing function.
C. open controller to move through event processing function of "open" button.

D. stop controller motion through event processing function of "close" button.
(6) Compile and run
A. complile and run teaching routine.

B. connect to the same one controller through ZDevelop, and observe motion control effect.
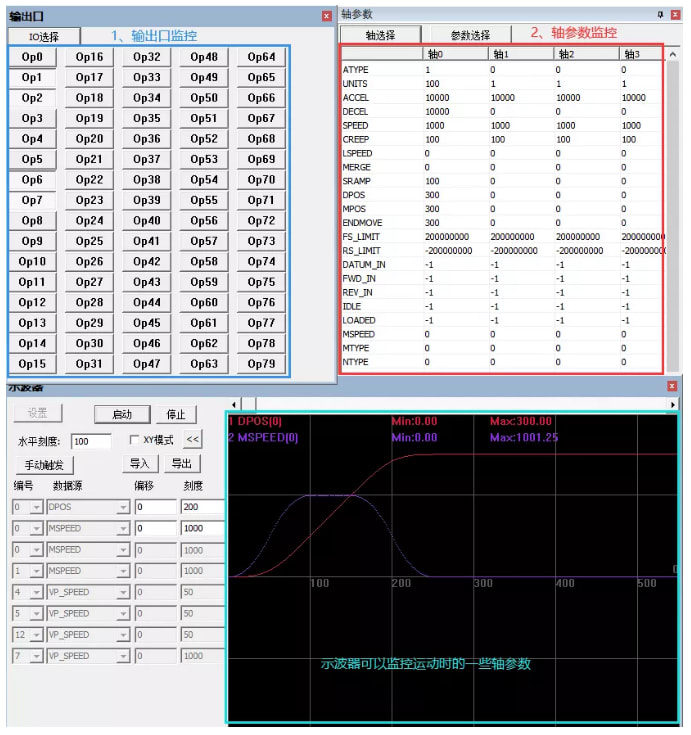
Below shows axis parameters and IN/OP, and in oscilloscope, DPOS, MPSEED are displayed.
"At last, one specail thing you should know"
There are two kinds of motion control cards, ECI2418 and ECI2618, are developed by ZMOTION.
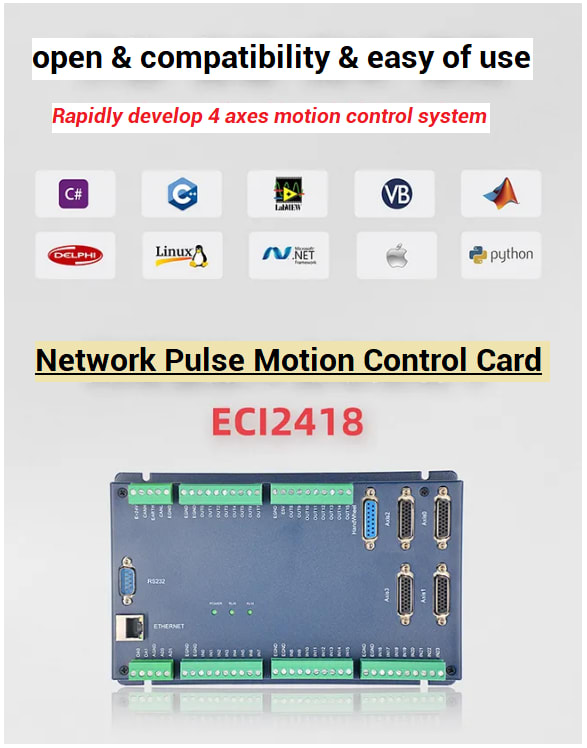
ECI2418 supports 4 axes pulse inputs and encoder feedback, and there are 24 inputs, 16 outputs, 2ADs and 2DAs on board. In addition, handwheel interface also is valid. Some specail outputs support high-speed PWM control.

ECI2618 supports 6 axes pulse inputs and encoder feedback, and there are 24 inputs, 16 outputs, 2ADs and 2DAs on board. In addition, handwheel interface also is valid. Some specail outputs support high-speed PWM control.

ECI2418 and ECI2618 both use the same set of API function, and support C, C++, C#, LabView, Python, Delphi and other development languages. And several platforms are valid, such as, VC6.0, VB6.0, Qt, .Net, etc., including Windows, Linux, WinCE, iMac and all kinds of operation systems.
That's all, thank you for your reading -- Application Development Tutorial -- Motion Control Card & CV6.0
Original Link: https://dev.to/zmotion/zmotion-application-development-tutorial-motion-control-card-vc60-oe2
Dev To
More About this Source Visit Dev To