
An Interest In:
Web News this Week
- April 3, 2024
- April 2, 2024
- April 1, 2024
- March 31, 2024
- March 30, 2024
- March 29, 2024
- March 28, 2024
Some of Our Sources
- Mashable
- TutsPlus - Code
- Pearsonified
- The Logo Smith
- Inspiredology
- Naldz Graphics
- Stylized Web
- Codrops
- Dev To
- The Verge
Help Webnuz
Referal links:
A Complete Guide to Importing Shopify Customer Data to Google Ads
Did you know that you could import Shopify customer data to Google Ads with a few steps? If no, Ive got some good news for you here - just read on and transfer your valuable data to Google Ads and make it more meaningful.
First things first, lets face it: Improving your remarketing performance and results takes a lot of time and effort. You can use many different techniques and methods to make things work. This one can be a game changer, though: importing Shopify customer data to Google ads.
By creating a customer list and importing the related data to Google Ads, you will be able to make more of your data as you will secure a set of detailed & valuable information that you can utilize to target your existing customers.
Why Should You Import Shopify Customer Data to Google Ads?
By performing this with the help of a thorough guide, you can create audiences and optimize them to come up with more effective sales strategies in addition to targeting existing customers more easily.
Once you import your Shopify customer data to Google Ads, you can:
- Enhance remarketing audiences
- Target users/audiences similar to your customers
- Use your time & energy more efficiently to develop remarketing strategies
- Find out what products to offer to your customers and increase their satisfaction
How to Import Shopify Customer Data to Google Ads?
Here I share a step-by-step guide that will help you benefit from your Shopify customer data on Google Ads on a different level. We are going to start by exporting the customer data from your Shopify store:
Step 1: Navigate to your Shopify store and find Customers on the left. Then, click Export as shown below:

Step 2: Next, choose the options of exporting to All customers and Export as CSV for Excel, Numbers, or other spreadsheet programs before clicking on Export customers down below.

At this point, the CSV file that includes your customer data will be sent to your admin email by Shopify.
Step 3: Once you get the related data in the form of a table, you need to optimize it considering what sort of specific data you will need & use. Here, itd be wise for you to keep the data you need and delete the other columns to ensure a clearer & more meaningful look.

Step 4: Save your data after customizing the data according to your needs, and go to your Google Ads account. Find Tools and Settings on the upper right corner, and then choose Audience Manager under Performance Planner.

Step 6: Click Segments end then the plus button right next to that.

Step 7: Go for the Customer list in the drop-down menu that appears next.

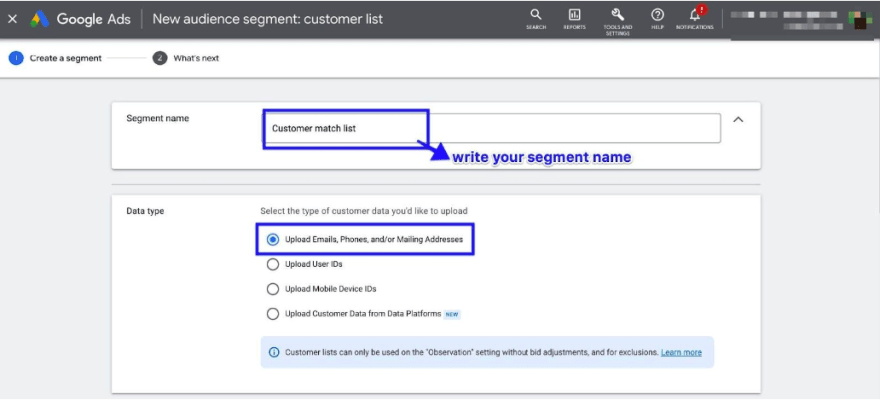
Step 8: Add a segment name and choose your data type.
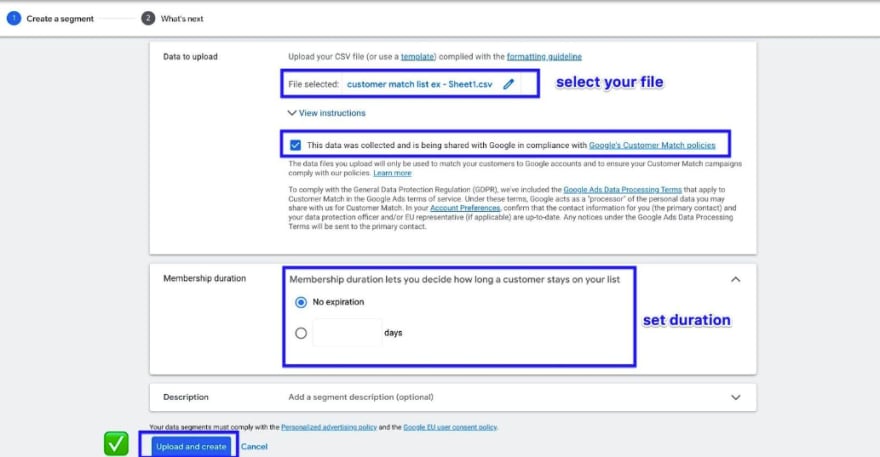
Step 9: Choose the CSV file you created earlier and apply the settings as seen below. Then, click Upload and create to finalize the process.
You have successfully imported your Shopify customer data to Google Ads! Keep in mind that you might have to wait for 48 hours to see your audience reflected in the Google Ads account. Then, youll be able to utilize your customer data on Google Ads effortlessly.
Original Link: https://dev.to/gloriamaldonado/a-complete-guide-to-importing-shopify-customer-data-to-google-ads-5e57
Dev To
More About this Source Visit Dev To