
An Interest In:
Web News this Week
- April 24, 2024
- April 23, 2024
- April 22, 2024
- April 21, 2024
- April 20, 2024
- April 19, 2024
- April 18, 2024
Some of Our Sources
- Slashdot
- Web Designer Wall
- Just Creative
- Abduzeedo
- You The Designer
- Creative Curio
- Web Resource Source
- Android Headlines
- Daily Now
- Hashedout
Help Webnuz
Referal links:
Exploring the repository pattern with TypeScript and Node
Written by Chimezie Enyinnaya
The repository pattern can be defined as an abstraction over data storage, allowing the decoupling of data access logic from the business logic. The repository pattern has lots of benefits:
- It enforces the dependency inversion principle
- Since business logic and data access logic are loosely coupled, they can be tested separately
- It helps with keeping the code structured and organized
- It reduces duplication of code and enhances code maintainability
Like most design patterns, the repository pattern is language agnostic. With that in mind, Ill be showing how to implement the repository with TypeScript and Node.js. For the purpose of demonstration, Ill be using Nest, a Node.js framework.
- Getting started
- Create a new Nest app
- Database setup
- Model and migration
- Implementing the repository pattern
- Creating the repository contract
- Creating the concrete implementation
- Using the repository
- Refactoring the repository contract to use generics
Getting started
Create a new Nest app
Like I said earlier, well be using the Nest framework. So, lets start by creating a fresh Nest application.
First, install the Nest CLI if you dont already have it installed:
npm install -g @nestjs/cliOnce installed, we can use the CLI to create a new Nest application:
nest new nest-repository-patternTo demonstrate the repository pattern, well be using the concept of post. Lets create the module and controller for it:
nest generate module postnest generate controller post --no-specThese commands will generate a post.module.ts file and a post.controller.ts file respectively inside a post directory within the src directory.
Database setup
Next, lets set up the database for our newly created Nest application. Ill be using PostgreSQL, but you can use any of the databases Knex supports. To interact with our database, well be using Objection.js, which is an ORM for Node.js built on top Knex. For this tutorial, well be using Nest Objection, a Nest module for Objection.
So, lets install all the necessary dependencies:
npm install knex objection @willsoto/nestjs-objection pgOnce installed, we can register the Nest Objection module inside the imports array of src/app.module.ts and pass along our database details:
// src/app.module.tsimport { Module } from '@nestjs/common';import { AppController } from './app.controller';import { AppService } from './app.service';import { ObjectionModule } from '@willsoto/nestjs-objection';@Module({ imports: [ ObjectionModule.register({ config: { client: 'pg', useNullAsDefault: true, connection: { host: '127.0.0.1', port: 5432, user: 'postgres', password: '', database: 'nest-repository-pattern', }, }, }), ], controllers: [AppController], providers: [AppService],})export class AppModule {}Model and migration
To demonstrate the repository pattern, well be using the concept of post. So lets create a Post model and the corresponding migration to create a posts table.
Lets start with the model. Inside the post directory, create a new post.model.ts file and paste the following code in it:
// src/post/post.model.tsimport { Model } from 'objection';export default class Post extends Model { static tableName = 'posts'; id: number; title: string; content: string;}The Post model extends the base model from Objection. Then we define the name of the table that this model will use. Lastly, we define the columns that the table will have and their types.
Next, lets register the model with the PostModule by updating the module as below:
// src/post/post.module.tsimport { Module } from '@nestjs/common';import { ObjectionModule } from '@willsoto/nestjs-objection';import { PostController } from './post.controller';import Post from './post.model';@Module({ imports: [ObjectionModule.forFeature([Post])], controllers: [PostController],})export class PostModule {}Lets create the migration for the posts table. Before we can create migrations, our project needs to have a knexfile, and we can create the file by running the command below:
npx knex init -x tsBy default the init command will create a knexfile.js, but since we are working with TypeScript, passing -x ts will instruct the init command to create a knexfile.ts instead. The file will created in the root of the project. Then, we replace it content with the following:
// knexfile.tsimport type { Knex } from 'knex';const config: { [key: string]: Knex.Config } = { development: { client: 'pg', connection: { host: '127.0.0.1', port: 5432, user: 'postgres', password: '', database: 'nest-repository-pattern', }, migrations: { directory: './src/database/migrations', }, },};module.exports = config;Ideally, you might want to have different configurations for different environments (development, staging, production, etc.), but for the purpose of this tutorial, I have only added the configuration for the development environment. In addition to the database config details, we also specified the directory where migrations will reside.
Now, we can create the migration for the posts table:
npx knex migrate:make create_posts_tableAs specified in knexfile.js, the migration will be created inside src/database/migrations. Open it and update it as below:
// src/database/migrations/TIMESTAMP_create_posts_table.tsimport { Knex } from 'knex';export async function up(knex: Knex): Promise { return knex.schema.createTable('posts', function (table) { table.increments('id'); table.string('title').notNullable(); table.text('content').notNullable(); });}export async function down(knex: Knex): Promise { return knex.schema.dropTable('posts');}In the up function, we are creating a posts table in our database with three columns: id, title, and content. The up function will be executed when we run the migration. Then inside the down function, we are simply dropping the posts table that might have been created. The down function will be executed when we roll back the migration.
Finally, lets run the migration:
npx knex migrate:upImplementing the repository pattern
Now, lets get to the meat of this tutorial. The repository pattern makes use of the concept of contracts (interface) and concrete implementations. Basically, we define contracts/interfaces that we would want a concrete implementation (class) to adhere to.
Creating the repository contract
Having said that, lets create the post contract/interface. Inside src, create a new repositories directory. This is where well store all our repositories. Inside the newly created directory, create a PostRepositoryInterface.ts file with the following content:
// src/repositories/PostRepositoryInterface.tsimport Post from '../post/post.model';export default interface PostRepositoryInterface { all(): Promise<Post[]>; find(id: number): Promise<Post>; create(data: object): Promise<Post>;}This is the contract we want all our post concrete implementation to adhere to. To keep things simple and straightforward, I have only added three methods.
Creating the concrete implementation
Next, lets create the concrete implementation. Since our application current uses Knex to interact with the database, this will be the Knex implementation. Still inside the repositories directory, create a new KnexPostRepository.ts file with the following content:
// src/repositories/KnexPostRepository.tsimport { Inject } from '@nestjs/common';import Post from 'src/post/post.model';import PostRepositoryInterface from './PostRepositoryInterface';export default class KnexPostRepository implements PostRepositoryInterface { constructor(@Inject(Post) private readonly postModel: typeof Post) {} async all(): Promise<Post[]> { return this.postModel.query(); } async find(id: number): Promise<Post> { return this.postModel.query().where('id', id).first(); } async create(data: object): Promise<Post> { return this.postModel.query().insert(data); }}The KnexPostRepository class implements the PostRepositoryInterface we created earlier, and so it therefore must adhere to the terms of the contract; that is, implement those methods defined in the interface. Inside the class constructor, we inject the Post model into the class. Since we now have access to the Post model, we can use it to perform the necessary operations in the respective methods.
Using the repository
Now, to use the KnexPostRepository we just created, we need to first register with the Nest IoC container. We can do that by adding it to the providers array of the PostModule:
// src/post/post.module.ts...import KnexPostRepository from 'src/repositories/KnexPostRepository';@Module({ ... providers: [ { provide: 'PostRepository', useClass: KnexPostRepository }, ], ...})export class PostModule {}Inside the providers array, we are saying, Hey, Nest, we want the PostRepository token to resolve to the KnexPostRepository class. In so doing, whenever we inject PostRepository (more on this shortly), we will get an instance of KnexPostRepository.
Now, lets actually make use of the repository. Update the PostController:
// src/post/post.controller.tsimport { Controller, Get, Inject } from '@nestjs/common';import PostRepositoryInterface from 'src/repositories/PostRepositoryInterface';import Post from './post.model';@Controller('post')export class PostController { constructor( @Inject('PostRepository') private readonly postRepository: PostRepositoryInterface, ) {} @Get() async findAll() { return this.postRepository.all(); }}The magic happens inside the constructor. Remember the PostRepository token from above? We inject it into the controller through its constructor, and as a result the postRepository property will be an instance of KnexPostRepository as explained above. Then we can conveniently use any of the methods defined in the repository.
Thats how to use the repository. If down the line in the course of the project we decide to switch data access layer to something like Prisma, well just need to create a PrismaPostRepository class that implements the PostRepositoryInterface:
// src/repositories/PrismaPostRepository.tsimport PostRepositoryInterface from './PostRepositoryInterface';export default class PrismaPostRepository implements PostRepositoryInterface { async all(): Promise<Post[]> { // Prisma logic } async find(id: number): Promise<Post> { // Prisma logic } async create(data: object): Promise<Post> { // Prisma logic }}Then simply register in with the Nest IoC container:
// src/post/post.module.ts...import KnexPostRepository from 'src/repositories/KnexPostRepository';@Module({ ... providers: [ // { provide: 'PostRepository', useClass: KnexPostRepository }, { provide: 'PostRepository', useClass: PrismaPostRepository }, ], ...})export class PostModule {}The controller code will mostly remain the same.
Refactoring the repository contract to use generics
As it stands, we have successfully implemented the repository pattern and we can simply call it a day at this point. Youll notice something though: PostRepositoryInterface is tightly coupled with the Post model, which isnt a problem, per se, but imagine we want to add commenting functionality to our application. We might lean towards creating a CommentRepositoryInterface that will have the same methods and structure as PostRepositoryInterface. Then, well create a KnexCommentRepository that will implement CommentRepositoryInterface.
You can immediately see the pattern of code duplication because PostRepositoryInterface and CommentRepositoryInterface are basically the same with just different models. So we are going to refactor the interface such that it can be reusable with any models.
We need a way to pass the model to the interface. Luckily for us, we can easily achieve that using TypeScript generics.
We are going to rename PostRepositoryInterface to RepositoryInterface and update the code:
// src/repositories/RepositoryInterface.tsexport default interface RepositoryInterface<T> { all(): Promise<T[]>; find(id: number): Promise<T>; create(data: object): Promise<T>;}Here, T will be the model that the concrete implementation is for. Any class that wants to make use of this interface must pass to it the model to fully adhere to the contract.
Now, we can make a slight adjustment to KnexPostRepository by passing the Post model to the RepositoryInterface:
// src/repositories/KnexPostRepository.tsimport RepositoryInterface from './RepositoryInterface';export default class KnexPostRepository implements RepositoryInterface<Post> { // rest of the code remain the same}Then, KnexCommentRepository can look like this:
// src/repositories/KnexCommentRepository.tsimport RepositoryInterface from './RepositoryInterface';export default class KnexCommentRepository implements RepositoryInterface<Comment> { // methods implementation for commenting functionality}Conclusion
In this tutorial, we learned about the repository pattern, some of its benefits, and how to implement the repository pattern with TypeScript and Node.js. Also, we saw how to reduce code duplication using TypeScript generics.
You can get the complete source code for our demo from this GitHub repository.
200s only Monitor failed and slow network requests in production
Deploying a Node-based web app or website is the easy part. Making sure your Node instance continues to serve resources to your app is where things get tougher. If youre interested in ensuring requests to the backend or third party services are successful, try LogRocket.
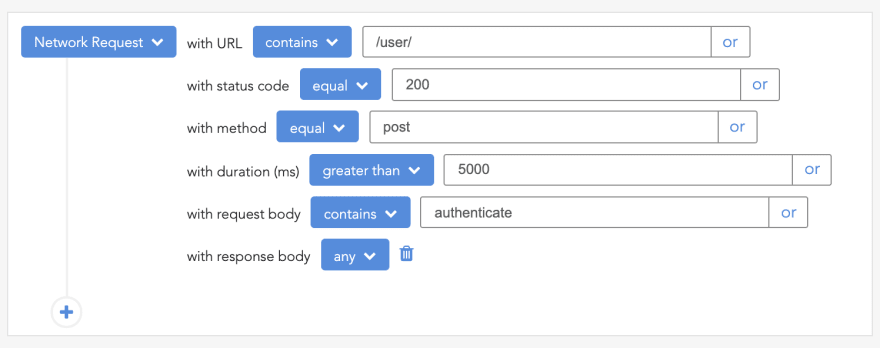
LogRocket is like a DVR for web and mobile apps, recording literally everything that happens while a user interacts with your app. Instead of guessing why problems happen, you can aggregate and report on problematic network requests to quickly understand the root cause.
LogRocket instruments your app to record baseline performance timings such as page load time, time to first byte, slow network requests, and also logs Redux, NgRx, and Vuex actions/state. Start monitoring for free.
Original Link: https://dev.to/logrocket/exploring-the-repository-pattern-with-typescript-and-node-4jc9
Dev To
More About this Source Visit Dev To