
An Interest In:
Web News this Week
- April 3, 2024
- April 2, 2024
- April 1, 2024
- March 31, 2024
- March 30, 2024
- March 29, 2024
- March 28, 2024
Some of Our Sources
- Techcrunch
- Team Treehouse
- Smashing Apps
- Six Revisions
- TutsPlus - Design
- Fuel Your Creativity
- FanExtra - PSD
- Specky Boy
- Design Modo
- Hashedout
Help Webnuz
Referal links:
Building a Notion-like system with Socket.io And React
What is this article about?
We are going to build a knowledge system like Click-Up and Notion. You will be able to add posts, write comments, tag other users and show it in their notifications.
In notion users can see what other users do in real-time without refreshing the page. This is why we will be using Socket.io. In the next article I will write about SSE (server sent events)

What is WebSocket?
WebSocket is a built-in Node.js module that enables us to create a real-time connection between a client and a server, allowing them to send data in both ways. However, WebSocket is low-level and doesn't provide the functionalities required to build complex real-time applications; this is why Socket.io exists.
Socket.iois a popular JavaScript library that allows us to create real-time, bi-directional communication between software applications and a Node.js server. It is optimised to process a large volume of data with minimal delay and provides better functionalities, such as fallback to HTTP long-polling or automatic reconnection.
Novu - the first open-source notification infrastructure
Just a quick background about us. Novu is the first open-source notification infrastructure. We basically help to manage all the product notifications. It can be In-App (the bell icon like you have in the Dev Community - Websockets), Emails, SMSs and so on.
I am having a live-event on how to build a Notion-like system with NX, Nest.js, Prisma, React.js, React Query, Debouncers and many more stuff! Feel free to RSVP HERE
https://github.novu.co/notion

How to create a real-time connection with React & Socket.io
Here, we'll set up the project environment for the notion app. You'll also learn how to add Socket.io to a React and Node.js application and connect both development servers for real-time communication via Socket.io.
Create the project folder containing two sub-folders named client and server.
mkdir notion-platformcd notion-platformmkdir client serverNavigate into the client folder via your terminal and create a new React.js project.
cd clientnpx create-react-app ./Install Socket.io client API and React Router. React Router is a JavaScript library that enables us to navigate between pages in a React application.
npm install socket.io-client react-router-domDelete the redundant files such as the logo and the test files from the React app, and update the App.js file to display Hello World as below.
function App() { return ( <div> <p>Hello World!</p> </div> );}export default App;Add the Socket.io client API to the React app as below:
import { io } from "socket.io-client";// http://localhost:4000 is where the server host URL.const socket = io.connect("http://localhost:4000");function App() { return ( <div> <p>Hello World!</p> </div> );}export default App;Navigate into the server folder and create a package.json file.
cd server & npm init -yInstall Express.js, CORS, Nodemon, and Socket.io Server API.
npm install express cors nodemon socket.ioExpress.jsis a fast, minimalist framework that provides several features for building web applications in Node.js.CORSis a Node.js package that allows communication between different domains.
Nodemonis a Node.js tool that automatically restarts the server after detecting file changes, andSocket.ioallows us to configure a real-time connection on the server.
Create an index.js file - the entry point to the web server.
touch index.jsSet up a Node.js server using Express.js. The code snippet below returns a JSON object when you visit thehttp://localhost:4000/apiin your browser.
//index.jsconst express = require("express");const app = express();const PORT = 4000;app.use(express.urlencoded({ extended: true }));app.use(express.json());app.get("/api", (req, res) => { res.json({ message: "Hello world", });});app.listen(PORT, () => { console.log(`Server listening on ${PORT}`);});Import the HTTP and the CORS library to allow data transfer between the client and the server domains.
const express = require("express");const app = express();const PORT = 4000;// New importsconst http = require("http").Server(app);const cors = require("cors");app.use(express.urlencoded({ extended: true }));app.use(express.json());app.use(cors());app.get("/api", (req, res) => { res.json({ message: "Hello world", });});http.listen(PORT, () => { console.log(`Server listening on ${PORT}`);});Next, add Socket.io to the project to create a real-time connection. Before theapp.get()block, copy the code below.
// New imports.....const socketIO = require('socket.io')(http, { cors: { origin: "http://localhost:3000" }});// Add this before the app.get() blocksocketIO.on('connection', (socket) => { console.log(`: ${socket.id} user just connected!`); socket.on('disconnect', () => { socket.disconnect() console.log(': A user disconnected'); });});From the code snippet above, thesocket.io("connection")function establishes a connection with the React app, then creates a unique ID for each socket and logs the ID to the console whenever a user visits the web page.
When you refresh or close the web page, the socket fires the disconnect event showing that a user has disconnected from the socket.
Configure Nodemon by adding the start command to the list of scripts in thepackage.jsonfile. The code snippet below starts the server using Nodemon.
// In server/package.json"scripts": { "test": "echo \"Error: no test specified\" && exit 1", "start": "nodemon index.js" }You can now run the server with Nodemon by using the command below.
npm startBuilding the user interface
Here, we'll create the user interface for the notion application to enable users to sign in, write posts, add comments, and tag other users.
Navigate into the client/src folder and create a components folder containing Login.js, Home.js, CreatePost.js, and NotionPost.js files.
cd clientmkdir componentscd componentstouch Login.js Home.js CreatePost.js NotionPost.jsUpdate theApp.jsfile to render the newly created components on different routes via React Router as below:
import { BrowserRouter, Routes, Route } from "react-router-dom";import NotionPost from "./components/NotionPost";import CreatePost from "./components/CreatePost";import Home from "./components/Home";import Login from "./components/Login";import { io } from "socket.io-client";const socket = io.connect("http://localhost:4000");function App() { return ( <BrowserRouter> <Routes> <Route path='/' element={<Login socket={socket} />} /> <Route path='/dashboard' element={<Home socket={socket} />} /> <Route path='/post/create' element={<CreatePost socket={socket} />} /> <Route path='/post/:id' element={<NotionPost socket={socket} />} /> </Routes> </BrowserRouter> );}export default App;Navigate into thesrc/index.cssfile and copy the code below. It contains all the CSS required for styling this project.
@import url("https://fonts.googleapis.com/css2?family=Space+Grotesk:wght@300;400;500;600;700&display=swap");* { box-sizing: border-box; padding: 0; margin: 0; font-family: "Space Grotesk", sans-serif;}body { padding: 0;}.login { width: 100%; min-height: 100vh; display: flex; flex-direction: column; align-items: center; justify-content: center;}.login > h2 { color: #00abb3; margin-bottom: 30px;}.loginForm { width: 70%; display: flex; flex-direction: column;}.loginForm > input { margin: 10px 0; padding: 10px 15px;}.home__navbar { width: 100%; height: 10vh; padding: 20px; display: flex; align-items: center; justify-content: space-between; border-bottom: 1px solid #eaeaea;}.home__navbar > h2 { color: #00abb3;}.home__buttons { display: flex; align-items: center; justify-content: baseline;}.home__createBtn { padding: 10px; cursor: pointer; margin-right: 10px; background-color: #00abb3; border: none; outline: none; color: #fff;}.home__createBtn:hover,.createForm__button:hover { background-color: #02595e;}.home__notifyBtn { padding: 10px; cursor: pointer; color: #00abb3; background-color: #fff; border: 1px solid #3c4048; outline: none; width: 100px;}.posts__container { width: 100%; min-height: 90vh; padding: 30px 20px;}.post { width: 100%; min-height: 8vh; background-color: #00abb3; border-radius: 5px; padding: 20px; display: flex; color: #eaeaea; align-items: center; justify-content: space-between; margin-bottom: 15px;}.post__cta { padding: 10px; background-color: #fff; cursor: pointer; outline: none; border: none; border-radius: 2px;}.createPost { min-height: 100vh; width: 100%; padding: 30px 20px;}.createPost > h2 { text-align: center; color: #00abb3;}.createForm { width: 100%; min-height: 80vh; padding: 20px; display: flex; flex-direction: column;}.createForm__title { padding: 10px; height: 45px; margin-bottom: 10px; text-transform: capitalize; border: 1px solid #3c4048;}.createForm__content { padding: 15px; margin-bottom: 15px; border: 1px solid #3c4048;}.createForm__button { width: 200px; padding: 10px; height: 45px; background-color: #00abb3; color: #fff; outline: none; border: none; cursor: pointer; border-radius: 5px;}.notionPost { width: 100%; min-height: 100vh; background-color: #eaeaea; display: flex; flex-direction: column; padding: 30px 50px;}.notionPost__container { width: 90%; min-height: 70vh; margin-bottom: 30px;}.notionPost__author { color: #00abb3;}.notionPost__date { opacity: 0.4; font-size: 12px;}.notionPost__content { padding-top: 30px; line-height: 200%;}.comments__container { min-height: 70vh; border: 1px solid #3c4048; padding: 30px; box-shadow: 0 0 0 1px rgba(0, 0, 0, 0.05), 2px 2px 3px 1px rgba(208, 213, 219, 0.28); border-radius: 3px;}.comments__inputContainer { display: flex; align-items: center; margin: 30px 0;}.comments__input { width: 50%; padding: 15px; margin-right: 15px;}.comments__cta,.login__cta { padding: 15px; width: 200px; cursor: pointer; outline: none; border: none; background-color: #00abb3; color: #fff;}.comment { margin-bottom: 15px;}The Login page
Here, the application accepts the username and saves it in the local storage for user identification. Copy the code below into the Login component.
import React, { useState } from "react";import { useNavigate } from "react-router-dom";const Login = () => { const [username, setUsername] = useState(""); const navigate = useNavigate(); const handleLogin = (e) => { e.preventDefault(); //The username console.log({ username }); localStorage.setItem("username", username); navigate("/dashboard"); }; return ( <div className='login'> <h2>Sign in to HackNotion</h2> <form className='loginForm' onSubmit={handleLogin}> <label htmlFor='username'>Enter your username</label> <input name='username' id='username' type='text' value={username} required onChange={(e) => setUsername(e.target.value)} /> <button className='login__cta'>LOG IN</button> </form> </div> );};export default Login;The Home page
Copy the code below into theHome.jsfile. It represents the home layout for the application.
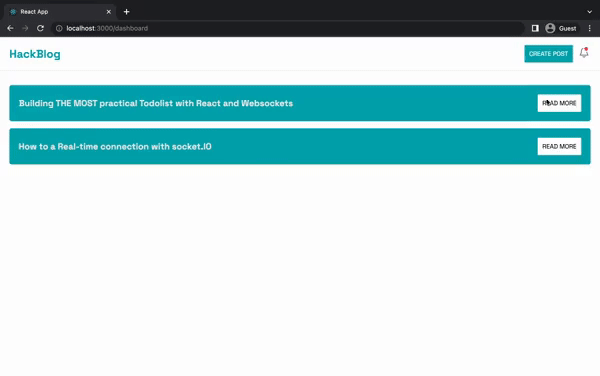
import React from "react";import { useNavigate } from "react-router-dom";const Home = () => { const navigate = useNavigate(); const createPostBtn = () => navigate("/post/create"); const readMoreBtn = () => navigate("/post/:id"); return ( <div className='home'> <nav className='home__navbar'> <h2>HackNotion</h2> <div className='home__buttons'> <button className='home__createBtn' onClick={createPostBtn}> CREATE POST </button> <button className='home__notifyBtn'>NOTIFY</button> </div> </nav> <div className='posts__container'> <div className='post'> <h3>How to create a new Socket.io client</h3> <button className='post__cta' onClick={readMoreBtn}> READ MORE </button> </div> <div className='post'> <h3>Creating React Native project with Expo</h3> <button className='post__cta' onClick={readMoreBtn}> READ MORE </button> </div> </div> </div> );};export default Home;
The NotionPost page
This page is dynamic and displays the content of each post via the ID passed into the URL. Here, users can read the notion post and add comments.
Copy the code below into the NotionPost.js file:
import React, { useState } from "react";const NotionPost = () => { const [comment, setComment] = useState(""); const handleAddComment = (e) => { e.preventDefault(); console.log({ comment }); setComment(""); }; return ( <div className='notionPost'> <div className='notionPost__container'> <h1>How to create a new React Native project with Expo</h1> <div className='notionPost__meta'> <p className='notionPost__author'>By Nevo David</p> <p className='notionPost__date'>Created on 22nd September, 2022</p> </div> <div className='notionPost__content'> For this article, I will use Puppeteer and ReactJS. Puppeteer is a Node.js library that automates several browser actions such as form submission. </div> </div> <div className='comments__container'> <h2>Add Comments</h2> <form className='comments__inputContainer' onSubmit={handleAddComment}> <textarea placeholder='Type in your comments...' rows={5} className='comments__input' value={comment} required onChange={(e) => setComment(e.target.value)} /> <button className='comments__cta'>Add Comment</button> </form> <div> <p className='comment'> <span style={{ fontWeight: "bold" }}>Scopsy Dima</span> - Nice post fam! </p> </div> </div> </div> );};export default NotionPost;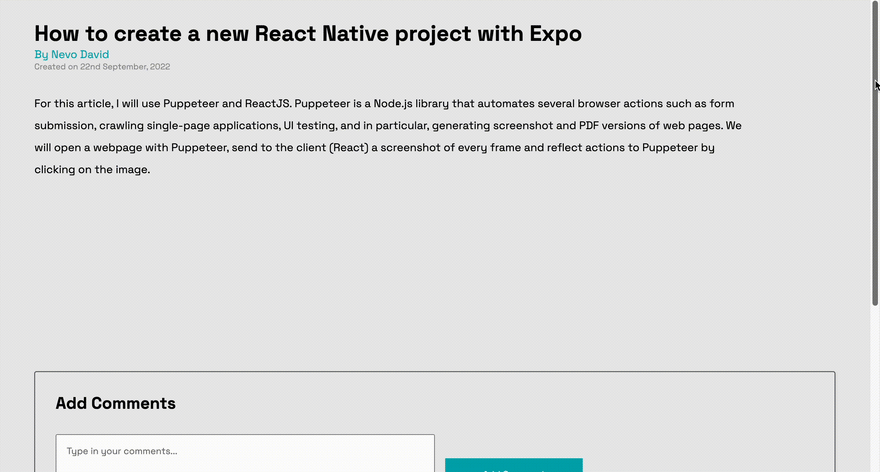
The CreatePost page
Here, we'll create a simple layout that allows users to create posts by adding the title and its content. Users will also be able to tag other users usingReact Tag.
React Tagis a library that allows us to create tags easily via a single component. It provides several features, such as autocomplete based on a suggestion list, reordering using drag-and-drop, and many more.*
Copy the code below into the CreatePost.js file.
import React, { useState } from "react";import { useNavigate } from "react-router-dom";const CreatePost = () => { const navigate = useNavigate(); const [postTitle, setPostTitle] = useState(""); const [postContent, setPostContent] = useState(""); //...gets the publish date for the post const currentDate = () => { const d = new Date(); return `${d.getDate()}-${d.getMonth() + 1}-${d.getFullYear()}`; }; //...logs the post details to the console const addPost = (e) => { e.preventDefault(); console.log({ postTitle, postContent, username: localStorage.getItem("username"), timestamp: currentDate(), }); navigate("/dashboard"); }; return ( <> <div className='createPost'> <h2>Create a new Post</h2> <form className='createForm' onSubmit={addPost}> <label htmlFor='title'> Title</label> <input type='text' required value={postTitle} onChange={(e) => setPostTitle(e.target.value)} className='createForm__title' /> <label htmlFor='title'> Content</label> <textarea required rows={15} value={postContent} onChange={(e) => setPostContent(e.target.value)} className='createForm__content' /> <button className='createForm__button'>ADD POST</button> </form> </div> </> );};export default CreatePost;Import React Tags into theCreatePost.jsfile:
import { WithContext as ReactTags } from "react-tag-input";Update the CreatePost component to contain the code snippet below for creating tags with React Tags.
// The suggestion list for autocompleteconst suggestions = ["Tomer", "David", "Nevo"].map((name) => { return { id: name, text: name, };});const KeyCodes = { comma: 188, enter: 13,};// The comma and enter keys are used to separate each tagsconst delimiters = [KeyCodes.comma, KeyCodes.enter];//...The React componentconst CreatePost = () => { // An array containing the tags const [tags, setTags] = useState([]); //...deleting tags const handleDelete = (i) => { setTags(tags.filter((tag, index) => index !== i)); }; //...adding new tags const handleAddition = (tag) => { setTags([...tags, tag]); }; //...runs when you click on a tag const handleTagClick = (index) => { console.log("The tag at index " + index + " was clicked"); }; return ( <div className='createPost'> <form> {/**...below the input fields---*/} <ReactTags tags={tags} suggestions={suggestions} delimiters={delimiters} handleDelete={handleDelete} handleAddition={handleAddition} handleTagClick={handleTagClick} inputFieldPosition='bottom' autocomplete /> <button className='createForm__button'>ADD POST</button> </form> </div> );};export default CreatePost;React Tags also allows us to customize its elements. Add the following code to the src/index.css file:
/*You can learn how it's styled here: https://stackblitz.com/edit/react-tag-input-1nelrc*/.ReactTags__tags react-tags-wrapper,.ReactTags__tagInput { width: 100%;}.ReactTags__selected span.ReactTags__tag { border: 1px solid #ddd; background: #00abb3; color: white; font-size: 12px; display: inline-block; padding: 5px; margin: 0 5px; border-radius: 2px; min-width: 100px;}.ReactTags__selected button.ReactTags__remove { color: #fff; margin-left: 15px; cursor: pointer; background-color: orangered; padding: 0 10px; border: none; outline: none;}.ReactTags__tagInput input.ReactTags__tagInputField,.ReactTags__tagInput input.ReactTags__tagInputField:focus { margin: 10px 0; font-size: 12px; width: 100%; padding: 10px; height: 45px; text-transform: capitalize; border: 1px solid #3c4048;}.ReactTags__selected span.ReactTags__tag { border: 1px solid #ddd; background: #63bcfd; color: white; font-size: 12px; display: inline-block; padding: 5px; margin: 0 5px; border-radius: 2px;}.ReactTags__selected a.ReactTags__remove { color: #aaa; margin-left: 5px; cursor: pointer;}/* Styles for suggestions */.ReactTags__suggestions { position: absolute;}.ReactTags__suggestions ul { list-style-type: none; box-shadow: 0.05em 0.01em 0.5em rgba(0, 0, 0, 0.2); background: white; width: 200px;}.ReactTags__suggestions li { border-bottom: 1px solid #ddd; padding: 5px 10px; margin: 0;}.ReactTags__suggestions li mark { text-decoration: underline; background: none; font-weight: 600;}.ReactTags__suggestions ul li.ReactTags__activeSuggestion { background: #fff; cursor: pointer;}.ReactTags__remove { border: none; cursor: pointer; background: none; color: white;}Congratulations! We've completed the layout for the notion application. Next, let's learn how to add all the needed functionalities with the Socket.io Node.js server.
Creating new posts with Socket.io
In this section, I'll guide you on how to create new posts and display them on the React app with Socket.io.
Update the addPost function within the CreatePost component by sending the newly created post to the server via Socket.io.
// Socket.io was passed from the App.js fileconst CreatePost = ({ socket }) => { //...other functions const addPost = (e) => { e.preventDefault(); // sends all the post details to the server socket.emit("createPost", { postTitle, postContent, username: localStorage.getItem("username"), timestamp: currentDate(), tags, }); navigate("/dashboard"); }; return <div className='createPost'>...</div>;};Create a listener to the event on the server.
socketIO.on("connection", (socket) => { console.log(`: ${socket.id} user just connected!`); socket.on("createPost", (data) => { /* data - contains all the post details from the React app */ console.log(data); }); socket.on("disconnect", () => { socket.disconnect(); console.log(": A user disconnected"); });});Create an array on the backend server that holds all the posts, and add the new post to the list.
// generates a random IDconst fetchID = () => Math.random().toString(36).substring(2, 10);let notionPosts = [];socket.on("createPost", (data) => { const { postTitle, postContent, username, timestamp, tags } = data; notionPosts.unshift({ id: fetchID(), title: postTitle, author: username, createdAt: timestamp, content: postContent, comments: [], }); // We'll use the tags later for sending notifications // The notionposts are sent back to the React app via another event socket.emit("updatePosts", notionPosts);});Add a listener to the notion posts on the React app via the useEffect hook by copying the code below:
// Within Home.js fileuseEffect(() => { socket.on("updatePosts", (posts) => console.log(posts));}, [socket]);Displaying the posts
Save the posts into a state and render them as below:
import React, { useEffect, useState } from "react";import { useNavigate } from "react-router-dom";const Home = ({ socket }) => { const navigate = useNavigate(); const [posts, setPosts] = useState([]); // Saves the posts into the "posts" state useEffect(() => { socket.on("updatePosts", (posts) => setPosts(posts)); }, [socket]); const createPostBtn = () => navigate("/post/create"); // Navigates to the NotionPost page to view // all the post contents const readMoreBtn = (postID) => { navigate(`/post/${postID}`); }; return ( <div className='home'> <nav className='home__navbar'> <h2>HackNotion</h2> <div className='home__buttons'> <button className='home__createBtn' onClick={createPostBtn}> CREATE POST </button> <button className='home__notifyBtn'>NOTIFY</button> </div> </nav> <div className='posts__container'> {posts?.map((post) => ( <div className='post' key={post.id}> <h3>{post.title}</h3> <button className='post__cta' onClick={() => readMoreBtn(post.id)}> READ MORE </button> </div> ))} </div> </div> );};export default Home;So far, we can only view the posts when we add one. Next, let's make it possible for us to display the posts when we load the page.
Create a route on the server that returns the notion posts.
app.get("/api", (req, res) => { res.json(notionPosts);});Update the Home.js file fetch the notion posts and listen for new posts from the server.
useEffect(() => { function fetchPosts() { fetch("http://localhost:4000/api") .then((res) => res.json()) .then((data) => setPosts(data)) .catch((err) => console.error(err)); } fetchPosts();}, []);useEffect(() => { socket.on("updatePosts", (posts) => setPosts(posts));}, [socket]);Completing the Notion Post component
In the previous section, you learnt how to create and display notion posts to users. Here, you'll learn how to show the contents of each notion post when you click the Read More button.
Update thereadMoreBtnfunction within theHome.jsfile as below:
const readMoreBtn = (postID) => { socket.emit("findPost", postID);// navigates to the Notionpost routenavigate(`/post/${postID}`);};The code snippet above gets the ID of the selected post and sends a Socket.io event containing the post ID to the server before redirecting to the post route.
Create a listener to thefindPostevent and return the post details via another Socket.io event.
socket.on("findPost", (postID) => { // Filter the notion post via the post ID let result = notionPosts.filter((post) => post.id === postID); // Returns a new event containing the post details socket.emit("postDetails", result[0]);});Listen to thepostDetailsevent with theNotionPostcomponent and render the post details as below:
import React, { useState, useEffect } from "react";import { useParams } from "react-router-dom";const NotionPost = ({ socket }) => { // gets the Post ID from its URL const { id } = useParams(); const [comment, setComment] = useState(""); const [post, setPost] = useState({}); //loading state for async request const [loading, setLoading] = useState(true); // Gets the post details from the server for display useEffect(() => { socket.on("postDetails", (data) => { setPost(data); setLoading(false); }); }, [socket]); // Function for creating new comments const handleAddComment = (e) => { e.preventDefault(); console.log("newComment", { comment, user: localStorage.getItem("username"), postID: id, }); setComment(""); }; if (loading) { return <h2>Loading... Please wait</h2>; } return ( <div className='notionPost'> <div className='notionPost__container'> <h1>{post.title}</h1> <div className='notionPost__meta'> <p className='notionPost__author'>By {post.author}</p> <p className='notionPost__date'>Created on {post.createdAt}</p> </div> <div className='notionPost__content'>{post.content}</div> </div> <div className='comments__container'> <h2>Add Comments</h2> <form className='comments__inputContainer' onSubmit={handleAddComment}> <textarea placeholder='Type in your comments...' rows={5} className='comments__input' value={comment} required onChange={(e) => setComment(e.target.value)} /> <button className='comments__cta'>Add Comment</button> </form> <div> <p className='comment'> <span style={{ fontWeight: "bold" }}>Scopsy Dima</span> - Nice post fam! </p> </div> </div> </div> );};export default NotionPost;The Comments section
Here, I'll guide you through adding comments to each notion post and displaying them in real-time.
Update thehandleAddCommentfunction within theNotionPostcomponent to send the new comments details to the server.
const handleAddComment = (e) => { e.preventDefault(); socket.emit("newComment", { comment, user: localStorage.getItem("username"), postID: id, }); setComment("");};Create a listener to the event on the server that adds the comment to the list of comments.
socket.on("newComment", (data) => { const { postID, user, comment } = data;// filters the notion post via its IDlet result = notionPosts.filter((post) => post.id === postID);// Adds the comment to the comments list result[0].comments.unshift({ id: fetchID(), user, message: comment, });// sends the updated details to the React app socket.emit("postDetails", result[0]);});Update theNotionPost.jsfile to display any existing comments.
return ( <div className='notionPost'> <div className='notionPost__container'> <h1>{post.title}</h1> <div className='notionPost__meta'> <p className='notionPost__author'>By {post.author}</p> <p className='notionPost__date'>Created on {post.createdAt}</p> </div> <div className='notionPost__content'>{post.content}</div> </div> <div className='comments__container'> <h2>Add Comments</h2> <form className='comments__inputContainer' onSubmit={handleAddComment}> <textarea placeholder='Type in your comments...' rows={5} className='comments__input' value={comment} required onChange={(e) => setComment(e.target.value)} /> <button className='comments__cta'>Add Comment</button> </form> {/** Displays existing comments to the user */} <div> {post.comments.map((item) => ( <p className='comment' key={item.id}> <span style={{ fontWeight: "bold", marginRight: "15px" }}> {item.user} </span> {item.message} </p> ))} </div> </div> </div>);Congratulations! You can now create posts and add comments with Socket.io. For the remaining part of this tutorial, I'll guide you through sending notifications to every user you tag in your post using Novu.
How to add Novu to a React and Node.js application
Novu allows you to add various notification types, such as email, SMS, and in-app notifications. In this tutorial, you will learn how to create a Novu project, add Novu to your React and Node.js projects, and send an in-app notification with Novu.
Install the Novu Node.js SDK on the server and the Notification Center in the React app.
Install on the clientnpm install @novu/notification-center Install on the servernpm install @novu/nodeCreate a Novu project by running the code below. A personalised dashboard is available to you.
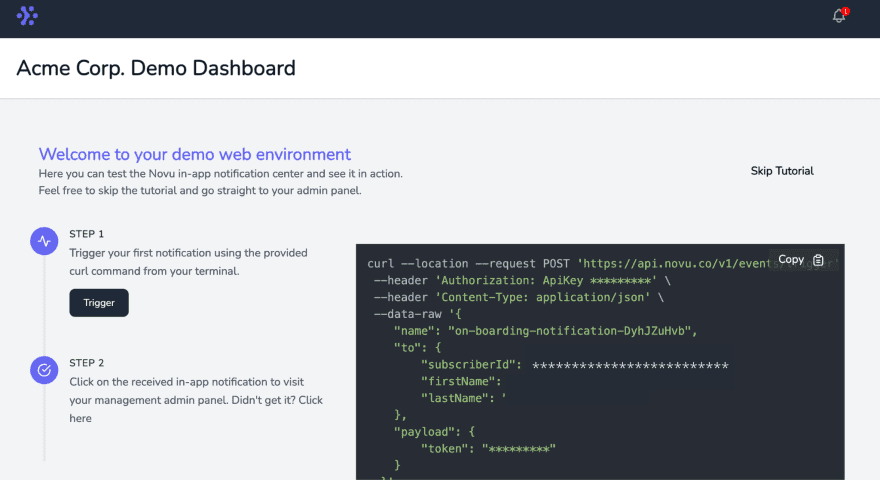
Run on the clientnpx novu initYou will need to sign in with Github before creating a Novu project. The code snippet below contains the steps you should follow after runningnpx novu init
Now let's setup your account and send your first notification What is your application name? Notionging-Platform Now lets setup your environment. How would you like to proceed? > Create a free cloud account (Recommended) Create your account with: > Sign-in with GitHub I accept the Terms and Condidtions (https://novu.co/terms) and have read the Privacy Policy (https://novu.co/privacy) > Yes Create your account successfully.We've created a demo web page for you to see novu notifications in action.Visit: http://localhost:57807/demo to continueVisit the demo web pagehttp://localhost:57807/demo, copy your subscriber ID from the page, and click the Skip Tutorial button. We'll be using it later in this tutorial.
Congratulations! Youve successfully added Novu to your React and Node.js project. Next, lets learn how to add in-app notifications to the notionging application to notify users when we tag them to a post.
Adding in-app notifications with Novu
Create a Notify.js file within the src/components folder and copy the code below into the file. It contains the elements required for in-app notifications from thedocumentation.
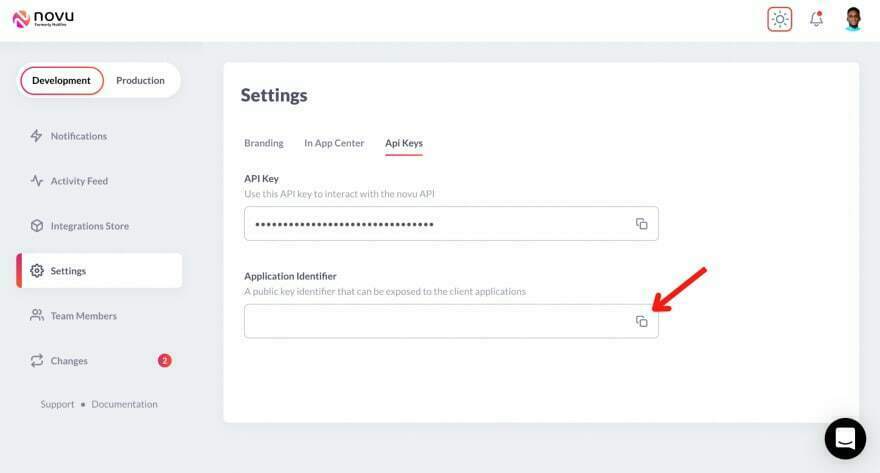
import React from "react";import { NovuProvider, PopoverNotificationCenter, NotificationBell,} from "@novu/notification-center";import { useNavigate } from "react-router-dom";const Notify = () => { const navigate = useNavigate(); const onNotificationClick = (notification) => navigate(notification.cta.data.url); return ( <div> <NovuProvider subscriberId='<YOUR_SUBSCRIBER_ID>' applicationIdentifier='<YOUR_APP_ID>' > <PopoverNotificationCenter onNotificationClick={onNotificationClick} colorScheme='light' > {({ unseenCount }) => <NotificationBell unseenCount={unseenCount} />} </PopoverNotificationCenter> </NovuProvider> </div> );};export default Notify;The code snippet above adds Novu notification bell icon to the Notify component, enabling us to view all the notifications within the application.
The
NovuProvidercomponent requires your Subscriber ID - copied earlier fromhttp://localhost:57807/demoand your application ID available in the Settings section under API Keys on theNovu Manage Platform.
Import the Notify component into the Home.js file and display the bell icon as below:
return ( <div className='home'> <nav className='home__navbar'> <h2>HackNotion</h2> <div className='home__buttons'> <button className='home__createBtn' onClick={createPostBtn}> CREATE POST </button> <Notify /> </div> </nav> </div>)Next, create the workflow for the application, which describes the features you want to add to the application.
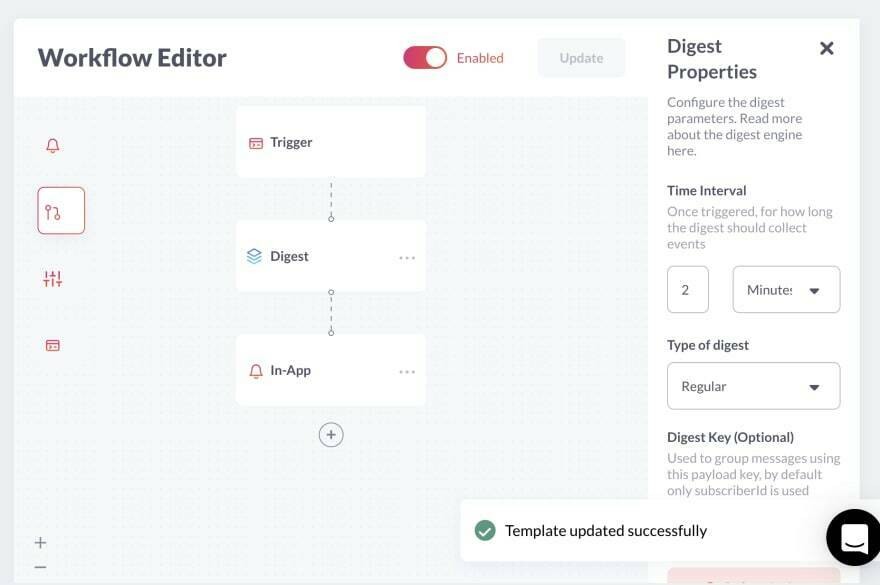
Select Notification from the Development sidebar and create a notification template. Click the newly created template, then, Workflow Editor, and ensure the workflow is as below:

From the image above, Novu triggers the Digest engine before sending the in-app notification.
Novu Digestallows us to control how we want to send notifications within the application. It collects multiple trigger events and sends them as a single message. The image above sends notifications every 2 minutes, and it can be effective when you have many users and frequent updates.
Click theIn-Appstep from the image above and edit the notification template to contain the content below.
{{sender}} tagged you to a postNovu allows you to add dynamic content or data to the templates usingthe Handlebars templating engine. The data for the
sendervariable will be inserted into the template as a payload from the request within our app.
Save the template by clickingUpdate button and head back to your code editor.
Sending notifications with Novu
Since we want to send notifications to users when we tag them to a post, we will have to store each username on the server, show them on the suggestion list provided by React Tags, and send them notifications via Novu.
Update the handleLogin function within the Login.js file to send the username to the server when they sign in.
const handleLogin = (e) => { e.preventDefault(); // sends the username to the server socket.emit("addUser", username); localStorage.setItem("username", username); navigate("/dashboard");};Listen to the event and store the username in an array on the server.
let allUsers = [];socket.on("addUser", (user) => { allUsers.push(user);});Also, render the list of users via another route on the server.
app.get("/users", (req, res) => { res.json(allUsers);});To show the users within the React Tags suggestion list, you need to send a request to the API route, get the list of users, and pass them into the list.
Update the CreatePost function to fetch the list of users, and save them within the local storage before navigating the post/create route.
const createPostBtn = () => { fetchUser(); navigate("/post/create");};const fetchUser = () => { fetch("http://localhost:4000/users") .then((res) => res.json()) .then((data) => { // converts the array to a string const stringData = data.toString(); // saved the data to local storage localStorage.setItem("users", stringData); }) .catch((err) => console.error(err));};Next, retrieve all the users from the local storage and pass them into the suggestion list provided by React Tags for display within the CreatePost component.
const [users, setUsers] = useState([]);useEffect(() => { function getUsers() { const storedUsers = localStorage.getItem("users").split(","); setUsers(storedUsers); } getUsers();}, []);const suggestions = users.map((name) => { return { id: name, text: name, };});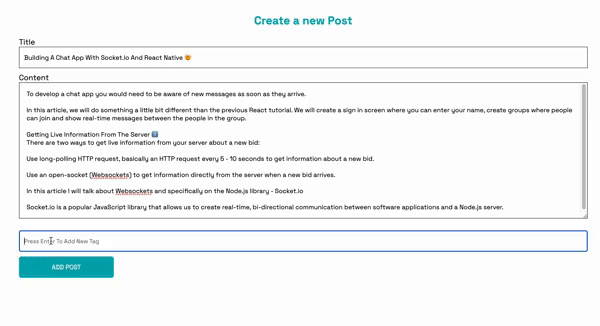
To notify each tagged user, create a function that loops through the users on the server and sends them a notification via Novu to them.
Import and initiate Novu on the server.
const { Novu } = require("@novu/node");const novu = new Novu("<YOUR_API_KEY>")Update the createPost listener on the backend to send a notification to all tagged users.
// Loops through the tagged users and sends a notification to each one of themconst sendUsersNotification = (users, sender) => { users.forEach(function (user) { novuNotify(user, sender); });};// sends a notification via Novuconst novuNotify = async (user, sender) => { try { await novu .trigger("<TEMPLATE_ID>", { to: { subscriberId: user.id, firstName: user.text, }, payload: { sender: sender, }, }) .then((res) => console.log("Response >>", res)); } catch (err) { console.error("Error >>>>", { err }); }};socket.on("createPost", (data) => { const { postTitle, postContent, username, timestamp, tags } = data; notionPosts.unshift({ id: fetchID(), title: postTitle, author: username, createdAt: timestamp, content: postContent, comments: [], }); // Calls the function to send a notification to all tagged users sendUsersNotification(tags, username); socket.emit("updatePosts", notionPosts);});Congratulations! We've completed the code for this project.

Conclusion
So far, you've learned how to set up Socket.io in a React and Node.js application, send messages between the client and a Node.js server, add Novu to a React and Node.js application, and send notifications with Novu.
This tutorial demonstrates what you can build using Socket.io and Novu. Feel free to improve on the project by adding an authentication library and saving the blog posts to a database that supports real-time communication.
The complete code for this tutorial is available here: https://github.com/novuhq/blog/tree/main/blogging-platform-with-react-socketIO
Thank you for reading!
P.S I am having a live-event on how to build a Notion-like system with NX, Nest.js, Prisma, React.js, React Query, Debouncers and many more stuff! Feel free to RSVP HERE
https://github.novu.co/notion
Original Link: https://dev.to/novu/building-a-notion-like-system-with-socketio-and-react-1hjg
Dev To
More About this Source Visit Dev To