
An Interest In:
Web News this Week
- March 22, 2024
- March 21, 2024
- March 20, 2024
- March 19, 2024
- March 18, 2024
- March 17, 2024
- March 16, 2024
Some of Our Sources
- Slashdot
- Technology Review
- Simplebits
- Web Designer Wall
- Six Revisions
- Abduzeedo
- Vandelay Design
- Naldz Graphics
- Reencoded
- Spyre Studios
Help Webnuz
Referal links:
Fetch and Create events in Google Calendar with HTML and Javascript.
The Google Calendar API is a RESTful API that can be accessed through explicit HTTP calls or via the Google Client Libraries. The API exposes most of the features available in the Google Calendar Web interface.
This Blog is a step-by-step guide on how to create a simple website using just HTML and JavaScript where the user can fetch their calendar events and create new events.
Google Calendar API
To read events from your public Google Calendars youll need create a Google API key for which firstly you need to have a google account. After that you need to go through the following steps to get the API key and other required key pair values.
Create Project click on this link to create a new project.

Enable API go to this link and enable your Google Calendar API. Make sure that your recently created project is select.

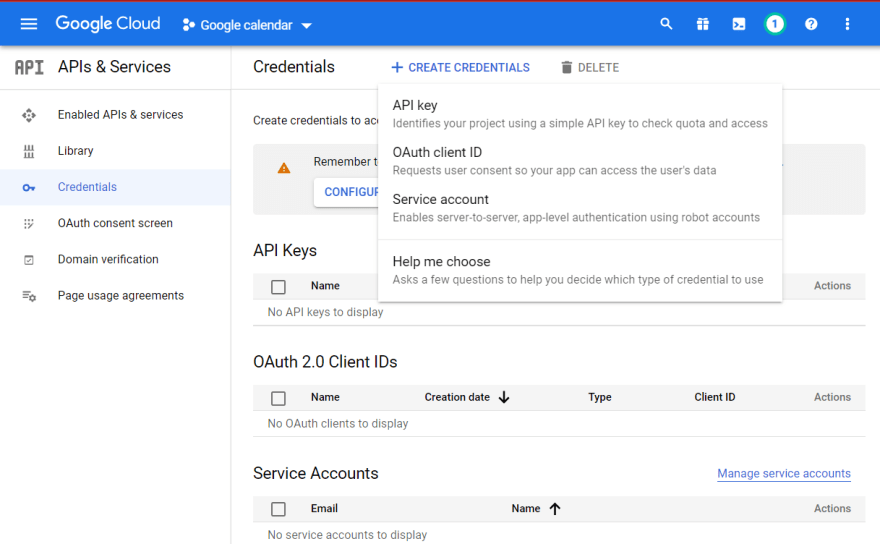
Next navigate to the credentials tab and click on CREATE CREDENTIALS and select API key from the dropdown. After which a api key will be generated for your.
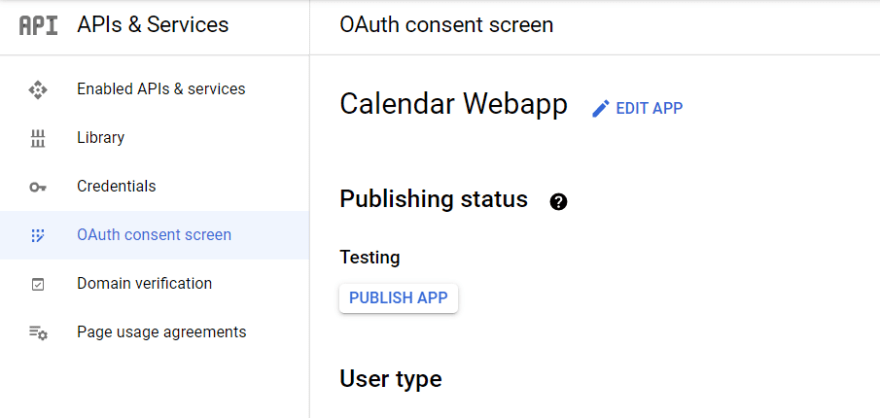
Next select the OAuth consent screen tab and select User Type as External.
You will be asked about you App Info. Give appropriate App Name and support email and click Save and Continue. Refresh the page and now Click on PUBLISH APP
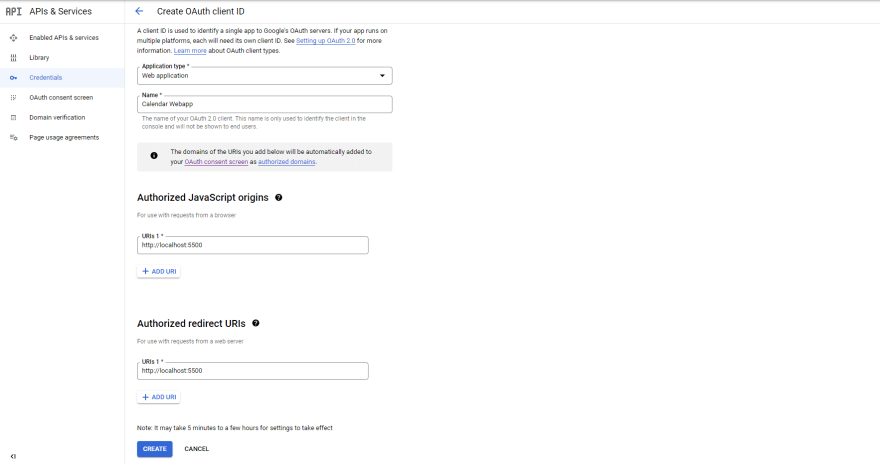
Now again go to the Credentials Tap and now create OAuth Client ID. Select Application type as Web Application and then authorize your domain URL on which your project will be running (if your are on development server give your localhost and the port on which the project is running). Now you will have your Client Id and Client Secret which we will use later for configuration.
Integrating website with Google Calendar API
Now we have the API key as well as the Client Id so we are ready to dive into coding.
Fetch Events
Create a folder, inside which create a HTML file and a JS file. Open the folder with VS Code and use the Live Server to run the index.html.
Add the following code in your index.html
<!DOCTYPE html><html><head><title>Google Calendar API Quickstart</title><meta charset="utf-8" /></head><body><p>Google Calendar API Quickstart</p><!--Add buttons to initiate auth sequence and sign out--><button id="authorize_button" onclick="handleAuthClick()">Authorize</button><button id="signout_button" onclick="handleSignoutClick()">Sign Out</button><pre id="content" style="white-space: pre-wrap;"></pre><script src="./index.js" type="text/javascript"></script><script async defer src="https://apis.google.com/js/api.js" onload="gapiLoaded()"></script><script async defer src="https://accounts.google.com/gsi/client" onload="gisLoaded()"></script></body></html>Add the following code in your index.js. Replace
<YOUR_CLIENT_ID>with the Client Id and<YOUR_API_KEY>with the API key. You can find those from your Google Calendar API Credential/* exported gapiLoaded */ /* exported gisLoaded */ /* exported handleAuthClick */ /* exported handleSignoutClick */ // TODO(developer): Set to client ID and API key from the Developer Console const CLIENT_ID = '<YOUR_CLIENT_ID>'; const API_KEY = '<YOUR_API_KEY>'; // Discovery doc URL for APIs used by the quickstart const DISCOVERY_DOC = 'https://www.googleapis.com/discovery/v1/apis/calendar/v3/rest'; // Authorization scopes required by the API; multiple scopes can be // included, separated by spaces. const SCOPES = 'https://www.googleapis.com/auth/calendar'; let tokenClient; let gapiInited = false; let gisInited = false; document.getElementById('authorize_button').style.visibility = 'hidden'; document.getElementById('signout_button').style.visibility = 'hidden'; /** * Callback after api.js is loaded. */ function gapiLoaded() { gapi.load('client', initializeGapiClient); } /** * Callback after the API client is loaded. Loads the * discovery doc to initialize the API. */ async function initializeGapiClient() { await gapi.client.init({ apiKey: API_KEY, discoveryDocs: [DISCOVERY_DOC], }); gapiInited = true; maybeEnableButtons(); } /** * Callback after Google Identity Services are loaded. */ function gisLoaded() { tokenClient = google.accounts.oauth2.initTokenClient({ client_id: CLIENT_ID, scope: SCOPES, callback: '', // defined later }); gisInited = true; maybeEnableButtons(); } /** * Enables user interaction after all libraries are loaded. */ function maybeEnableButtons() { if (gapiInited && gisInited) { document.getElementById('authorize_button').style.visibility = 'visible'; } } /** * Sign in the user upon button click. */ function handleAuthClick() { tokenClient.callback = async (resp) => { if (resp.error !== undefined) { throw (resp); } document.getElementById('signout_button').style.visibility = 'visible'; document.getElementById('authorize_button').innerText = 'Refresh'; await listUpcomingEvents(); }; if (gapi.client.getToken() === null) { // Prompt the user to select a Google Account and ask for consent to share their data // when establishing a new session. tokenClient.requestAccessToken({prompt: 'consent'}); } else { // Skip display of account chooser and consent dialog for an existing session. tokenClient.requestAccessToken({prompt: ''}); } } /** * Sign out the user upon button click. */ function handleSignoutClick() { const token = gapi.client.getToken(); if (token !== null) { google.accounts.oauth2.revoke(token.access_token); gapi.client.setToken(''); document.getElementById('content').innerText = ''; document.getElementById('authorize_button').innerText = 'Authorize'; document.getElementById('signout_button').style.visibility = 'hidden'; } } /** * Print the summary and start datetime/date of the next ten events in * the authorized user's calendar. If no events are found an * appropriate message is printed. */ async function listUpcomingEvents() { let response; try { const request = { 'calendarId': 'primary', 'timeMin': (new Date()).toISOString(), 'showDeleted': false, 'singleEvents': true, 'maxResults': 10, 'orderBy': 'startTime', }; response = await gapi.client.calendar.events.list(request); } catch (err) { document.getElementById('content').innerText = err.message; return; } const events = response.result.items; if (!events || events.length == 0) { document.getElementById('content').innerText = 'No events found.'; return; } // Flatten to string to display const output = events.reduce( (str, event) => `${str}${event.summary} (${event.start.dateTime || event.start.date})
`, 'Events:
'); document.getElementById('content').innerText = output; }Run the index.html with live server on VS Code. This should appear.
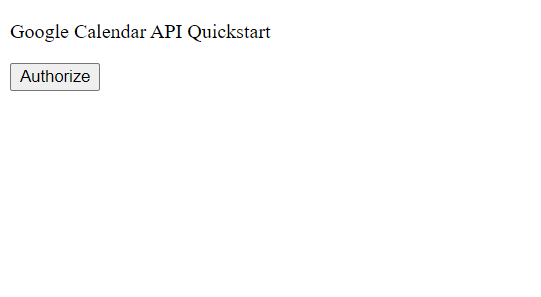
After you click the Authorize button a popup will appear. You will be asked to authorize your google account. After you have authorized your account all the upcomming events from the calendar of that event will appear. (You may schedule some events in advance for testing)

Till now we have successfully fetched the calendar Events Now we need to Create Events from our website.
Create Events
First we need to create a form in our index.html.
<form id="event_form"><fieldset> <input type="text" name="title" id="title" placeholder="Add Title" class="input-title" /> <br /> <textarea type="text" name="desc" id="desc" placeholder="Add Descreption" class="input-title"></textarea> <br /> <label>Date</label> <input type="date" name="date" id="date" /> <div> <label>Start Time</label> <input type="time" name="st" id="st" /> <label>End Time</label> <input type="time" name="et" id="et" /> </div> <button type="button" onclick="addEvent()">Schedule</button></fieldset></form>Add the addEvent function in your index.js. Also make sure that your SCOPE is
https://www.googleapis.com/auth/calendar.
const addEvent = () => { const title = document.getElementById("title").value; const desc = document.getElementById("desc").value; const date = document.getElementById("date").value; const start = document.getElementById("st").value; const end = document.getElementById("et").value; const startTime = new Date(date + "," + start).toISOString(); const endTime = new Date(date + "," + end).toISOString(); var event = { summary: title, location: "Google Meet", description: desc, start: { dateTime: startTime, timeZone: "America/Los_Angeles" }, end: { dateTime: endTime, timeZone: "America/Los_Angeles" }, recurrence: ["RRULE:FREQ=DAILY;COUNT=2"], attendees: [ { email: "[email protected]" }, { email: "[email protected]" } ], reminders: { useDefault: false, overrides: [ { method: "email", minutes: 24 * 60 }, { method: "popup", minutes: 10 } ] } }; console.log(event) var request = gapi.client.calendar.events.insert({ calendarId: "primary", resource: event }); request.execute(function(event) { console.log(event.htmlLink); });};This should be your final result
So far you have created a basic website where users can list their calendar events and also add new events. I have pushed my code in this GitHub Repo you can fork it and add your innovations or if you want to contribute to this repository you can create a pull request.
Do share your websites in the comment section also if you are still facing any issue, you can comment that down I will try to solve it.
Reference
Original Link: https://dev.to/debopriyadey/fetch-and-create-events-in-google-calendar-with-html-and-javascript-1o6f
Dev To
More About this Source Visit Dev To