
An Interest In:
Web News this Week
- March 21, 2024
- March 20, 2024
- March 19, 2024
- March 18, 2024
- March 17, 2024
- March 16, 2024
- March 15, 2024
Some of Our Sources
- Engadget
- Mashable
- Techcrunch
- Technology Review
- Just Creative
- Smashing Magazine
- Six Revisions
- Fudge Graphics
- Freelance Switch
- Willems Lab
Help Webnuz
Referal links:
Handle quick phone authentication in Next.js using Appwrite and Twilio
Phone authentication has provided a more accessible and secure way to validate users' identities during onboarding or security-sensitive operations. It involves sending a user an SMS with a secret key that a system can use to validate their identity.
In this post, we will learn how to authenticate a user with their phone number by leveraging Appwrites phone authentication APIs and Twilio.
Prerequisites
To fully grasp the concepts presented in this tutorial, the following requirements apply:
- Basic understanding of JavaScript and React.
- Docker installation.
- An Appwrite (version 0.15.0) instance; check out this article on how to set up an instance locally. Appwrite also supports one-click install on DigitalOcean or Gitpod.
- A Twilio account; sign up for a trial account is completely free.
Getting started
We need to create a Next.js starter project by navigating to the desired directory and running the command below in our terminal.
npx create-next-app twilio-auth && cd twilio-authThe command creates a Next.js project called twilio-auth and navigates into the project directory.
Installing dependencies
Installing TailwindCSS
TailwindCSS is a utility-first CSS framework packed with classes to help us style our web pages. To use it in our application, run the command below in our terminal.
npm install -D tailwindcss postcss autoprefixernpx tailwindcss init -pThe command installs TailwindCSS and its dependencies and generates tailwind.config.js and postcss.config.js files.
Next, we need to update tailwind.config.js file with the snippet below:
module.exports = { content: [ "./pages/**/*.{js,ts,jsx,tsx}", "./components/**/*.{js,ts,jsx,tsx}", ], theme: { extend: {}, }, plugins: [],}Finally, we need to add TailwindCSS directives to our application. The directives give our application access to TailwindCSS utility classes. To do this, navigate to the styles folder and update the globals.css files in it with the snippet below:
@tailwind base;@tailwind components;@tailwind utilities;Installing Appwrite
Appwrite is a development platform that provides a powerful API and management console for building backend servers for web and mobile applications. To install it, run the command below:
npm i appwrite@~9.0.0Set up Twilio as SMS provider
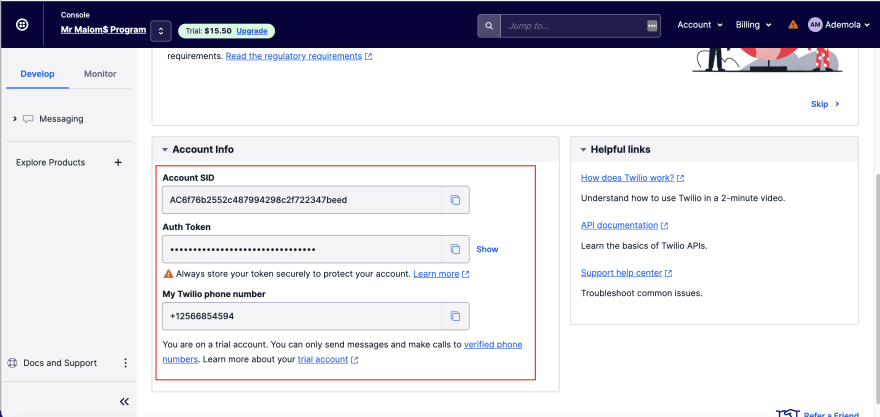
To enable phone verification with Appwrite, we need to sign into our Twilio Console and create a virtual phone number to send SMS messages.
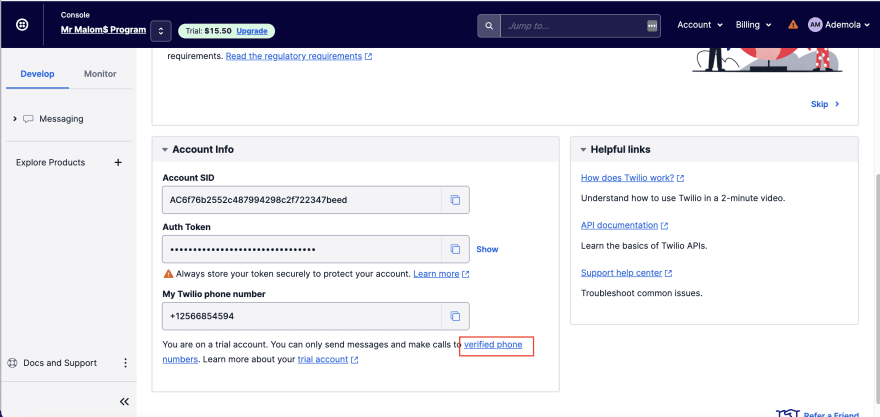
Click on the Get a Twilio phone number button:

Twilio will generate a phone number for sending SMS messages, an account SID, and an Auth Token. We need to keep these parameters handy as we need them to configure and enable phone authentication on Appwrite.

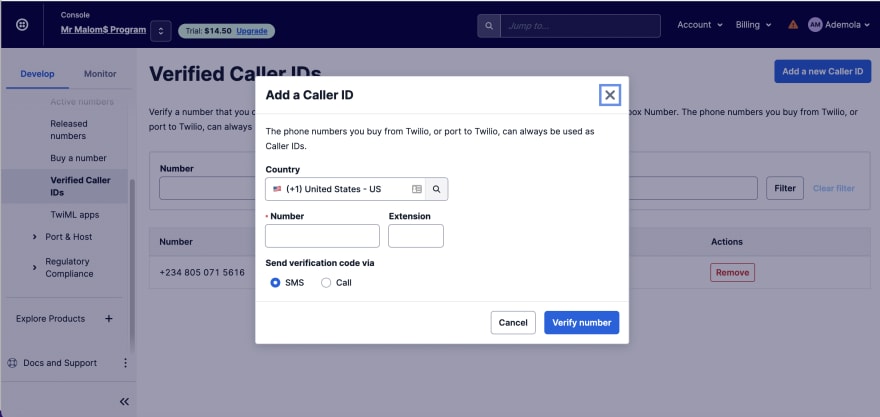
Add a verified phone number
Since we are using Twilios free trial, we need to verify the numbers we intend to send SMS to. To do this, click on the verified phone numbers link and click on Add a new Caller ID button.

Input the country code, phone number, and verify accordingly.
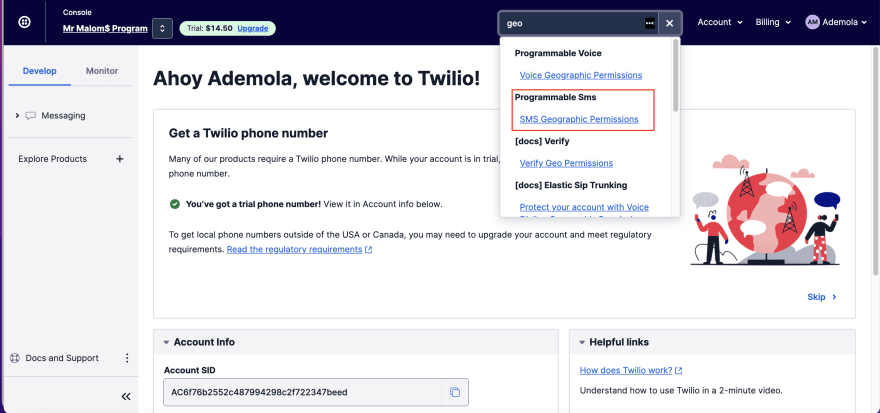
Enable geographical permission
To avoid fraud, abuse, and high costs for voice or messaging usage, Twilio implements a geo-permissions mechanism for enabling and disabling countries that can receive voice calls and SMS messages from a Twilio account.
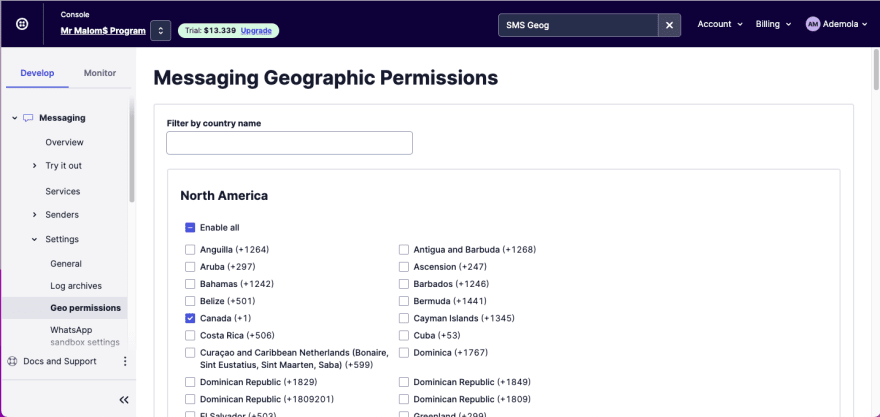
To enable SMS for our verified numbers, we need to search for SMS Geographic Permissions in the search bar, click on the SMS Geographic Permissions result, and then check the country where the verified phone number operates.
Configure Appwrite
To get started, we need to start up the Appwrite instance on our machine and then follow the steps that follow.
Enabling Twilio support in Appwrite
To enable Twilio support with Appwrite, we need to update Appwrites environment variables with our Twilio credentials. To do this, first, we need to navigate to the directory created when we installed Appwrite and edit the .env file as shown below:

//remaining env variable goes here_APP_PHONE_PROVIDER=phone://<Account SID>:<Auth Token>@twilio_APP_PHONE_FROM=<TWILIO GENERATED PHONE NUMBER>Sample of a properly filled variables is shown below:
_APP_PHONE_PROVIDER=phone://AC6f76b2552c487994298c2f:1f6ca1acbc5667c43ea26bb@twilio_APP_PHONE_FROM=+1234647638As mentioned earlier, we can get the required credentials from Twilio console.
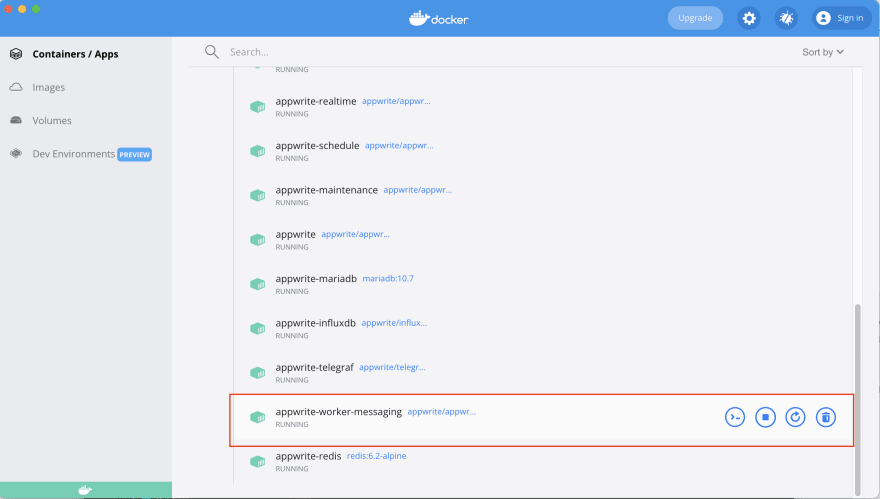
Secondly, we need to sync the changes we made on the .env file with our Appwrite server. To do this, we must run the command below inside the appwrite directory.
docker compose up -d --force-recreateLastly, we need to confirm that the service handling messaging on Appwrite is up and running. We can verify or start this by expanding the Appwrite project on Docker Desktop.
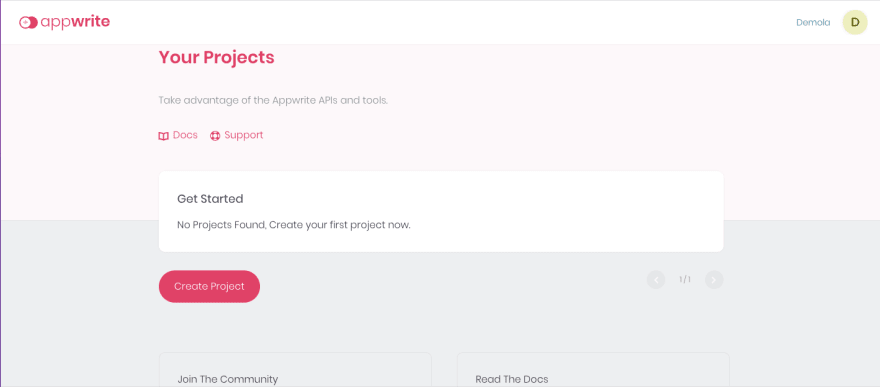
Creating a new Appwrite project
To create a new project, we need to navigate to the specified hostname and port http://localhost:80. Next, we need to log in to our account or create an account if we dont have one.

On the console, click on the Create Project button, input twilio-auth as the name, and click Create.

The project dashboard will appear on the console. Next, click on the settings tab and copy the Project ID and API Endpoint.

Create phone authentication in Next.js
To get started, well navigate to our project root directory and create a helper folder; here, create an utils.js file and add the snippet below:
import { Client, Account } from 'appwrite';//create clientconst client = new Client();client.setEndpoint('http://localhost/v1').setProject('PROJECT ID GOES HERE');//create accountconst account = new Account(client);//authenticate user with phone numberexport const phoneAuth = (phone_number) => { return account.createPhoneSession('unique()', phone_number);};//validate phone sessionexport const validateSMS = (userID, secret) => { return account.updatePhoneSession(userID, secret);};The snippet above does the following:
- Imports the required dependency.
- Uses the
ClientandAccountclass to set up an Appwrite instance by specifying the endpoint and corresponding project ID. - Creates a
phoneAuthandvalidateSMSfunction that uses thecreatePhoneSessionandupdatePhoneSessionmethods to create a user and validate the user using the code sent via SMS, respectively.
PS: The unique() string passed to the createPhoneSession method tells Appwrite to auto-generate a unique ID when creating a user.
Finally, we need to update the index.js file inside the pages folder as shown below:
import Head from 'next/head';import { useState } from 'react';import { phoneAuth, validateSMS } from '../helper/utils';import styles from '../styles/Home.module.css';export default function Home() { const [value, setValue] = useState({ phone: '', otp: '', }); const [user, setUser] = useState(null); const [isPhoneVerify, setIsPhoneVerify] = useState(false); const handleChange = (e) => { setValue({ ...value, [e.target.name]: e.target.value }); }; const handleSubmit = (e) => { e.preventDefault(); phoneAuth(value.phone) .then((res) => { setUser(res.userId); setIsPhoneVerify(true); }) .catch((e) => { alert('Error getting phone session!', e); }); }; const handleValidatePhone = (e) => { e.preventDefault(); validateSMS(user, value.otp) .then((res) => { alert( `User successfully verified using for user with ID ${res.userId}, country Code ${res.countryCode}, and expires on ${res.expire}` ); }) .catch((e) => { alert('Error validating session!', e); }); }; return ( <div className={styles.container}> <Head> <title>Appwrite | Twilio Auth</title> <meta name='description' content='Generated by appwrite twilio aauth' /> <link rel='icon' href='/favicon.ico' /> </Head> <main className='flex justify-center items-center h-screen'> <div className='rounded-xl w-96 p-7 shadow-xl'> <h1 className='text-xl font-bold mb-6 text-indigo-900 text-center'> Appwrite | Twilio Auth </h1> {isPhoneVerify ? ( // Verify OTP using phone session <form onSubmit={handleValidatePhone}> <fieldset className='mb-4'> <label className='text-sm block mb-2'>OTP</label> <input className='h-10 border w-full rounded border-gray-400' required type='number' name='otp' onChange={handleChange} /> </fieldset> <button className='bg-indigo-900 w-full h-10 rounded font-semibold text-white hover:bg-indigo-700'> Validate OTP </button> </form> ) : ( //Get Phone Session Form <form onSubmit={handleSubmit}> <fieldset className='mb-4'> <label className='text-sm block mb-2'>Phone Number</label> <input className='h-10 border w-full rounded border-gray-400' required type='tel' name='phone' onChange={handleChange} /> </fieldset> <button className='bg-indigo-900 w-full h-10 rounded font-semibold text-white hover:bg-indigo-700'> Submit </button> </form> )} </div> </main> </div> );}The snippet above does the following:
- Imports the required dependencies
- Lines 7-12: Create state properties to manage application state
- Lines 14-16: Create an
handleChangefunction to control inputs - Lines 18-28: Create an
handleSubmitfunction that uses thephoneAuthfunction to create a user - Line 30-41: Create an
handleValidatePhonefunction that uses thevalidateSMSfunction to verify the created user using the secret key sent via SMS - Modify the UI to display the forms conditionally
With that done, we can start a development server using the command below:
npm run dev
https://media.giphy.com/media/4pcCS79rGzwL2i9uMH/giphy.gif
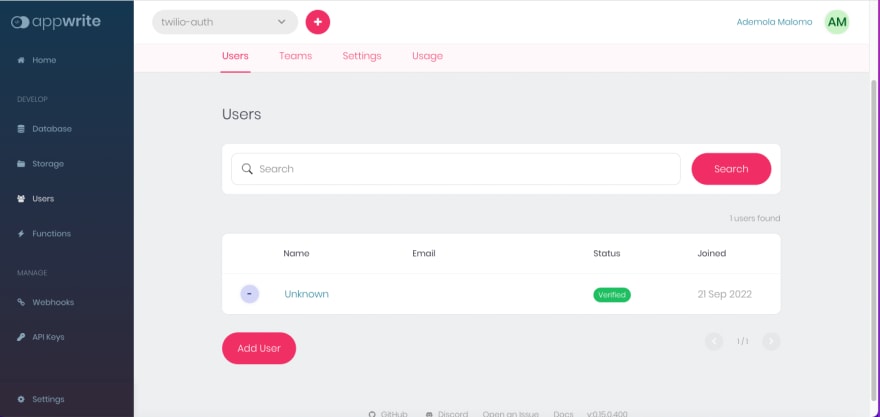
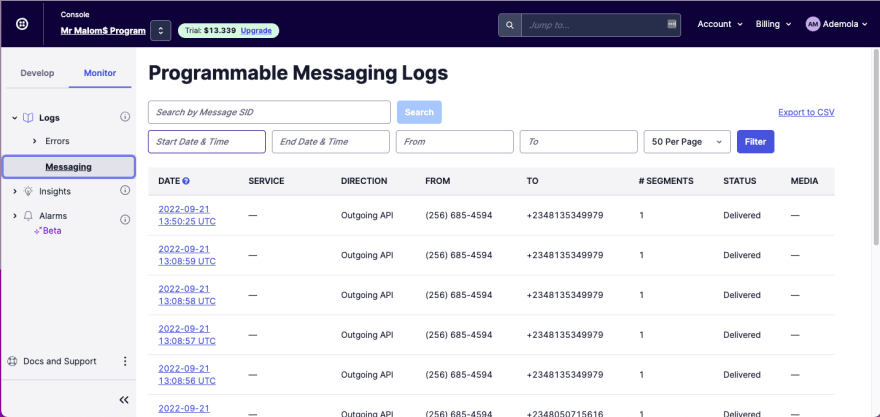
We can validate the created user on Appwrite and also view Message Logs on Twilio:
Conclusion
This post discussed how to handle phone number authentication in Next.js using Appwrite and Twilio. With Appwrite, developers dont have to reinvent the wheel when building authentication into their applications. They can save application development time by leveraging intuitive authentication APIs provided by Appwrite.
These resources might also be helpful:
Original Link: https://dev.to/hackmamba/handle-quick-phone-authentication-in-nextjs-using-appwrite-and-twilio-569i
Dev To
More About this Source Visit Dev To