
An Interest In:
Web News this Week
- March 30, 2024
- March 29, 2024
- March 28, 2024
- March 27, 2024
- March 26, 2024
- March 25, 2024
- March 24, 2024
Some of Our Sources
- Just Creative
- Joshua Blankenship
- You The Designer
- Web Designer Depot
- FanExtra - PSD
- Fudge Graphics
- Web Design Ledger
- Freelance Switch
- Dev To
- The Verge
Help Webnuz
Referal links:
EC2 Web Server with Apache using AWS CLI
Amazon Web Services provides services and infrastructure to build reliable, fault-tolerant, and highly available systems in the cloud. Services that provide basic infrastructure, such as EC2 and EBS, provide specific features, such as availability zones, auto-scaling groups, and application load balancers that a fault- tolerant and highly available system must take advantage of and use correctly.
As I start working on building a basic infrastructure, first I will be showing you how to create an EC2 Web Server with Apache using AWS CLI. In the coming days, you will be hearing more from me on building complex 2-tier/3-tier infrastructures for highly available systems.
You can find all the projects related to EC2, in my GitHub Repository.
What is AWS CLI?:
AWS CLI or Command Line Interface (AWS CLI) is an open-source tool. It helps you to interact, manage many AWS services and to automate them through scripts. With minimal configuration, the AWS CLI helps to run the commands from the command prompt in your terminal program which are equivalent to that provided by the GUI-based AWS Management Console.
Let's get started!
Objectives:
1.---> AWS CLI Installed/Configured
2.---> Items needed to create an AWS EC2 instance
- AMI (Amazon Machine Image)
- Instance type
- Key Pair
- Security Group
- Add Rules to the Security Group
- Verify the rules created for security group
3.---> Create Apache script and create an EC2 Instance to launch a Web Server
4.---> Verify your installed EC2 instance and Apache Web Server
Pre-Requisites:
- AWS Account with admin permissions, not a root account
- IAM user with admin permissions
- Cloud9 IDE - AWS CLI Installed
Resources Used:
AWS CLI Installed/Configured
AWS EC2 Instance
Steps for implementation to this project:
Check if AWS CLI Installed/Configured
As per Amazon "AWS Cloud9 EC2 environments come preinstalled with the AWS CLI, which is authenticated with the permissions of the logged-in AWS user automatically. This enables you to run interactive CLI commands against AWS services from the built-in terminal window in Cloud9 without any additional configuration."
On Cloud9, check to see if AWS CLI is Installed/Configured

Create an AWS EC2 instance
- Find an AMI using AWS CLI
An Amazon Machine Image (AMI) is an image provided by AWS. It is
a template for the root volume of the instance (for example, an
operating system, an application server, and applications).
Select an AMI from which to launch the instance, either
through the AWS EC2 console/Instances/Launch an EC2 Instance/Under - Application and OS Images (Amazon Machine Image) - Amazon Linux AWS

OR
Run this command


- Instance types
There are many instance types which are grouped together based on different compute, memory and storage capabilities. I have chosen t2.micro which is in free-tier.
![]()

- Key Pair
- Run this command To create the key pair, which will output the pair to a .pem file in your current directory
aws ec2 create-key-pair --key-name MyKeyPair --query 'KeyMaterial' --output text > MyKeyPair.pem
- Run this command To check key pair created
aws ec2 describe-key-pairs --key-name MyKeyPair

- Security Group
Create a security group for Amazon EC2 instance, which acts as a firewall for in-bound and out-bound network traffic.
aws ec2 create-security-group --group-name MyWebSG --description "Allows SSH and HTTP connections for the Web Server"

Copy the security group id, which you will need when creating an EC2 Instance
sg-000d2c961be941fa0- Add rules to the Security Group
Now add rule to allow network traffic on TCP port 22 for SSH connections and on TCP port 80 for HTTP connections for connecting to your EC2 instance.
A mandatory parameter of this command is the CIDR notation. Include either your public IP address of your computer (just type value you get from "what is my ip" command in the Google search bar) or leave it open with 0.0.0.0/0 for outside world.
- network traffic on TCP port 22 for SSH connections
aws ec2 authorize-security-group-ingress --group-id sg-000d2c961be941fa0 --protocol tcp --port 22 --cidr 0.0.0.0/0

- network traffic on TCP port 80 for HTTP connections
aws ec2 authorize-security-group-ingress --group-id sg-000d2c961be941fa0 --protocol tcp --port 80 --cidr 0.0.0.0/0

- Verify the rules created for security group
aws ec2 describe-security-groups --group-ids sg-000d2c961be941fa0


Create Apache script and create an EC2 Instance to launch a Web Server
- Create Apache Script apachescript.sh in your Cloud9 folder and type in these commands, save and exit.
#!/bin/bash# use this for your user data (script without new lines)# install httpd (Linux 2 version)sudo yum update -ysudo yum install httpd.x86_64 -ysystemctl start httpd.servicesystemctl enable httpd.service- Create an EC2 Instance to launch a Web Server
Run this command to create an EC2 Instance
aws ec2 run-instances --image-id ami-026b57f3c383c2eec --count 1 --instance-type t2.micro --key-name MyKeyPair --security-group-ids sg-000d2c961be941fa0 --user-data file://apachescript.sh
See, the status of your EC2 instance shows Pending

Verify your installed EC2 instance and Apache Web Server
Now move on to your Final Step
- Now, the status of your EC2 instance shows running
aws ec2 describe-instances

- Now, the status of your EC2 instance shows running from AWSManagement Console

- Login as ec2-user with this command for successful login to viaSSH:
chmod 400 MyKeyPair.pemssh -i MyKeyPair.pem [email protected]

- Check your network connections via HTTP
sudo systemctl status httpd
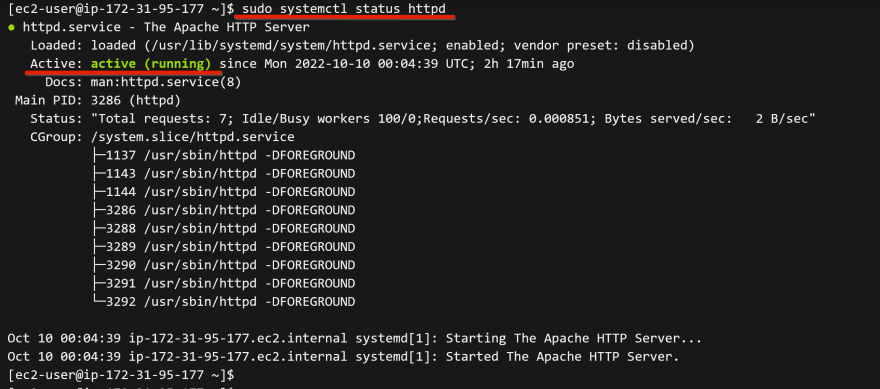
- Now copy and paste your Public IPaddress on to the browser to see your successful connection.
http://44.201.169.29

Cleanup:
copy the instance-id

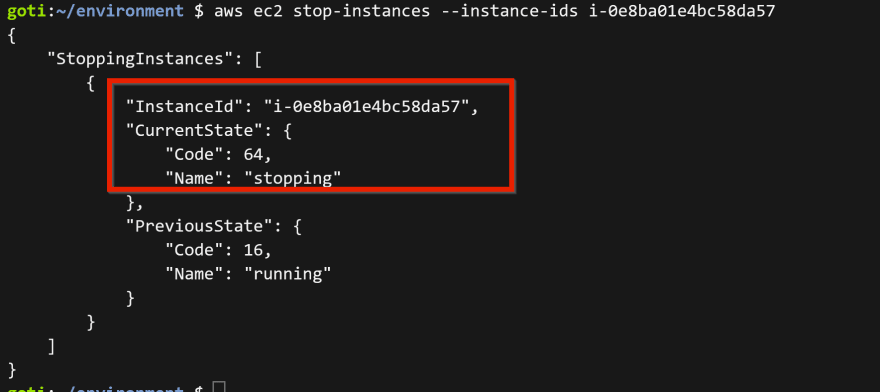
terminate the instance
aws ec2 stop-instances --instance-ids i-0e8ba01e4bc58da57
first, the status is "stopping"
aws ec2 describe-instance-status --instance-id i-0e8ba01e4bc58da57
- Now status is "stopped"

aws ec2 terminate-instances --instance-ids i-0e8ba01e4bc58da57

What we have done so far:
Created successfully an EC2 Web Server with Apache using AWS CLI. Verified its connection thru SSH and HTTP.
Original Link: https://dev.to/aws-builders/ec2-web-server-with-apache-using-aws-cli-2gak
Dev To
More About this Source Visit Dev To