
An Interest In:
Web News this Week
- April 2, 2024
- April 1, 2024
- March 31, 2024
- March 30, 2024
- March 29, 2024
- March 28, 2024
- March 27, 2024
Some of Our Sources
- Slashdot
- Mashable
- Spoon Graphics
- Six Revisions
- Naldz Graphics
- FanExtra - PSD
- My Ink Blog
- 24 Ways
- Design Modo
- Android Headlines
Help Webnuz
Referal links:
Building a PDF Generator using AWSLambda
Using AWS Lambda, Amazon SQS, Amazon API Gateway, Amazon S3, AWS Lambda Layers and Pulumi to Build a Scalable PDF Generation Service
 Almost all modern web applications use PDFs. For example, an application may utilize PDFs to send an email of an invoice for payment confirmation, a report or even a custom-typed document. For example, SignRequest uses PDFs to email a copy of a signed PDF document when all participants sign it. Likewise, there will come a time when you need to implement a PDF generator on your application as well.
Therefore, as a serverless developer, its important to ensure that you can design scalable and resilient PDF generation solutions for applications.
The Easy Way Out: Front-End Generation
When tasked with PDF generation, a go-to option would be to generate the PDF on the client side with the available data. For example, if youre using React, you might have used@react-pdf/rendererto compile a PDF and download it directly in the web browser. Though it creates a fast and efficient process, it does have its set of negatives. For example:
There is no authenticity: Since the PDF is being generated on the client side, the software product has no say in what gets compiled in the PDF. A user can easily tamper with the HTML content beforehand and compile the PDF in the client application before sending it to the backend.
There is no traceability: You arent able to keep track of the location and the device that was used to create the PDF.
There is no security: You cannot sign a document on the client side without exposing your private key. However, if you choose to sign your document on the client side, you will be putting your keys at risk of exposure.
It does not scale: If your user is using a low-end device (or even Internet Explorer), your libraries may not be able to generate the PDF efficiently.
Designing PDFs using the client-side approach is suitable for large-scale, demanding applications due to the discussed negatives.
The Best Way Out - Server-Side Generation
The recommended approach for PDF generation is to use the server side. This ensures that a client can obtain a copy of the PDF in a highly secure manner.
Additionally, serverless computing helps you design and develop solutions that are highly available, resilient and cost-efficient.
A Resilient, Scalable PDF Generation Architecture for Serverless
Therefore, let us take a look at the serverless architecture for the solution that we will be building for the PDF service.
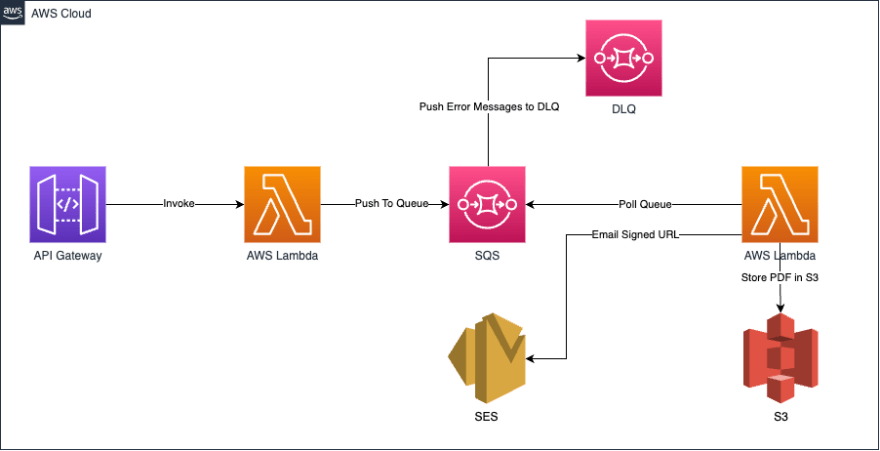 The architectural diagram shown above utilizes the AWS Serverless ecosystem to build a PDF generation service. It has:
- An API Gateway - For clients to request a PDF.
- An SQS Queue - The API Gateway will be integrated with a Lambda function that pushes data to an SQS Queue. This helps decouple the AWS Lambda function that generates the PDF, allowing the function to independently scale and not run out of possible concurrency limits. It allows the implementation of the Queue-Based Load Levelling Design Pattern.
- An S3 Storage Bucket - To store the generated PDF
- SES - To email the signed URL to the client.
- DLQ - A Dead Letter Queue to handle error messages. The SQS Queue will push the failed messages to a DLQ if the Lambda processing a message fails a defined number of times.
Implementing the PDF Generation Service
There are several ways this infrastructure can be provisioned. It could be:
- Using the SDK
- Using the GUI
- Using Infrastructure as Code
We will be using the IaC approach with Pulumi. Pulumi is an IaC tool that enables developers to provision infrastructure using their favourable programming language. It directly deploys infrastructure using the typed language, rather than transpiling back to CloudFormation, which makes your deployments a bit faster.
Therefore, this implementation will be using Pulumi.
Creating a Pulumi Project
Initially, a new Pulumi project will be initialized using the Pulumi CLI. Ensure you've installed the CLI and have configured an IAM User with an Access Key in your AWS Profile.
Run the command shown below to create a new Pulumi project with TypeScript in a default dev stacks in your preferred AWS Region (mine is US East 01).
pulumi new aws-typescript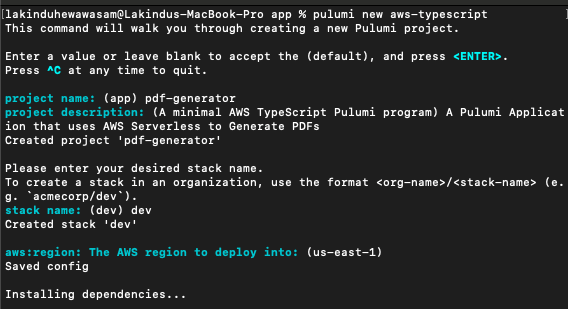
Figure - Creating a new Pulumi Project
Afterwards, you should see the output shown below.
 Figure - Creating the Pulumi Project successfully
Hereafter, we can start provisioning the required infrastructure.
Defining the Infrastructure
The source code will be structured into directories where each directory holds a specific service. Hence, the project will have four directories:
- ses
- sqs
- lambda
- api
Provisoning the SQS Queues
Firstly, the two SQS queues will be provisioned. One queue will act as a DLQ while the other queue will integrate with the API Gateway.
import * as aws from "@pulumi/aws";const deadLetterQueue = new aws.sqs.Queue("deadLetterQueue", { name: "deadLetterQueue", visibilityTimeoutSeconds: 120, // 2 minutes visibility timeout messageRetentionSeconds: 1209600, // remove messages in DLQ after 14 days});const pdfProcessingQueue = new aws.sqs.Queue("pdfProcessingQueue", { name: "pdfProcessingQueue", // 1 minute visibility timeout for processing// within 1 minute -> create PDF, upload to S3, send a message, delete message from queue// else it will be visible again and can cause double processing, visibilityTimeoutSeconds: 60, messageRetentionSeconds: 86400, // remove messages in queue after 24 hours fifoQueue: false, delaySeconds: 10, // delay message for 10 seconds to avoid possible lambda limits. // redrive policy to push to DLQ after message fails three times redrivePolicy: deadLetterQueue.arn.apply((arn) => JSON.stringify({ deadLetterTargetArn: arn, maxReceiveCount: 3, }))}); export const Queues = { deadLetterQueue, pdfProcessingQueue,};The snippet shown above highlights the two SQS Queues set up. I've made certain design decisions when designing the queues
- All messages in DLQ will be removed after 14 days
- All messages in PDF Processing Queue will be removed after 1 day, while each message will have a visibility timeout of 1 minute (assuming that the entire process will occur in under a minute)
- Additionally, each message has a delay message for 10 seconds to allow the Lambda function to process each Queue record without exceeding possible limits.
Adding a Lambda Function to Poll The PDF Processing Queue
Once the PDF Processing Queue recieves a message, it needs to be processed. To do so, a Lambda function must poll the queue to fetch records to process. Setting up a Lambda function that polls the SQS queue is as simple as its shown below (since Pulumi takes care of the underlying IAM Policies).
However, since this Lambda function generates a PDF of a file, it needs two things:
- A Chromium Engine: Needed to create an HTML Page, paint the PDF
- SDK to control the chromium browser: Needed to control the rendering engine to create the HTML page, paint the PDF and to fetch the compiled PDF stream.
A browser rendering engine such as chromium is quite large in size. In fact, there is one library available for AWS in specific called chrome-aws-lambda that provides a Chromium Rendering Engine + Puppeteer to control the browser. This allows users to seamlessly generate PDFs inside a Lambda function.
However, this library is around 65MB which is typically quite heavy for a single Lambda function. Therefore, we can utilize a Lambda Layer to package this library as a seperate resource and ultimately use it in any Lambda function that we need, by simply including the layer.
Therefore, first download the library and package it using the command below. This will package it in the format needed for the Lambda Layer.
git clone --depth=1 https://github.com/alixaxel/chrome-aws-lambda.git && \cd chrome-aws-lambda && \make chrome_aws_lambda.zipThe chrome_aws_lambda.zip will be the file that we will be uploading to our layer. It creates a folder structure like nodejs/node_modules that is the recommended directory structure to allow Lambda functions to let users automatically import the library at execution time.
Hereafter, provision the lambda layer as below.
const pdfLayer = new aws.lambda.LayerVersion("pdfLayer", { layerName: "pdfLayer", code: new pulumi.asset.AssetArchive({ ".": new pulumi.asset.FileArchive("./lambda/layer/chrome_aws_lambda.zip"), }), compatibleRuntimes: [aws.lambda.Runtime.NodeJS16dX],});Hereafter, we can create a Lambda Function that uses the defined layer and integrate it with SQS as shown below.
// in lambda directoryexport const pdfProcessingLambda = new aws.lambda.CallbackFunction("pdfProcessingLambda", { callback: async (event: aws.sqs.QueueEvent) => { }, memorySize: 3072, // use 3gb memory runtime: aws.lambda.Runtime.NodeJS16dX, timeout: 30, layers: [pdfLayer.arn] // bind layer});// in sqs directorypdfProcessingQueue.onEvent("pdfProcessingQueueEvent", pdfProcessingLambda);Adding the PDF Generator Logic
In the snippet shown above, we've provisioned a Lambda function named "pdfProcessingLambda". We can add its implementation that helps compiled the pdf. This is shown below.
const generatePdf = async (content: string): Promise<Buffer> => { const chromium = require('chrome-aws-lambda'); let browser: any = undefined; try { // launch a headless chrome instanceconst executablePath = await chromium.executablePath; browser = await chromium.puppeteer.launch({ args: chromium.args, executablePath, headless: chromium.headless, defaultViewport: chromium.defaultViewport, }); // create a new pageconst page = await browser.newPage();const html = `<h1> Hi! Here is a copy of your PDF Content that you requested!</h1> <br/> <hr/> <p> ${content} </p>`; // set the content of the pageawait page.setContent(html); // generate the pdf as a buffer and return itreturn (await page.pdf({ format: "A4" })) as Buffer; } catch (err) { console.error(err); throw err; } finally { if (browser !== undefined) { // close the browserawait browser.close(); } }};A function (shown above) will accept content passed from the client and utilize chromium to generate the PDF via puppeteer. It initially launches an instance of chrome, sets the page content and returns a Buffer as an A4 (which holds the PDF).
The Lambda function code will be updated to utilize this function.
export const pdfProcessingLambda = new aws.lambda.CallbackFunction("pdfProcessingLambda", { callback: async (event: aws.sqs.QueueEvent) => { const processedEventPromises = event.Records.map(async (record) => { const { messageId, body, receiptHandle } = record; const { content, email } = JSON.parse(body) as { email: string; content: string; }; // generate pdfconst pdf = await generatePdf(content); const pdfName = `${messageId}.pdf`; // upload pdf to s3 const s3 = new aws.sdk.S3({ region: "eu-central-1" }); await s3.putObject({ Bucket: pdfBucket.bucket.get(), Key: `pdf/${pdfName}`, Body: pdf, ContentType: "application/pdf", }).promise(); // generate signed url from s3 for public reads. const signedUrl = await s3.getSignedUrlPromise("getObject", { Bucket: pdfBucket.bucket.get(), Key: `pdf/${pdfName}`, Expires: 60 * 60 * 24 * 7, // 7 days }); // send email with signed url const ses = new aws.sdk.SES({ region: "us-east-1" }); await ses.sendEmail({ Source: senderEmail, Destination: { ToAddresses: [email], }, Message: { Body: { Html: { Charset: "UTF-8", Data: `Your pdf is ready. <a href="${signedUrl}">Download</a>`, }, }, Subject: { Data: "Your pdf is ready", Charset: "UTF-8" }, }, }).promise(); // delete message from queue await sqs.deleteMessage({ QueueUrl: Queues.pdfProcessingQueue.url.get(), ReceiptHandle: receiptHandle }).promise(); console.log(`Deleted message ${messageId} from queue`); }); await Promise.all(processedEventPromises); }, memorySize: 3072, runtime: aws.lambda.Runtime.NodeJS14dX, timeout: 30, layers: [pdfLayer.arn], policies: [ManagedPolicies.AmazonSESFullAccess, ManagedPolicies.AmazonS3FullAccess, ManagedPolicies.AmazonSQSFullAccess, ManagedPolicies.AWSLambdaBasicExecutionRole, ManagedPolicies.CloudWatchFullAccess],});The PDF generated by the function will then be used in the Lambda function shown above and will upload it to S3 and return a signed URL for the client via an email so that the client can read the PDF.
NOTE: Ensure that the identities that you are using via SES have been created as verified identifies.
The snippet shown above utilizes an S3 bucket. This bucket will be used to store the PDFs and must be restricted from zublic access and can only be accessed via signed URL. Its implementation with the required resource based policies is shown below.
import * as aws from "@pulumi/aws";const provider = new aws.Provider("provider", { region: 'eu-central-1' });export const pdfBucket = new aws.s3.Bucket("pdf-bucket-lak", { bucket: "pdf-bucket-lak", acl: 'private', policy: JSON.stringify({ Version: "2012-10-17", Statement: [ { Sid: 'AllowPutObjectForLambda', Effect: 'Allow', Principal: { Service: 'lambda.amazonaws.com' }, Action: 's3:PutObject', Resource: `arn:aws:s3:::pdf-bucket-lak/pdf/*` }, { Sid: 'AllowGetObjectForLambda', Effect: 'Allow', Principal: { Service: 'lambda.amazonaws.com' }, Action: 's3:GetObject', Resource: `arn:aws:s3:::pdf-bucket-lak/pdf/*` }, ], }),}, { provider });The bucket is being provisioned on AWS Global Infrastructure and has the resource based policies to only allow writes from a Lambda function, and denying all public reads.
Provisioning the API Gateway
An API Gateway which invokes a Lambda function that pushes data to an SQS Queue will be provisioned.
import * as awsx from "@pulumi/awsx";import * as aws from "@pulumi/aws";import { Queues } from "../sqs";const sqs = new aws.sdk.SQS({ region: "us-east-1" });export const apiGateway = new awsx.apigateway.API("api", { routes: [ { path: "/pdf", method: "POST", eventHandler: async (event) => { // client passes email and content to add to pdf const { email, content } = JSON.parse(event.body || "{}"); // construct message to send to SQS const sqsParams = {MessageBody: JSON.stringify({ email, content }),QueueUrl: Queues.pdfProcessingQueue.url.get(), }; // send message to SQS const resp = await sqs.sendMessage(sqsParams).promise(); const { MessageId } = resp; // return message id to client for tracking purposes return { statusCode: 200, body: JSON.stringify({ MessageId }) }; }, }, ], restApiArgs: { binaryMediaTypes: [], },});The snippet shown above highlights an API Gateway being provisioned with one endpoint /pdf that has a Lambda function that obtains the email and content sent by client and pushes it to the queue. Finally, it returns the message ID that the client can use to track the status of the message.
Deploying
Navigate to the index.ts file and import all added infrastructure so the Pulumi Deployment Service can deploy it.
import { Queues } from "./sqs";import { apiGateway } from "./api";export const dlqUrl = Queues.deadLetterQueue.url;export const pdfProcessingQueueUrl = Queues.pdfProcessingQueue.url;export const apiGatewayUrl = apiGateway.url;Finally, you can deploy the infrastructure using the command pulumi up --stack dev -skip-preview --yes.
Upon successful deployment, the output shown below will be illustrated.

Figure - Deploying the infrastructure
Testing the Application
Hereafter, you can use the apiGatewayUrl to invoke the API as shown below and observe the architecture in action, and generating a PDF which will be emailed to you.

Figure: Executing the API Call

Figure: Receiving the email
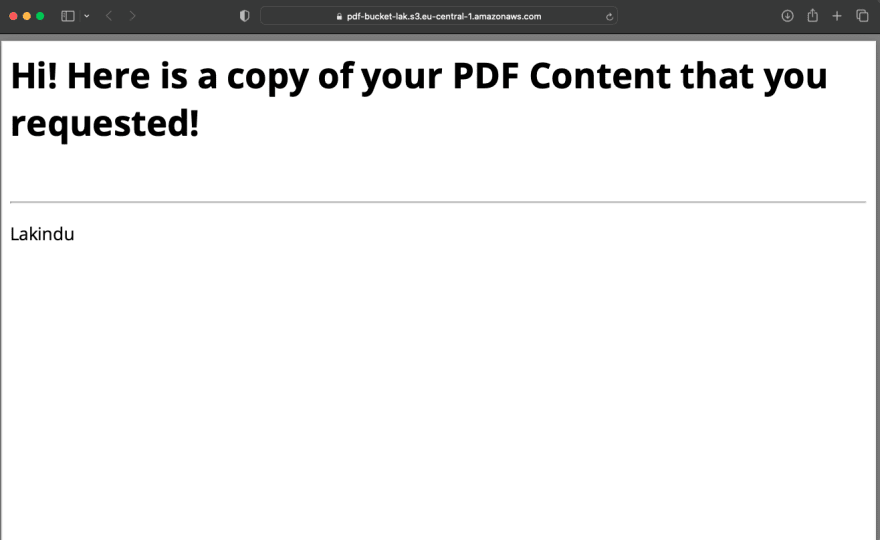
Figure: Viewing the generated PDFs
Wrapping Up
And there we have it! We've successfully designed and implemented a secure, robust, resilient and scalable PDF generation service using AWS Serverless Computing!
The code implemented in this article is accessible in the GitHub repository.
I hope you that have found this article helpful!
Thank you for reading!
Original Link: https://dev.to/aws-builders/building-a-pdf-generator-using-aws-lambda-4220
Dev To
More About this Source Visit Dev To