
An Interest In:
Web News this Week
- April 18, 2024
- April 17, 2024
- April 16, 2024
- April 15, 2024
- April 14, 2024
- April 13, 2024
- April 12, 2024
Some of Our Sources
- BoingBoing
- Pearsonified
- Spoon Graphics
- Six Revisions
- Vandelay Design
- You The Designer
- Fudge Graphics
- CSS Tricks
- Android Headlines
- Dev To
Help Webnuz
Referal links:
Adding Chat to Your Amazon IVS Live Stream
Welcome back to this series where we're learning all about live streaming in the cloud with Amazon Interactive Video Service (Amazon IVS). If you're new to this series, here's what we've covered so far:
- Getting Started Live Streaming in the Cloud with Amazon IVS
- Creating Your First Live Stream Playback Experience with Amazon IVS
- Enhancing Your Amazon IVS Playback Experience
- Creating Interactive Live Streaming Experiences Using Timed Metadata with Amazon IVS
In this post, we're going to level up the interactivity and add live chat alongside our live stream viewer.
If you want to play along at home with this blog post, you will need to create your own chat room. Amazon IVS Chat rooms require custom user tokens, so you'll need to plug in your own token and chat endpoint in the embedded demo below to try it out!
Creating a Chat Room
The first step here is to create a chat room for our application.
Free? The AWS Free Tier for Amazon IVS provides 13,500 messages sent and 270,000 messages delivered every month. Sign up to get started for free!
I should also mention that as of the the published date of this post, Amazon IVS Chat is available in the following regions:
- us-east-1
- us-west-2
- eu-west-1
Keep an eye out for future region support if you are trying to create a chat room in a region other than those listed above.
Using the Console
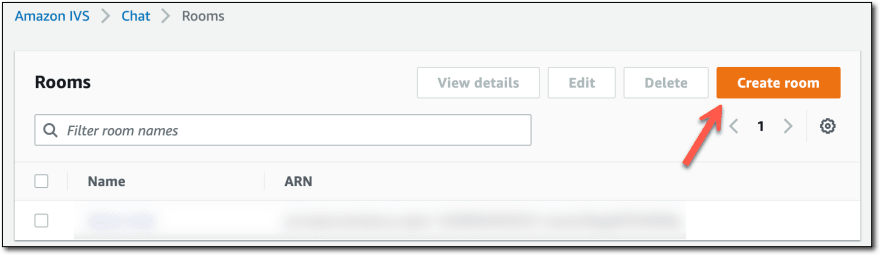
One way to create our chat room is by using the Amazon IVS Management Console. From the console home page, expand Chat and select Rooms.

From the chat room list page, click on Create room.
On the create room page, enter a Room name, and leave Default configuration selected under Room configuration. The default configuration gives us a maximum message length of 500 characters, and 10 messages per second. If this is not sufficient for your application, you can select Custom configuration and override it as necessary.

Next, under Message review handler, leave Disabled selected.

The message review handler is a really powerful way to provide AI moderation of chat messages via an AWS Lambda function. Per the help text:
When a message review handler is associated with a room, it is invoked for each SendMessage request to that room. The handler enforces any business logic that has been defined and determines whether to allow, deny, or modify a message.
We'll cover using a custom event handler in a future post, but for now, we'll leave it disabled.
Enter any desired tags for this resource, and then click Create room.

Our room will be created with no delay, and we'll be redirected to the room details page. On that page, you'll see a summary of the room configuration. The important bit that we'll need from this section is the Messaging endpoint. Since Amazon IVS Chat rooms are based on WebSockets, this is the secure endpoint that we'll use in the frontend to connect to our chat room.

There is also a panel titled Chat tokens that gives us a helpful tool to generate a chat token for development purposes. As I mentioned above, if you'd like to try the embedded chat experience below, you'll need a token and this is one way to generate it.

Using the AWS CLI
We can also use the AWS CLI to create a chat room via the following command.
$ aws ivschat create-room --name my-first-ivs-chat-roomWhich returns the chat room information in JSON format:
{ "arn": "arn:aws:ivschat:us-east-1:[redacted]:room/[redacted]", "createTime": "2022-08-05T12:46:17.945000+00:00", "id": "j0mJloyM8mOy", "maximumMessageLength": 500, "maximumMessageRatePerSecond": 10, "name": "my-first-ivs-chat-room", "tags": {}, "updateTime": "2022-08-05T12:46:17.945000+00:00"}The CLI does not return the messaging endpoint. However, it's easy to determine this. There are only three options and they correspond to the region in which your chat room was created.
| Region | Endpoint |
|---|---|
| us-east-1 | wss://edge.ivschat.us-east-1.amazonaws.com |
| us-west-2 | wss://edge.ivschat.us-west-2.amazonaws.com |
| eu-west-1 | wss://edge.ivschat.eu-west-1.amazonaws.com |
To retrieve a chat token from the CLI, you can use the following command. But hold off on generating that for now until we need it below, because the token will expire pretty quickly. To clarify - the token itself is used to authorize a chat user expires and establish a session. The default timeout for the session established via the token is 60 minutes, at which point a new session will need to be established (via logic in your application - more on this later on).
$ aws \ ivschat \ create-chat-token \ --room-identifier "[YOUR CHAT ROOM ARN]" \ --user-id "[A UNIQUE ID FOR THIS USER]" \ --capabilities "SEND_MESSAGE"Integrating Chat
Now that we have a chat room, let's build out a demo to see it in action. As I mentioned above, since the chat room requires a chat token, we'll create a form to capture the token and the messaging endpoint.
<form id="settings-form" class="needs-validation" novalidate> <div class="mb-3 row"> <label for="chat-token" class="col-sm-2 col-form-label">Chat Token</label> <div class="col-sm-10"> <input type="text" class="form-control" id="chat-token" required /> </div> </div> <div class="mb-3 row"> <label for="chat-endpoint" class="col-sm-2 col-form-label">Endpoint</label> <div class="col-sm-10"> <input type="text" class="form-control" id="chat-endpoint" placeholder="Begins with: wss://" required /> </div> </div> <div class="mb-3 row"> <div class="col-sm-10 offset-sm-2"> <button type="submit" class="btn btn-dark" id="submit-settings" disabled>Submit</button> </div> </div></form>You can generate your own token to plugin to this form via the console or the CLI methods shown above. In your production applications, you'll use an SDK to generate this token (and refresh, if necessary). Here's how you might generate a token with the Node SDK (reference docs).
import AWS from 'aws-sdk';const credentials = new AWS.Credentials({ accessKeyId: process.env.ACCESS_KEY, secretAccessKey: process.env.SECRET_KEY,});const IvsChat = new AWS.Ivschat({ region: 'us-east-1', credentials });const createToken = async () { let token; const params = { roomIdentifier: "[YOUR CHAT ARN]", userId: "[UNIQUE USERID]", attributes: {}, capabilities: ['SEND_MESSAGE'], sessionDurationInMinutes: 60, }; try { const data = await IvsChat.createChatToken(params).promise(); token = data.token; } catch (e) { console.error(e); throw new Error(e); } return token;}Next, add some markup to display the chat messages, a text input to enter a new message, and a send button.
<div id="chat-container" class="d-none"> <div id="chat" class="border rounded mb-3 p-3" style="height: 300px; overflow-y: auto;"></div> <div id="chat-input-container"> <div class="input-group"> <input id="chat-input" placeholder="Message" maxlength="500" type="text" class="form-control" /> <button id="submit-chat" class="btn btn-outline-secondary">Send</button> </div> </div></div>We'll listen for the form submission, and when that happens we can initialize the chat room WebSocket connection.
const endpoint = document.getElementById('chat-endpoint').value;const token = document.getElementById('chat-token').value;window.chatConnection = new WebSocket(endpoint, token);All of the standard WebSocket events apply here. For example, to listen for incoming messages, we use onmessage.
window.chatConnection.onmessage = (event) => { // parse the event data const data = JSON.parse(event.data); // append the incoming msg to the chat const msgHtml = `<div class="mb-2"><b class="text-primary">${data.Attributes.username}</b>: ${data.Content}</div>`; const chatContainer = document.getElementById('chat'); chatContainer.innerHTML += msgHtml; chatContainer.scrollTop = chatContainer.scrollHeight;};And finally, an event listener on the Send button that will send the message using the chatConnection.
document.getElementById('submit-chat').addEventListener('click', () => { const msgInput = document.getElementById('chat-input'); const payload = { "action": "SEND_MESSAGE", "content": stripHtml(msgInput.value), "attributes": { "username": username } } try { window.chatConnection.send(JSON.stringify(payload)); } catch (e) { console.error(e); } msgInput.value = ''; msgInput.focus();});The Demo
Let's see our chat demo in action! Use one of the methods we looked at above to get a chat token, and use your chat room's messaging endpoint to login and give it a shot!
Check out the full source in the CodePen above to see the complete example.
Summary
In this post, we created our first Amazon IVS Chat room and learned how to integrate it into our live streaming application. Well switch gears in the next post and focus a bit more on broadcasting to our live stream. If you have questions, leave a comment or reach out to me on Twitter.
Image by Pontep Luangon from Pixabay
Original Link: https://dev.to/aws/adding-chat-to-your-amazon-ivs-live-stream-43i6
Dev To
More About this Source Visit Dev To