
An Interest In:
Web News this Week
- April 2, 2024
- April 1, 2024
- March 31, 2024
- March 30, 2024
- March 29, 2024
- March 28, 2024
- March 27, 2024
Some of Our Sources
- Mashable
- Techcrunch
- TutsPlus - Code
- TutsPlus - Design
- Vandelay Design
- You The Designer
- Fuel Your Creativity
- CSS Tricks
- Spyre Studios
- Codrops
Help Webnuz
Referal links:
How to appropriately git stash
Imagine these scenarios
- You want to safely switch between branches without worrying about current untracked files or the state of the working directory. Well, you don't need to commit changes every time before switching between branches.
- Imagine temporarily committing on the current branch, switching to a different branch, cherry-picking your commit, and then removing it from where it was originally created.
I am not done with what I am currently working on and there comes an urgent update that needs to be implemented in a production environment.
should I just commit the unfinished updates and move to the production branch?
which commit message should I write, Just committed this for the sake of not losing my updates?
Thats where git stash becomes your Swiss knife to support you in multitasking and constantly being able to shift and work on something different without breaking a sweat.
Git stash is a powerful tool to stash or secretly save changes made on any tracked files without the need to commit them, which allows retrieving or reapplying those changes at any point in time regardless of the current branch in use.
So how do you use it?
To stash the current changes just use the git stash command as shown below and your changes are safely stashed.
$ git stashNote: git stash works only for tracked changes. So for example you have added a new file to your project, any changes made to that file are untracked changes. To allow them to be tracked you need to stage them with git add command.
To confirm if all the files are tracked, you can run git status command as shown below.
$ git statusThe output should look like so.

As seen above there is a list of files that are not staged yet in /number_trivia.dart directory and an untracked file in /sampleNumberTrivia.dart.
To allow files to be tracked, we use git add command followed by a specific file name you would like to start tracking, or followed by a full stop . if you would like to track all untracked files.
This adds tracking to a specific file
$ git add <file name>This adds tracking to all untracked files
$ git add .So if we run the git status command it should look different now.

To view a list of all stashed changes you simply run the git stash list command as shown below.
$ git stash listThe output should be something like this:
But hey, how can I remember which stashed changes contain what.? Though the files are named with different names as stash{0}, stash{1} . Stash{n} but this naming format is not helpful enough.
Stash your changes with a message
To make it simple it is possible to stash changes with name or message. I usually stash my changes with a message.
Run the git stash -m command as shown below with a message.
$ git stash -m stashing messageAnd the output should be like so.

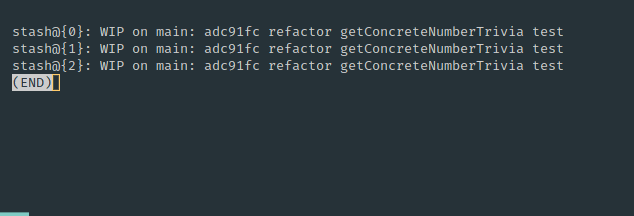
So if we list the stashed changes by using git stash list command now, the output should look as below

Notice a message on index stash@{0}. This makes it simple to understand which stash contains what.
How git stash works
Before we start looking at how to retrieve a stashed record, we need to understand how stashing works.
Consider the following diagram

Every time you stash changes, git tracks the stash records in a stack. Therefore, the latest stash is moved to the top of the stack which is identified with the index 0 (stash@{0}). Storing the stashes in a stack plays a key role when using other functionality when using apply and pop options to retrieve a stash.
How to retrieve stashed records?
There are two ways you can retrieve stashed changes
- Pop
- Apply
pop
With pop, you retrieve changes to a current branch and remove the stash record from the stash list.
We use git stash pop command to pop the stashed record. This can be used in two ways by specifying a targeted stash record or without specifying a targeted stash record
$ git stash popThe above command will pop Stash@{0} from the stash record and apply it to a current branch since stashes are stored in stack format. This can be seen in the below example

To pop a specific record from a stash list we need to specify the record name (index) defined at the end of the git stash pop command.
$ git stash pop <name index>This can be seen in the diagram below.

Apply
Git Apply command works almost similar to the git pop command with the only difference being that using pop retrieves and deletes the record from the stash list while git apply retrieves and retains the record from the stash list.
Also apply can be used in two ways. Git apply with a specific target record or without specifying a targeted record.
Without specifying a targeted record, git will retrieve stash@{0} index which is the last stashed record.
Apply without a targeted record
$ git stash applyApply a specific record
$ git stash apply <name index>Let us take a break here for today, on the next section we will go through the rest of the concepts which are.
Removing git stash
Most of the time we keep on stashing records and re-applying them later without necessarily removing them from the stash list. To remove git stash we use the drop option. as in pop and apply, if you don't specify which record you want to drop from the list, it will remove the last stashed record stash@{0}
$ git stash dropto specify which record you would like to remove from a stash list we use
$ git stash drop <name index>In case you would like to wipe and clean all the stashed records from the stack at once, you can use the clear option.
$ git stash clearThis is all I have for you today, I hope you find this article useful. until next time "keep reading keep growing"
This article has been prepared on behalf of ClickPesa. For many articles like this just click this --> ClickPesa on hasnode, ClickPesa on dev.to and ClickPesa on medium.
Original Link: https://dev.to/clickpesa/how-to-appropriately-git-stash-1ed3
Dev To
More About this Source Visit Dev To