
An Interest In:
Web News this Week
- April 2, 2024
- April 1, 2024
- March 31, 2024
- March 30, 2024
- March 29, 2024
- March 28, 2024
- March 27, 2024
Some of Our Sources
- Slashdot
- Engadget
- Simplebits
- The Logo Smith
- Six Revisions
- Vandelay Design
- Creative Curio
- Crazy Leaf Design
- Spyre Studios
- Codrops
Help Webnuz
Referal links:
Building an interactive screen-sharing app with Puppeteer and React
What is this article about?
You want to give a user the ability to browse a webpage through your system and feel like it's a real browser.
Why did I create this article?
For a long time, I tried to create a way to do onboarding for members to go through some web page and fill in their details. I searched for many open-source libraries that can do it and found nothing. So I have decided to implement it myself.

How are we going to do it?
For this article I will use Puppeteer and ReactJS.
Puppeteeris a Node.js library that automates several browser actions such as form submission, crawling single-page applications, UI testing, and in particular, generating screenshot and PDF versions of web pages.
We will open a webpage with Puppeteer, send to the client (React) a screenshot of every frame and reflect actions to Puppeteer by clicking on the image. To begin with, let's set up the project environment.
Novu - the first open-source notification infrastructure
Just a quick background about us. Novu is the first open-source notification infrastructure. We basically help to manage all the product notifications. It can be In-App (the bell icon like you have in the Dev Community - Websockets), Emails, SMSs and so on.
I would be super happy if you could give us a star! It will help me to make more articles every week
https://github.com/novuhq/novu
How to create a real-time connection with Socket.io & React.js
Here, we'll set up the project environment for the screen-sharing app. You'll also learn how to add Socket.io to a React and Node.js application and connect both development servers for real-time communication via Socket.io.
Create the project folder containing two sub-folders named client and server.
mkdir screen-sharing-appcd screen-sharing-appmkdir client serverNavigate into the client folder via your terminal and create a new React.js project.
cd clientnpx create-react-app ./Install Socket.io client API and React Router.React Routeris a JavaScript library that enables us to navigate between pages in a React application.
npm install socket.io-client react-router-domDelete the redundant files such as the logo and the test files from the React app, and update the App.js file to display Hello World as below.
function App() { return ( <div> <p>Hello World!</p> </div> );}export default App;Navigate into the server folder and create a package.json file.
cd server & npm init -yInstall Express.js, CORS, Nodemon, and Socket.io Server API.
Express.jsis a fast, minimalist framework that provides several features for building web applications in Node.js.CORSis a Node.js package that allows communication between different domains.
Nodemonis a Node.js tool that automatically restarts the server after detecting file changes, andSocket.ioallows us to configure a real-time connection on the server.
npm install express cors nodemon socket.ioCreate an index.js file - the entry point to the web server.
touch index.jsSet up a simple Node.js server using Express.js. The code snippet below returns a JSON object when you visit the http://localhost:4000/api in your browser.
//index.jsconst express = require("express");const app = express();const PORT = 4000;app.use(express.urlencoded({ extended: true }));app.use(express.json());app.get("/api", (req, res) => { res.json({ message: "Hello world", });});app.listen(PORT, () => { console.log(`Server listening on ${PORT}`);});Import the HTTP and the CORS library to allow data transfer between the client and the server domains.
const express = require("express");const app = express();const PORT = 4000;app.use(express.urlencoded({ extended: true }));app.use(express.json());//New importsconst http = require("http").Server(app);const cors = require("cors");app.use(cors());app.get("/api", (req, res) => { res.json({ message: "Hello world", });});http.listen(PORT, () => { console.log(`Server listening on ${PORT}`);});Next, add Socket.io to the project to create a real-time connection. Before the app.get() block, copy the code below. Next, add Socket.io to the project to create a real-time connection. Before the app.get() block, copy the code below.
//New imports.....const socketIO = require('socket.io')(http, { cors: { origin: "http://localhost:3000" }});//Add this before the app.get() blocksocketIO.on('connection', (socket) => { console.log(`: ${socket.id} user just connected!`); socket.on('disconnect', () => { console.log(': A user disconnected'); });});From the code snippet above, the socket.io("connection") function establishes a connection with the React app, then creates a unique ID for each socket and logs the ID to the console whenever a user visits the web page.
When you refresh or close the web page, the socket fires the disconnect event showing that a user has disconnected from the socket.
Configure Nodemon by adding the start command to the list of scripts in the package.json file. The code snippet below starts the server using Nodemon.
//In server/package.json"scripts": { "test": "echo \"Error: no test specified\" && exit 1", "start": "nodemon index.js" },You can now run the server with Nodemon by using the command below.
npm startBuilding the user interface
Here, we'll create a simple user interface to demonstrate the interactive screen-sharing feature.
Navigate into client/src and create a components folder containing Home.js and a sub-component named Modal.js.
cd client/srcmkdir componentstouch Home.js Modal.jsUpdate the App.js file to render the newly created Home component.
import React from "react";import { BrowserRouter, Route, Routes } from "react-router-dom";import Home from "./components/Home";const App = () => { return ( <BrowserRouter> <Routes> <Route path='/' element={<Home />} /> </Routes> </BrowserRouter> );};export default App;Navigate into the src/index.css file and copy the code below. It contains all the CSS required for styling this project.
@import url("https://fonts.googleapis.com/css2?family=Space+Grotesk:wght@300;400;500;600;700&display=swap");body { margin: 0; padding: 0; font-family: -apple-system, BlinkMacSystemFont, "Segoe UI", "Roboto", "Oxygen", "Ubuntu", "Cantarell", "Fira Sans", "Droid Sans", "Helvetica Neue", sans-serif; -webkit-font-smoothing: antialiased; -moz-osx-font-smoothing: grayscale;}* { font-family: "Space Grotesk", sans-serif; box-sizing: border-box;}.home__container { display: flex; min-height: 55vh; width: 100%; flex-direction: column; align-items: center; justify-content: center;}.home__container h2 { margin-bottom: 30px;}.createChannelBtn { padding: 15px; width: 200px; cursor: pointer; font-size: 16px; background-color: #277bc0; color: #fff; border: none; outline: none; margin-right: 15px; margin-top: 30px;}.createChannelBtn:hover { background-color: #fff; border: 1px solid #277bc0; color: #277bc0;}.form { width: 100%; display: flex; align-items: center; justify-content: center; flex-direction: column; margin-bottom: 30px;}.form__input { width: 70%; padding: 10px 15px; margin: 10px 0;}.popup { width: 80%; height: 500px; background: black; border-radius: 20px; padding: 20px; overflow: auto;}.popup-ref { background: white; width: 100%; height: 100%; position: relative;}.popup-ref img { top: 0; position: sticky; width: 100%;}@media screen and (max-width: 768px) { .login__form { width: 100%; }}Copy the code below into the Home.js. It renders a form input for the URL, a submit button, and the Modal component.
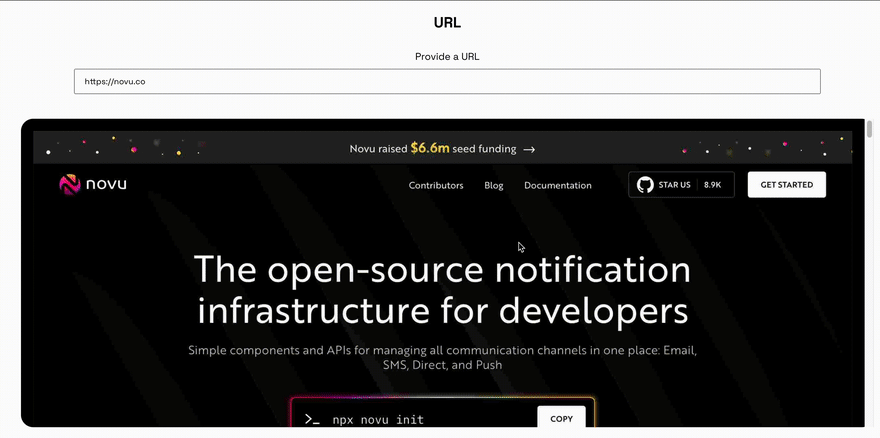
import React, { useCallback, useState } from "react";import Modal from "./Modal";const Home = () => { const [url, setURL] = useState(""); const [show, setShow] = useState(false); const handleCreateChannel = useCallback(() => { setShow(true); }, []); return ( <div> <div className='home__container'> <h2>URL</h2> <form className='form'> <label>Provide a URL</label> <input type='url' name='url' id='url' className='form__input' required value={url} onChange={(e) => setURL(e.target.value)} /> </form> {show && <Modal url={url} />} <button className='createChannelBtn' onClick={handleCreateChannel}> BROWSE </button> </div> </div> );};export default Home;Add an image representing the screencast to the Modal.js file and import the Socket.io library.
import { useState } from "react";import socketIO from "socket.io-client";const socket = socketIO.connect("http://localhost:4000");const Modal = ({ url }) => { const [image, setImage] = useState(""); return ( <div className='popup'> <div className='popup-ref'>{image && <img src={image} alt='' />}</div> </div> );};export default Modal;Start the React.js server.
npm startCheck the terminal where the server is running; the ID of the React.js client should appear on the terminal.
Congratulations , We can now start communicating with the Socket.io server from the app UI.
Taking screenshots with Puppeteer and Chrome DevTools Protocol
In this section, you'll learn how to take automatic screenshots of web pages using Puppeteer and theChrome DevTools Protocol. Unlike the regular screenshot function provided by Puppeteer, Chrome's API creates very fast screenshots that won't slow down Puppeteer and your runtime because it is asynchronous.
Navigate into the server folder and install Puppeteer.
cd servernpm install puppeteerUpdate the Modal.js file to send the URL for the web page provided by the user to the Node.js server.
import { useState, useEffect } from "react";import socketIO from "socket.io-client";const socket = socketIO.connect("http://localhost:4000");const Modal = ({ url }) => { const [image, setImage] = useState(""); useEffect(() => { socket.emit("browse", { url, }); }, [url]); return ( <div className='popup'> <div className='popup-ref'>{image && <img src={image} alt='' />}</div> </div> );};export default Modal;Create a listener for the browse event on the backend server.
socketIO.on("connection", (socket) => { console.log(`: ${socket.id} user just connected!`); socket.on("browse", async ({ url }) => { console.log("Here is the URL >>>> ", url); }); socket.on("disconnect", () => { socket.disconnect(); console.log(": A user disconnected"); });});Since we've been able to collect the URL from the React app, let's create screenshots using Puppeteer and Chrome DevTools Protocol.
Create a screen.shooter.js file and copy the code below:
const { join } = require("path");const fs = require("fs").promises;const emptyFunction = async () => {};const defaultAfterWritingNewFile = async (filename) => console.log(`${filename} was written`);class PuppeteerMassScreenshots { /* page - represents the web page socket - Socket.io options - Chrome DevTools configurations */ async init(page, socket, options = {}) { const runOptions = { // Their values must be asynchronous codes beforeWritingImageFile: emptyFunction, afterWritingImageFile: defaultAfterWritingNewFile, beforeAck: emptyFunction, afterAck: emptyFunction, ...options, }; this.socket = socket; this.page = page; // CDPSession instance is used to talk raw Chrome Devtools Protocol this.client = await this.page.target().createCDPSession(); this.canScreenshot = true; // The frameObject parameter contains the compressed image data // requested by the Page.startScreencast. this.client.on("Page.screencastFrame", async (frameObject) => { if (this.canScreenshot) { await runOptions.beforeWritingImageFile(); const filename = await this.writeImageFilename(frameObject.data); await runOptions.afterWritingImageFile(filename); try { await runOptions.beforeAck(); /* acknowledges that a screencast frame (image) has been received by the frontend. The sessionId - represents the frame number */ await this.client.send("Page.screencastFrameAck", { sessionId: frameObject.sessionId, }); await runOptions.afterAck(); } catch (e) { this.canScreenshot = false; } } }); } async writeImageFilename(data) { const fullHeight = await this.page.evaluate(() => { return Math.max( document.body.scrollHeight, document.documentElement.scrollHeight, document.body.offsetHeight, document.documentElement.offsetHeight, document.body.clientHeight, document.documentElement.clientHeight ); }); //Sends an event containing the image and its full height return this.socket.emit("image", { img: data, fullHeight }); } /* The startOptions specify the properties of the screencast format - the file type (Allowed fomats: 'jpeg' or 'png') quality - sets the image quality (default is 100) everyNthFrame - specifies the number of frames to ignore before taking the next screenshots. (The more frames we ignore, the less screenshots we will have) */ async start(options = {}) { const startOptions = { format: "jpeg", quality: 10, everyNthFrame: 1, ...options, }; try { await this.client?.send("Page.startScreencast", startOptions); } catch (err) {} } /* Learn more here : https://github.com/shaynet10/puppeteer-mass-screenshots/blob/main/index.js */ async stop() { try { await this.client?.send("Page.stopScreencast"); } catch (err) {} }}module.exports = PuppeteerMassScreenshots;- From the code snippet above:
- The
runOptionsobject contains four values.beforeWritingImageFileandafterWritingImageFilemust contain asynchronous functions that run before and after sending the images to the client. beforeAckandafterAckrepresent the acknowledgment sent to the browser as asynchronous code showing that images were received.- The
writeImageFilenamefunction calculates the full height of the screencast and sends it together with the screencast image to the React app.
- The
Create an instance of the PuppeteerMassScreenshots and update the server/index.js file to take the screenshots.
// Add the following importsconst puppeteer = require("puppeteer");const PuppeteerMassScreenshots = require("./screen.shooter");socketIO.on("connection", (socket) => { console.log(`: ${socket.id} user just connected!`); socket.on("browse", async ({ url }) => { const browser = await puppeteer.launch({ headless: true, }); // creates an incognito browser context const context = await browser.createIncognitoBrowserContext(); // creates a new page in a pristine context. const page = await context.newPage(); await page.setViewport({ width: 1255, height: 800, }); // Fetches the web page await page.goto(url); // Instance of PuppeteerMassScreenshots takes the screenshots const screenshots = new PuppeteerMassScreenshots(); await screenshots.init(page, socket); await screenshots.start(); }); socket.on("disconnect", () => { socket.disconnect(); console.log(": A user disconnected"); });});Update the Modal.js file to listen for the screencast images from the server.
import { useState, useEffect } from "react";import socketIO from "socket.io-client";const socket = socketIO.connect("http://localhost:4000");const Modal = ({ url }) => { const [image, setImage] = useState(""); const [fullHeight, setFullHeight] = useState(""); useEffect(() => { socket.emit("browse", { url, }); /* Listens for the images and full height from the PuppeteerMassScreenshots. The image is also converted to a readable file. */ socket.on("image", ({ img, fullHeight }) => { setImage("data:image/jpeg;base64," + img); setFullHeight(fullHeight); }); }, [url]); return ( <div className='popup'> <div className='popup-ref' style={{ height: fullHeight }}> {image && <img src={image} alt='' />} </div> </div> );};export default Modal;Congratulations! We've been able to display the screenshots in the React app. In the following section, I'll guide you on making the screencast images interactive.
Making the screenshots interactive
Here, you'll learn how to make the screencasts fully interactive such that it behaves like a browser window and responds to the mouse scroll and move events.
Reacting to the cursor's click and move events.
Copy the code below into the Modal component.
const mouseMove = useCallback((event) => { const position = event.currentTarget.getBoundingClientRect(); const widthChange = 1255 / position.width; const heightChange = 800 / position.height; socket.emit("mouseMove", { x: widthChange * (event.pageX - position.left), y: heightChange * (event.pageY - position.top - document.documentElement.scrollTop), });}, []);const mouseClick = useCallback((event) => { const position = event.currentTarget.getBoundingClientRect(); const widthChange = 1255 / position.width; const heightChange = 800 / position.height; socket.emit("mouseClick", { x: widthChange * (event.pageX - position.left), y: heightChange * (event.pageY - position.top - document.documentElement.scrollTop), });}, []);- From the code snippet above:
[event.currentTarget.getBoundingClient()](https://developer.mozilla.org/en-US/docs/Web/API/Element/getBoundingClientRect)returns an object containing information about the size and position of the screencasts relative to the viewport.- event.pageX - returns the position of the mouse pointer; relative to the left edge of the document.
- Then, calculate the cursor's position and send it to the backend via the
mouseClickandmouseMoveevents.
Create a listener to both events on the backend.
socket.on("browse", async ({ url }) => { const browser = await puppeteer.launch({ headless: true, }); const context = await browser.createIncognitoBrowserContext(); const page = await context.newPage(); await page.setViewport({ width: 1255, height: 800, }); await page.goto(url); const screenshots = new PuppeteerMassScreenshots(); await screenshots.init(page, socket); await screenshots.start(); socket.on("mouseMove", async ({ x, y }) => { try { //sets the cursor the position with Puppeteer await page.mouse.move(x, y); /* This function runs within the page's context, calculates the element position from the view point and returns the CSS style for the element. */ const cur = await page.evaluate( (p) => { const elementFromPoint = document.elementFromPoint(p.x, p.y); return window .getComputedStyle(elementFromPoint, null) .getPropertyValue("cursor"); }, { x, y } ); // sends the CSS styling to the frontend socket.emit("cursor", cur); } catch (err) {} }); // Listens for the exact position the user clicked // and set the move to that position. socket.on("mouseClick", async ({ x, y }) => { try { await page.mouse.click(x, y); } catch (err) {} });});Listen to the cursor event and add the CSS styles to the screenshot container.
import { useCallback, useEffect, useRef, useState } from "react";import socketIO from "socket.io-client";const socket = socketIO.connect("http://localhost:4000");const Modal = ({ url }) => { const ref = useRef(null); const [image, setImage] = useState(""); const [cursor, setCursor] = useState(""); const [fullHeight, setFullHeight] = useState(""); useEffect(() => { //...other functions // Listens to the cursor event socket.on("cursor", (cur) => { setCursor(cur); }); }, [url]); //...other event emitters return ( <div className='popup'> <div ref={ref} className='popup-ref' style={{ cursor, height: fullHeight }} // cursor is added > {image && ( <img src={image} onMouseMove={mouseMove} onClick={mouseClick} alt='' /> )} </div> </div> );};export default Modal;
Responding to scroll events
Here, I'll guide you through making the screencast scrollable to view all the web page's content.
Create an onScroll function that measures the distance from the top of the viewport to the screencast container and sends it to the backend.
const Modal = ({ url }) => { //...other functions const mouseScroll = useCallback((event) => { const position = event.currentTarget.scrollTop; socket.emit("scroll", { position, }); }, []); return ( <div className='popup' onScroll={mouseScroll}> <div ref={ref} className='popup-ref' style={{ cursor, height: fullHeight }} > {image && ( <img src={image} onMouseMove={mouseMove} onClick={mouseClick} alt='' /> )} </div> </div> );};Create a listener for the event to scroll the page according to the document's coordinates.
socket.on("browse", async ({ url }) => { //....other functions socket.on("scroll", ({ position }) => { //scrolls the page page.evaluate((top) => { window.scrollTo({ top }); }, position); });});Congratulations! We can now scroll through the screencast and interact with the web page's content.
Conclusion
So far, you've learned how to set up a real-time connection with React.js andSocket.io, take screenshots of webpages with Puppeteer andChrome DevTools Protocol, and make them interactive.
This article is a demo of what you can build with Puppeteer. You can also generate PDFs of pages, automate form submission, UI testing, test chrome extensions, and many more. Feel free to explore thedocumentation.
The source code for this tutorial is available here:https://github.com/novuhq/blog/tree/main/screen-sharing-with-puppeteer.
P.S I would be super happy if you could give us a star! It will help me to make more articles every week
https://github.com/novuhq/novu

Thank you for reading!
Original Link: https://dev.to/novu/building-an-interactive-screen-sharing-app-with-puppeteer-and-react-12h7
Dev To
More About this Source Visit Dev To