
An Interest In:
Web News this Week
- April 2, 2024
- April 1, 2024
- March 31, 2024
- March 30, 2024
- March 29, 2024
- March 28, 2024
- March 27, 2024
Some of Our Sources
- BoingBoing
- Techcrunch
- Technology Review
- TutsPlus - Code
- Team Treehouse
- Abduzeedo
- Fuel Your Creativity
- Naldz Graphics
- Design Modo
- Codrops
Help Webnuz
Referal links:
Part 9: Set up the Node.js server to handle Elasticsearch requests
Table of Content | Read Next: Part 10 - Visualize data with Kibana Lens
Review
In part 8, we have created the client side of the app.

Using the client, the user can search for earthquakes that match the specified criteria(type, magnitude, location, date range).
We have set up our client to capture the user input and send the input to the server.
In this blog, we will set up our server to:
- receive the user input from the client and pass the user input into a Elasticsearch request
- send the request to Elasticsearch and receive relevant documents from Elasticsearch
- send the received documents to the client so the search results could be displayed to the user
Resources
Would you rather watch a video to learn this content? Click on the link below!
Want the code covered in this blog? Click on the link below to access it!
Set up the server to handle Elasticsearch request
Using your code editor, open the earthquake_app directory. Within the server directory, locate the server.js file.
In server.js, replace the existing code with the following code.
//in server/server.js'const { Client } = require('@elastic/elasticsearch');const client = require('./elasticsearch/client');const express = require('express');const cors = require('cors');const app = express();const data = require('./data_management/retrieve_and_ingest_data');app.use('/ingest_data', data);app.use(cors());app.get('/results', (req, res) => { const passedType = req.query.type; const passedMag = req.query.mag; const passedLocation = req.query.location; const passedDateRange = req.query.dateRange; const passedSortOption = req.query.sortOption; async function sendESRequest() { const body = await client.search({ index: 'earthquakes', body: { sort: [ { mag: { order: passedSortOption, }, }, ], size: 300, query: { bool: { filter: [ { term: { type: passedType }, }, { range: { mag: { gte: passedMag, }, }, }, { match: { place: passedLocation }, }, // for those who use prettier, make sure there is no whitespace. { range: { '@timestamp': { gte: `now-${passedDateRange}d/d`, lt: 'now/d', }, }, }, ], }, }, }, }); res.json(body.hits.hits); } sendESRequest();});const PORT = process.env.PORT || 3001;app.listen(PORT, () => console.group(`Server started on ${PORT}`));Let's go over the newly added code!
Heads up!
For reference purposes only, I have included screenshots of code that I will be explaining.
If you need to copy and paste the code, please refer to the code snippet above or the GitHub repo for part 9.

Line 4
We import cors dependency we have installed in part 2.
We will be using cors to allow our server(http://localhost:3000) and client(http://localhost:3001) of different origin to exchange information without encountering a CORS error.
Line 12
We use app.use(cors()) to enable all CORS requests.
Lines 14-66
We create an endpoint called /results to handle HTTP requests from the client.
Review from part 8
Using the client, the user can search for earthquakes based on the criteria they select(type, magnitude, location, and date range).

The user can also sort the results by descending or ascending order of magnitude.
When the user specifies the criteria and clicks on the search button, the user input is captured and sent to the server.
Lines 15-19 create constants for the user input received from the client(type, mag, location, dateRange and sortOption).

Lines 21-64
We define the sendESRequest() function. This function is designed to send a search request to Elasticsearch.
This search request retrieves earthquake documents that match the user's selected criteria(type, magnitude, location, and time range).
Line 22
We create a constant called body and set it equal to the client.search() method.
Within the client.search() method, we leave instructions for Elasticsearch on what documents we wish to retrieve.
Line 23
We instruct Elasticsearch to search against the index earthquakes.
Line 24
In the request body(lines 24-61), we include the search criteria.
Sort by Magnitude (Lines 25-31)
Using the client, a user can sort the search results by descending or ascending order of magnitude.


To accomplish this, we add the sort parameter(line 25) in the request body. We specify that the search results must be ordered by the value of the field mag(line 27).
The sorting order(desc or asc) is determined by the user input passedSortOption(line 28).
Line 32
We instruct Elasticsearch to retrieve up to 300 matching documents.
Lines 33-60
Our app is designed to retrieve earthquake documents that match the user's chosen criteria(type, mag, location, and dateRange).
The documents must match all four of the user's criteria to be considered as a hit(search result). To retrieve such documents, we will write four queries and combine them into one request.
The bool query becomes super handy when we are trying to accomplish such a task!
We covered this query in season 1 of Mini Beginner's Crash Course to Elasticsearch and Kibana. Check out these videos(part 1 & part 2) if you need a refresher!
In a bool query(lines 33-60), we use a combination of one or more clauses to narrow down our search results.

In our case, documents in the earthquakes index either match or do not match user input(yes or no).
Therefore, we use the filter clause(line 35) to retrieve documents that match the user's input of type, magnitude, location, and date range.
Quake Type (lines 36-38)
Using our client, a user can select the type of quake from the drop down menu.
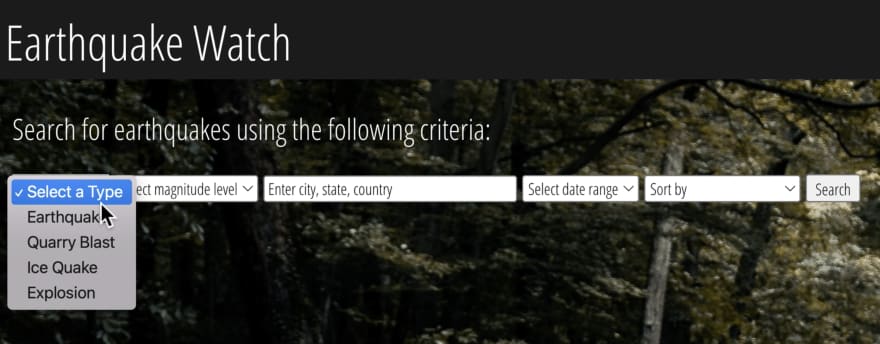
When a user selects an option, the user input is sent to the server and saved as a constant called passedType(line 15).

passedType contains the option value the user has selected from the dropdown menu(earthquake, quarry blast, ice quake, or explosion).
Since we are looking for a specific term(earthquake, quarry blast, ice quake, or explosion) within the document, we use the term query.

We instruct Elasticsearch to look for the term contained in the constant passedType in the field type(line 37).
Magnitude (lines 39-45)
Using our client, a user can select the level of magnitude from the drop down menu.

These options allow the user to search for earthquakes with magnitudes that is greater than or equal to 2.5, 5.5, 6.1, 7, and 8.
When a user selects an option, the user input is sent to the server and saved as a constant called passedMag(line 16).

passedMag contains the value of the chosen option (2.5, 5.5, 6.1, 7, or 8).
Since we are looking for documents that reflect a range of magnitudes, we use the range query for this task.

We run the range query(line 40) on the field mag(line 41). We look for documents that contain values that are greater than or equal(gte) to the value of passedMag(line 42).
Location (lines 46-48)
Using our client, a user can type in the location in which they want to search for earthquakes.

The user input is sent to the server and saved as a constant called passedLocation(line 17).

passedLocation contains whatever text the user has typed in.

To search the field place for the typed user input, full text search should be performed. Therefore, we use the match query to look for passedLocation in the field place(line 47).
Date Range (lines 50-57)
Using our client, a user can choose the date range of earthquake occurrence.
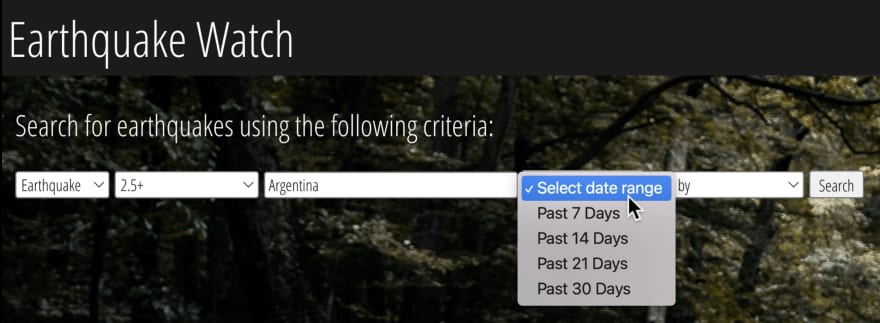
This user input is sent to the server and saved as a constant called passedDateRange(line 18).

passedDateRange contains the date range option the user has selected(past 7 days, past 14 days, past 21 days, and past 30 days).
Since we are looking for documents that reflect a range of dates, we need to use the range query for this task.
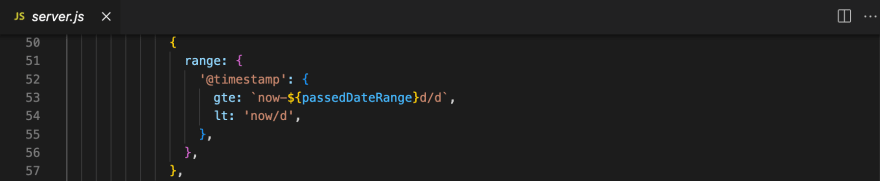
We run the range query(line 51) on the field @timestamp(line 52).
Lines 54-55
We instruct Elasticsearch to look for documents whose timestamp falls within the past x days that the user has specified.
At first glance, these lines of code may look complicated so let's break this down.
The term gte in line 53 stands for "greater than or equal to".
The term lt in line 54 stands for "less than".
We use these terms to specify the date range that a document must fall into to be considered as a search result.
The term now/d represents the current timestamp(the time when your request reaches Elasticsearch).
Therefore, lines 54-55 are telling Elasticsearch to find the documents that fall between now and now minus PassedDateRange which is the number of days specified by the user.
As a result, Elasticsearch will look for documents whose timestamp falls within the past x days that the user has specified.
Line 63
When the request is sent to Elasticsearch, Elasticsearch will retrieve relevant documents and send the documents to the server.
Once the documents have been received by the server, the server is instructed to send the documents to the client so it can display the search results.
Line 65
We call the sendESRequest() function so it would execute when the server receives an http request to the /results endpoint.
Final product
Now the moment we have all been waiting for! Let's check out what we have built!
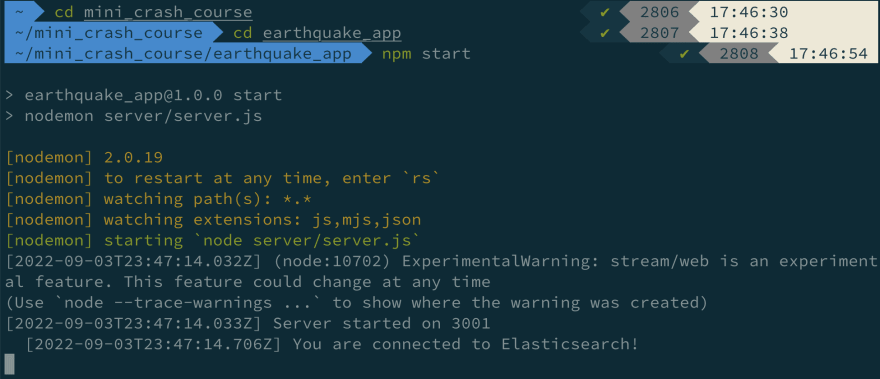
Go back to your terminal.
cd into the earthquake_app directory. Start the server by executing the following command.
//in terminal within the earthquake_app directorynpm startScreenshot of the terminal:
Add a new tab to your terminal.
cd into the earthquake directory then into the client directory. Start the client by executing the following command.
//in terminal earthquake_app/clientnpm startScreenshot of the terminal:


It should automatically display the home page of the app(http://localhost:3000)!
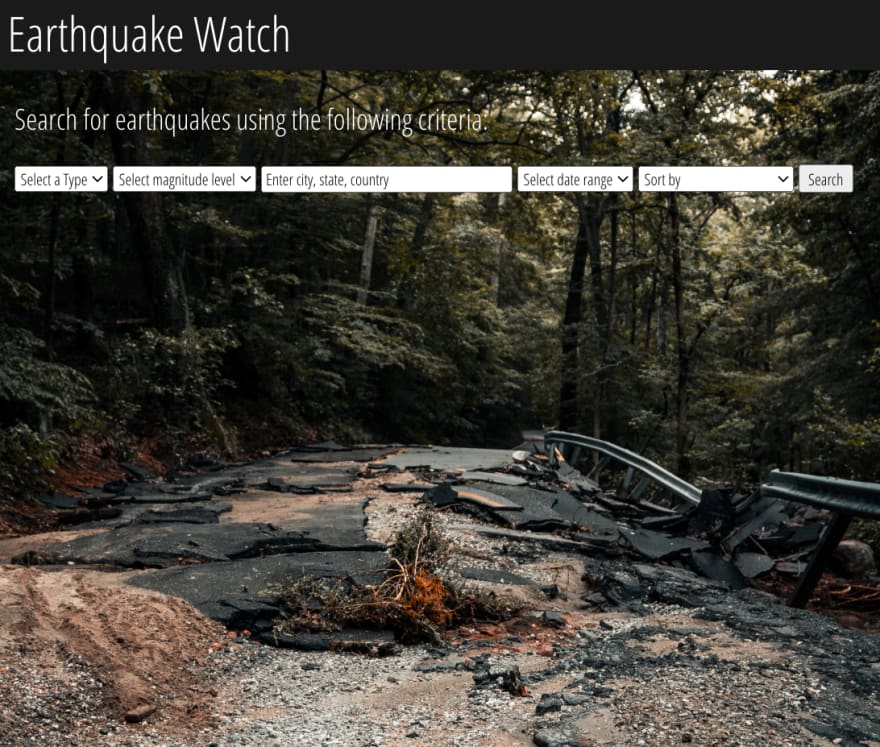
In the browser, specify the criteria of earthquakes you are looking for and hit the search button.
If Elasticsearch contains the documents you seek, you will see the search results displayed in the form of cards.
You should see that the search results are sorted by the sorting order you have specified!

If Elasticsearch does not have the documents you seek, you will see the following message displayed on the page. 
There you have it! You have successfully created a full stack JavaScript app that can search for earthquake data stored in Elasticsearch!
Next, we are going to explore our data even further.
Move on to Part 10 to visualize data with Kibana Lens!
Original Link: https://dev.to/lisahjung/part-9-set-up-the-nodejs-server-to-handle-elasticsearch-requests-5206
Dev To
More About this Source Visit Dev To