
An Interest In:
Web News this Week
- April 19, 2024
- April 18, 2024
- April 17, 2024
- April 16, 2024
- April 15, 2024
- April 14, 2024
- April 13, 2024
Some of Our Sources
- Engadget
- Just Creative
- Joshua Blankenship
- Smashing Apps
- Abduzeedo
- Vandelay Design
- Reencoded
- CSS Globe
- Wal You
- Hashedout
Help Webnuz
Referal links:
Easy CDN using S3 and CloudFront
Introduction
Since I started blogging, I have been using S3 to store images for my blog. I just used the publicly accessible S3 Link. Easy, simple, no problem.
I did this for a long time without realizing two things.
I was leaving some performance on the table by not utilizing a content delivery network.
I was probably using the least secure method for serving images.
So I combined S3 with CloudFront to create a more secure and performant static asset delivery workflow.
My only regret is not taking controlled measurements of my image serving times, as once this was completed, my static assets loaded much faster. Regardless lets go through what I did.
Setup
I already had an S3 bucket set up, but it is a simple process if you don't.
Sign in to your AWS console and navigate to the S3 management screen.

You can create a new bucket by hitting the Create bucket button.
You can leave all the default options for the bucket. Well take an extra step to ensure only our new distribution has access to our bucket.
After completing this, head over to the CloudFront screen in AWS and hit the Create distribution button.

The first option is setting the origin. Clicking that input box brings down a list of your S3 buckets; I chose the one I made earlier.
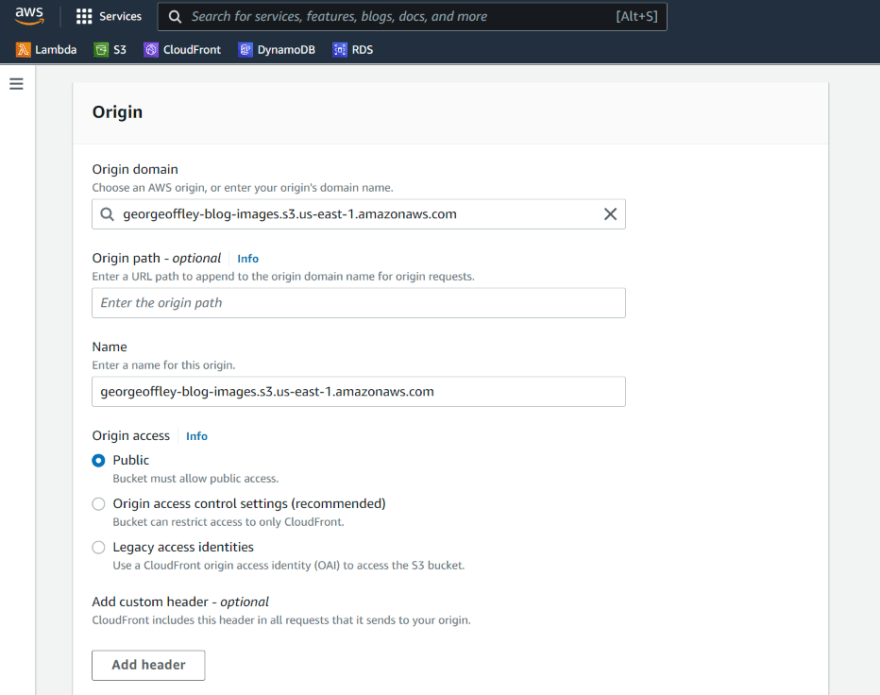
There are dozens of different settings for the distribution that you can go through and customize to fit your situation, but I want to focus on the Origin access section. I clicked the option for Origin access control settings, which has you choose an origins access control template. I created a new one for this purpose.
Once you click the create button, youll be taken back to the main page while the distribution starts deploying. At the top, youll see a button to copy the bucket policy for S3. Clicking this button will copy some JSON code into your clipboard meant to be copied into your S3 permissions tab. The console will also have a convenient link to open the Permissions tab in your S3 bucket.
Scroll down to the Bucket policy section, where you can hit the Edit button and copy in the JSON CloudFront provided.

Note: I had to go to this site and copy in the JSON to better format it for S3 to accept the settings.
Once you do that, you click Save changes, and youre done. You can now serve images of Serena being fantastic in a performant and scalable way.

Just note that youll have to go back to distribution and get the distribution URL. You just add the route to your S3 assets from there, like below, and youre golden.

Conclusion
An easy solution to hosting images and whatever else you want. I have some issues with it that I will get into, but so far, so good.
-George
Original Link: https://dev.to/aws-builders/easy-cdn-using-s3-and-cloudfront-5ghf
Dev To
More About this Source Visit Dev To