
An Interest In:
Web News this Week
- April 18, 2024
- April 17, 2024
- April 16, 2024
- April 15, 2024
- April 14, 2024
- April 13, 2024
- April 12, 2024
Some of Our Sources
- Techcrunch
- Technology Review
- Just Creative
- Spoon Graphics
- Fuel Your Creativity
- FanExtra - PSD
- My Ink Blog
- Web Design Ledger
- Line 25
- Spyre Studios
Help Webnuz
Referal links:
Deploying a simple portable Web App in any cloud using Terraform and Multy
Introduction
In this tutorial, we'll deploy a simple web app to the cloud of your choice - composed of a database and a virtual machine where the frontend code will run.
So that the configuration is reusable and consistent, we'll write it in Terraform.
Usually Terraform configurations are cloud-specific, and changing clouds requires a complete rewrite. In this case, so that you can reuse the same configuration across clouds, we'll be using Multy.
In-depth knowledge of Terraform and Multy is not needed to follow this tutorial. If you want to learn more about these tools, check out the Multy documentation and the Terraform documentation.
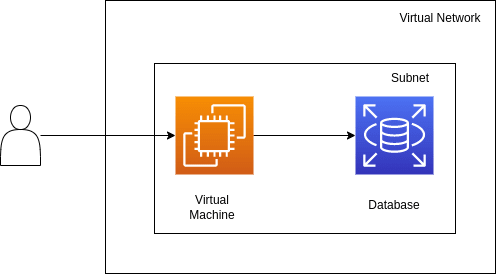
Architecture
This web app will contain the following components:
- Networking - a virtual network that can be accessed from the internet with the appropriate security group
- Database - a managed MySQL database where data will be stored
- Virtual machine - a server configured to serve a simple notes app that stores and retrieves data from the database
Initializing Terraform
First, initialize Terraform.
Here we'll set up the Multy provider and pass along any needed credentials.
Note that a Multy API key is needed - you can get it for free at https://multy.dev/#beta.
Additionally, we'll declare 2 variables, cloud and location, that make it easy to redeploy the web app in different clouds and locations. You'll need to generate some cloud credentials if you don't have them already - check out the Getting Started guide.
To set up the providers, open a providers.tf file with the following content:
terraform { required_providers { multy = { source = "multycloud/multy" } }}provider "multy" { api_key = "xxx" aws = {}}variable "cloud" { type = string default = "aws"}variable "location" { type = string default = "eu_west_1"}After, run the following command in the same folder:
terraform initThis command will download the Multy provider and initialize everything Terraform needs into a .terraform folder.
Configuring networking
In order for the web app to be accessible from outside the cloud, we'll need to create a virtual network with the appropriate route table.
We need:
- A virtual network and a subnet
- A security group that opens up port 22 (for SSH access) and port 4000 (so that the website is accessible) as well as HTTP and HTTPS access to download the code and linux packages
- A route table that routes all traffic to the Internet
While this is quite different in each cloud, with Multy we can describe it in a cloud-agnostic manner:
resource "multy_virtual_network" "vn" { cloud = var.cloud location = var.location name = "multy-vm" cidr_block = "10.0.0.0/16"}resource "multy_subnet" "subnet" { name = "multy-subnet" cidr_block = "10.0.10.0/24" virtual_network_id = multy_virtual_network.vn.id}resource "multy_network_security_group" "nsg" { cloud = var.cloud location = var.location name = "multy_nsg" virtual_network_id = multy_virtual_network.vn.id rule { protocol = "tcp" priority = 133 from_port = 443 to_port = 443 cidr_block = "0.0.0.0/0" direction = "egress" } rule { protocol = "tcp" priority = 131 from_port = 80 to_port = 80 cidr_block = "0.0.0.0/0" direction = "egress" } rule { protocol = "tcp" priority = 132 from_port = 4000 to_port = 4000 cidr_block = "0.0.0.0/0" direction = "ingress" } rule { protocol = "tcp" priority = 130 from_port = 22 to_port = 22 cidr_block = "0.0.0.0/0" direction = "ingress" }}resource "multy_route_table" "rt" { name = "multy-rt" virtual_network_id = multy_virtual_network.vn.id route { cidr_block = "0.0.0.0/0" destination = "internet" }}resource "multy_route_table_association" "rta" { route_table_id = multy_route_table.rt.id subnet_id = multy_subnet.subnet.id}Configuring database
Next up, we need to configure our database. We want a small MySQL database with a random password in the same location where we placed our virtual network.
resource "random_password" "password" { length = 16 override_special = "!#" special = true}resource "multy_database" "db" { cloud = var.cloud location = var.location storage_gb = 10 name = "multydb" engine = "mysql" engine_version = "5.7" username = "multyadmin" password = random_password.password.result size = "micro" subnet_id = multy_subnet.subnet.id depends_on = [multy_route_table_association.rta]}Configuring a virtual machine
Finally, we need to configure the server. For this demo, we'll use the smallest server we can use. To initialize it, we'll make use of user data, a script that is executed by cloud-init when the virtual machine first boots.
resource "multy_virtual_machine" "vm" { cloud = var.cloud location = var.location name = "web_app_vm" size = "general_micro" image_reference = { os = "ubuntu" version = "18.04" } subnet_id = multy_subnet.subnet.id generate_public_ip = true user_data_base64 = base64encode(local.init_script) # uncomment this line to allow ssh access # public_ssh_key = file("~/.ssh/id_rsa.pub") network_security_group_ids = [multy_network_security_group.nsg.id]}locals { init_script = <<EOT#!/bin/bash -xesudo apt-get update -y && sudo apt-get -y install git npm mysql-client curl jqcurl -fsSL https://deb.nodesource.com/setup_16.x | sudo -E bash -sudo apt-get install -y nodejssudo chmod a+rwx .# putting secrets into user data is not best practice, you can use multy_vault insteadexport DATABASE_HOST=${multy_database.db.hostname}export DATABASE_USER=${multy_database.db.connection_username}export DATABASE_PASSWORD='${multy_database.db.password}'git clone https://github.com/FaztTech/nodejs-mysql-links.gitcd nodejs-mysql-linksmysql -h $DATABASE_HOST -P 3306 -u $DATABASE_USER --password=$DATABASE_PASSWORD -e 'source database/db.sql' || truenpm i && npm run build && npm startEOT}output "endpoint" { value = "http://${multy_virtual_machine.vm.public_ip}:4000"}Deploying
After you have everything written, you can deploy the resources using Terraform. Run the following command, using the cloud and location you prefer:
terraform apply -var="cloud=aws" -var="location=eu_west_1"After a few minutes, you should see an endpoint where you can access the example app!
Summary
Terraform is a very powerful tool that makes deployments repeatable using a single unified language (HCL) for any cloud. However, clouds are quite different from each other which means Terraform files look very different from cloud to cloud. In this tutorial we looked at an example on how to leverage Multy to make deployments portable across multiple cloud providers - by just changing a single cloud parameter. If you want to explore other examples further, take a look at Multy examples.
Original Link: https://dev.to/multy/deploying-a-simple-portable-web-app-in-any-cloud-using-terraform-and-multy-20hl
Dev To
More About this Source Visit Dev To