
An Interest In:
Web News this Week
- March 26, 2024
- March 25, 2024
- March 24, 2024
- March 23, 2024
- March 22, 2024
- March 21, 2024
- March 20, 2024
Some of Our Sources
- BoingBoing
- Engadget
- Technology Review
- Just Creative
- Joshua Blankenship
- Pearsonified
- Creative Curio
- My Ink Blog
- Fudge Graphics
- Stylized Web
Help Webnuz
Referal links:
I implemented the DEV Community Notification Center with React, Novu and Websockets
What is this article about?
No matter what application you are building, you will probably send the user notifications at some point. It can be over Emails, SMSs, Push notifications, or a Notification center like the one you have on the DEV Community. I will show you how to implement the DEV Community notification center in this article.
For this demonstration, I have created the DEV Community design - at least, I tried to. I will send a notification in the bell icon every time there is a new post. And in case we get more than one post in 30 seconds, I will merge them into one notification (Digest/Batch).

You know this urge to click on the notifications button every-time there is a new notification? If you do, write me in the comments
That's actually a great way to get engagement in your app, but that's for another day
What is Websockets (Socket.io)?
WebSockets create a connection between a client and a server, allowing them to send data both ways; client-server and server-client. Compared to HTTP, WebSockets provide a lasting bi-directional client-server connection, making it possible to send and receive messages in real-time.
In this article, I'll useSocket.iofor real-time communication because it follows the WebSocket protocol and provides excellent functionalities, such as fallback to HTTP long-polling or automatic reconnection, which enables us to build efficient real-time applications.
How to connect a React app to Socket.io
Here, we'll set up the project environment for the DEV Community clone. You'll also learn how to add Socket.io to a React and Node.js application and connect both development servers for real-time communication via Socket.io.
Create the project folder containing two sub-folders named client and server.
mkdir devto-clonecd devto-clonemkdir client serverNavigate into the client folder via your terminal and create a new React.js project.
cd clientnpx create-react-app ./Install Socket.io client API and React Router.React Routeris a JavaScript library that enables us to navigate between pages in a React application.
npm install socket.io-client react-router-domDelete the redundant files such as the logo and the test files from the React app, and update the App.js file to display Hello World as below.
function App() { return ( <div> <p>Hello World!</p> </div> );}export default App;Navigate into the server folder and create a package.json file.
cd server & npm init -yInstall Express.js, CORS, Nodemon, and Socket.io Server API.
Express.jsis a fast, minimalist framework that provides several features for building web applications in Node.js.CORSis a Node.js package that allows communication between different domains.
Nodemonis a Node.js tool that automatically restarts the server after detecting file changes, andSocket.ioallows us to configure a real-time connection on the server.
npm install express cors nodemon socket.ioCreate an index.js file - the entry point to the web server.
touch index.jsSet up a simple Node.js server using Express.js. The code snippet below returns a JSON object when you visit the http://localhost:4000/api in your browser.
//index.jsconst express = require("express");const app = express();const PORT = 4000;app.use(express.urlencoded({ extended: true }));app.use(express.json());app.get("/api", (req, res) => { res.json({ message: "Hello world", });});app.listen(PORT, () => { console.log(`Server listening on ${PORT}`);});Import the HTTP and the CORS library to allow data transfer between the client and the server domains.
const express = require("express");const app = express();const PORT = 4000;app.use(express.urlencoded({ extended: true }));app.use(express.json());//New importsconst http = require("http").Server(app);const cors = require("cors");app.use(cors());app.get("/api", (req, res) => { res.json({ message: "Hello world", });});http.listen(PORT, () => { console.log(`Server listening on ${PORT}`);});Next, add Socket.io to the project to create a real-time connection. Before the app.get() block, copy the code below. Next, add Socket.io to the project to create a real-time connection. Before the app.get() block, copy the code below.
//New imports.....const socketIO = require('socket.io')(http, { cors: { origin: "http://localhost:3000" }});//Add this before the app.get() blocksocketIO.on('connection', (socket) => { console.log(`: ${socket.id} user just connected!`); socket.on('disconnect', () => { console.log(': A user disconnected'); });});From the code snippet above, the socket.io("connection") function establishes a connection with the React app, then creates a unique ID for each socket and logs the ID to the console whenever a user visits the web page.
When you refresh or close the web page, the socket fires the disconnect event showing that a user has disconnected from the socket.
Configure Nodemon by adding the start command to the list of scripts in the package.json file. The code snippet below starts the server using Nodemon.
//In server/package.json"scripts": { "test": "echo \"Error: no test specified\" && exit 1", "start": "nodemon index.js" },You can now run the server with Nodemon by using the command below.
npm startOpen the App.js file in the client folder and connect the React app to the Socket.io server.
import socketIO from "socket.io-client";const socket = socketIO.connect("http://localhost:4000");function App() { return ( <div> <p>Hello World!</p> </div> );}export default App;Start the React.js server.
npm startCheck the terminal where the server is running; the ID of the React.js client should appear on the terminal.
Congratulations , the React app has been successfully connected to the server via Socket.io.
For the remaining part of this article, I will walk you through creating the pages for the application. We'll create a Home page - where users sign in to the application, a 404 page for unauthenticated users, and a protected Post page only visible to authenticated users where they can create, view, and react to posts.
Creating the home page of the application
Here, we'll create the home page for the application that accepts the username and saves it to the local storage for identification.
Create a folder named components within the client/src folder. Then, create the Home page component.
cd srcmkdir components & cd componentstouch Home.jsCopy the code below into the Home.js file. The code snippet displays a form input that accepts the username and stores it in the local storage.
import React, { useState } from "react";import { useNavigate } from "react-router-dom";const Home = () => { const [username, setUsername] = useState(""); const navigate = useNavigate(); const handleSignIn = (e) => { e.preventDefault(); localStorage.setItem("_username", username); setUsername(""); navigate("/post"); }; return ( <main className='home'> <h2>Sign in to Dev.to</h2> <form className='home__form' onSubmit={handleSignIn}> <label htmlFor='username'>Your Username</label> <input type='text' id='username' name='username' value={username} onChange={(e) => setUsername(e.target.value)} /> <button className='home__cta'>SIGN IN</button> </form> </main> );};export default Home;Configure React Router to enable navigation between the pages of the application. Copy the code below into the src/App.js file and create the referenced components.
import React from "react";import { BrowserRouter, Route, Routes } from "react-router-dom";import socketIO from "socket.io-client";import PostPage from "./components/PostPage";import Home from "./components/Home";import NullPage from "./components/NullPage";const socket = socketIO.connect("http://localhost:4000");const App = () => { return ( <BrowserRouter> <div> <Routes> <Route path='/post' element={<PostPage socket={socket} />} /> <Route path='/' element={<Home />} /> <Route path='*' element={<NullPage />} /> </Routes> </div> </BrowserRouter> );};export default App;The code snippet assigns different routes to the Home, Post page, and Null page using React Router v6 and passes the Socket.io library into the PostPage component.
Navigate into the src/index.css file and copy the code below. It contains all the CSS required for styling this project.
@import url("https://fonts.googleapis.com/css2?family=Space+Grotesk:wght@300;400;500;600;700&display=swap");* { box-sizing: border-box; font-family: "Space Grotesk", sans-serif;}body { margin: 0; padding: 0;}.home { width: 100%; min-height: 100vh; background-color: #cfd2cf; display: flex; flex-direction: column; align-items: center; justify-content: center;}.home__form { display: flex; flex-direction: column; width: 60%;}.home__cta { padding: 10px; font-size: 16px; cursor: pointer; border: 1px solid #333; outline: none; width: 200px;}.navbar { display: flex; justify-content: space-between; padding: 20px; align-items: center; height: 10vh; position: sticky; top: 0; border-bottom: 1px solid #ddd;}.logo { height: 7vh; width: 50px; border-radius: 5px;}.notification__container { display: flex; align-items: center;}.notification__container > div { margin-right: 15px;}.logOutBtn { padding: 10px; width: 150px; color: red; border: 1px solid #333; background-color: #fff; cursor: pointer;}.input__container { width: 100%; min-height: 50vh; padding: 15px;}.input__form { display: flex; width: 70%; flex-direction: column; margin: 0 auto;}label { font-size: 18px; margin-bottom: 10px;}input { margin-bottom: 15px; padding: 10px; font-size: 16px; outline: none; border: 1px solid #ddd;}textarea { font-size: 16px; padding: 10px; width: 100%; border-radius: 10px; outline: none; border: 1px solid #ddd; margin-bottom: 15px;}.sendBtn { padding: 10px; font-size: 16px; height: 45px; width: 200px; cursor: pointer; border: 1px solid #333; outline: none;}.sendBtn:hover { color: #fff; background-color: #333;}.articles__container { width: 100%; padding: 20px; display: flex; align-items: center; justify-content: center; flex-direction: column;}.article { width: 70%; min-height: 300px; padding: 15px; box-shadow: 0 0 0 1px rgba(0, 0, 0, 0.05), 1px 1px 3px 1px rgba(208, 213, 219, 0.28); margin-bottom: 30px; background-color: #fcfffc;}.article__content { word-spacing: 3px;}.likeBtn__container { display: flex; align-items: center;}.likeBtn { color: #fff; cursor: pointer; font-size: 30px; margin-right: 10px;}@media screen and (max-width: 768px) { .article { width: 100%; } .input__form { width: 100%; }}We've created the home page of our DEV Community clone. Next, let's design the user interface for the post route.
Creating the 404 page for unauthenticated users
In this section, we'll create a simple 404 page for unauthenticated users or users who are not on any of the defined routes of the application.
Navigate into the components/NullPage.js and paste the code below:
import React from "react";import { Link } from "react-router-dom";const NullPage = () => { return ( <div style={{ padding: "20px" }}> <h3> Seems you are lost, head back to the <Link to='/'>home page</Link> </h3> </div> );};export default NullPage;Creating the protected Post page
In this section, we'll create the PostPage and make it visible to authenticated users only. Users can create, view, and react to posts and get notified when a user creates a post.

From the image above, the Post page is divided into three sections:
Navcomponent - containing the DEV Community logo, the bell icon, and the logout buttonCreatePostcomponent - containing the form inputs, and the buttonPostcomponent containing the already created posts.
Since we've been able to define the layout for the Post page, we can now create the components for the design.
Copy the code below into the PostPage.js file. You will need to create Nav, CreatePost, and Posts components.
import React from "react";import CreatePost from "./CreatePost";import Nav from "./Nav";import Posts from "./Posts";import NullPage from "./NullPage";const PostPage = () => { return ( <div> {localStorage.getItem("_username") ? ( <> <Nav /> <CreatePost /> <Posts /> </> ) : ( <NullPage /> )} </div> );};export default PostPage;The code snippet above checks if the user is signed-in before displaying the contents of the Post page; otherwise, it renders the 404 page (Null Page).
Building the Nav component
Copy the code below into the Nav.js file.
import React from "react";import { useNavigate } from "react-router-dom";const Nav = () => { const navigate = useNavigate(); const handleLogOut = () => { localStorage.removeItem("_username"); navigate("/"); }; return ( <nav className='navbar'> <div> <img src='https://res.cloudinary.com/practicaldev/image/fetch/s--R9qwOwpC--/c_limit%2Cf_auto%2Cfl_progressive%2Cq_auto%2Cw_880/https://thepracticaldev.s3.amazonaws.com/i/78hs31fax49uwy6kbxyw.png' alt='Dev.to' className='logo' /> </div> <div className='notification__container'> <div> <button>BELL ICON </button> </div> <button className='logOutBtn' onClick={handleLogOut}> LOG OUT </button> </div> </nav> );};export default Nav;The code snippet above displays the DEV Community logo and two buttons representing the logout and the notification icon. The logout button signs users out and redirects them to the home page.
Building the CreatePost component
Here, we'll create the form that allows users to create blog posts. The code snippet below accepts the title and content of the blog post and logs them to the console.
import React, { useState } from "react";const CreatePost = () => { const [title, setTitle] = useState(""); const [content, setContent] = useState(""); function addNewPost(e) { e.preventDefault(); console.log({ title, content }); setContent(""); setTitle(""); } return ( <div className='input__container'> <form className='input__form' onSubmit={addNewPost}> <label htmlFor='title'>Title</label> <input name='title' type='text' id='title' value={title} onChange={(e) => setTitle(e.target.value)} required /> <textarea name='content' id='content' rows='7' placeholder='Write the contents' value={content} required onChange={(e) => setContent(e.target.value)} ></textarea> <div> <button className='sendBtn'>SEND POST</button> </div> </form> </div> );};export default CreatePost;Building the Posts component
Copy the code below. The blog posts will be dummy posts for now.
import React from "react";const Posts = () => { const posts = [ { id: 1, title: "What is Novu?", content: "is the first open-source notification infrastructure that manages all forms of communication from email to SMS, Push notifications, etc.", }, { id: 2, title: "What is Websocket?", content: "WebSockets are used to create a connection between a client and a server, allowing them to send data both ways; client-server and server-client.", }, ]; return ( <div className='articles__container'> <h1>Recent Articles</h1> {posts.map((post) => ( <div className='article' key={post.id}> <h2>{post.title}</h2> <p className='article__content'>{post.content}</p> <div className='likeBtn__container'> <p className='likeBtn'> <span role='img' aria-label='like'> </span> </p> <p>1</p> </div> </div> ))} </div> );};export default Posts;Congratulations! We've completed the user interface for the DEV Community clone. Next, let's create the required functionalities.
How to communicate between the React app and Socket.io server
In this section, you'll learn how to send messages from the React app to the Node.js server and vice-versa via Socket.io.
From the App.js file, pass Socket.io down into the PostPage component - where will be communicating with the server via web sockets.
import React from "react";import socketIO from "socket.io-client";import PostPage from "./components/PostPage";import { Route, Routes } from "react-router-dom";import Home from "./components/Home";import NullPage from "./components/NullPage";const socket = socketIO.connect("http://localhost:4000");const App = () => { return ( <div> <Routes> <Route path='/post' element={<PostPage socket={socket} />} /> <Route path='/' element={<Home />} /> <Route path='*' element={<NullPage />} /> </Routes> </div> );};export default App;Creating blog posts
Here, we will make it possible for users to create blog posts.
Update the PostPage.js file to accept Socket.io as a prop and pass it into the CreatePost component.
import React from "react";import CreatePost from "./CreatePost";import Nav from "./Nav";import Posts from "./Posts";import NullPage from "./NullPage";const PostPage = ({ socket }) => { return ( <div> {localStorage.getItem("_username") ? ( <> <Nav /> <CreatePost socket={socket} /> <Posts /> </> ) : ( <NullPage /> )} </div> );};export default PostPage;Update the CreatePost component to send the posts to the backend Node.js server.
import React, { useState } from "react";const CreatePost = ({ socket }) => { const [title, setTitle] = useState(""); const [content, setContent] = useState(""); const addNewPost = (e) => { e.preventDefault();//sends the post details to the backend via Socket.io socket.emit("newPost", { id: Math.random(), title, content, likes: 0, username: localStorage.getItem("_username"), }); setContent(""); setTitle(""); }; return ( <div className='input__container'> <form className='input__form' onSubmit={addNewPost}> <label htmlFor='title'>Title</label> <input name='title' type='text' id='title' value={title} onChange={(e) => setTitle(e.target.value)} required /> <textarea name='content' id='content' rows='7' placeholder='Write the contents' value={content} required onChange={(e) => setContent(e.target.value)} ></textarea> <div> <button className='sendBtn'>SEND POST</button> </div> </form> </div> );};export default CreatePost;From the code snippet above, the addNewPost function emits a message labeled newPost containing a random id, the title, content, username, and the initial number of likes for the post.
Create the event listener on the backend by copying the code below within the Socket.io block
socketIO.on("connection", (socket) => { console.log(`: ${socket.id} user just connected!`); //Event Listener for new posts socket.on("newPost", (data) => { //logs the newly created posts to the terminal console.log(data); }); socket.on("disconnect", () => { socket.disconnect(); });});Displaying the blog posts to users
In the previous section, we successfully sent the posts to the backend. Here, we will send the posts back to the React app for display.
Create an array in the server/index.js and add the newly created posts to the array.
let posts = [];socketIO.on("connection", (socket) => { console.log(`: ${socket.id} user just connected!`); //Event Listener for new posts socket.on("newPost", (data) => { //adds every new post as the first element in the array posts.unshift(data); }); socket.on("disconnect", () => { socket.disconnect(); });});Create another event that sends the array of posts to the React app.
let posts = [];socketIO.on("connection", (socket) => { console.log(`: ${socket.id} user just connected!`); //Event Listener for new posts socket.on("newPost", (data) => { //adds every new post as the first element in the array posts.unshift(data); //sends the array of posts to the React app socket.emit("posts", posts); }); socket.on("disconnect", () => { socket.disconnect(); });});Head back to the PostPage.js file, create a listener to the post event, and pass the details into the Posts component for display.
import React, { useState, useEffect } from "react";import CreatePost from "./CreatePost";import Nav from "./Nav";import Posts from "./Posts";import NullPage from "./NullPage";const PostPage = ({ socket }) => { const [posts, setPosts] = useState([]); useEffect(() => { socket.on("posts", (data) => setPosts(data)); }, []); return ( <div> {localStorage.getItem("_username") ? ( <> <Nav /> <CreatePost socket={socket} /> <Posts posts={posts} /> </> ) : ( <NullPage /> )} </div> );};export default PostPage;Render the posts via the Posts component. The code snippet below checks if the post array is not empty before passing the data into the user interface.
import React from "react";const Posts = ({ posts }) => { return ( <div className='articles__container'> {posts[0] && <h1>Recent Articles</h1>} {posts.length > 0 && posts.map((post) => ( <div className='article' key={post.id}> <h2>{post.title}</h2> <p className='article__content'>{post.content}</p> <div className='likeBtn__container'> <p className='likeBtn'> <span role='img' aria-label='like'> </span> </p> <p>{post.likes}</p> </div> </div> ))} </div> );};export default Posts;Next, let's enable users to like their favourite posts and update the number of likes accordingly.
Creating the like post functionality
In this section, I'll walk you through adding the "like post" functionality to the application, enabling users to react to any post of their choice.
Pass Socket.io into the Posts component and create a postLiked function which triggers an event that sends the id of the post liked by the user to the Node.js server.
import React from "react";const Posts = ({ posts, socket }) => { //Sends the id of the selected post via a Socket.io event const postLiked = (id) => socket.emit("postLiked", id); return ( <div className='articles__container'> {posts[0] && <h1>Recent Articles</h1>} {posts.length > 0 && posts.map((post) => ( <div className='article' key={post.id}> <h2>{post.title}</h2> <p className='article__content'>{post.content}</p> <div className='likeBtn__container'> {/* The postLiked function runs after clicking on the like emoji*/} <p className='likeBtn' onClick={() => postLiked(post.id)}> <span role='img' aria-label='like'> </span> </p> <p>{post.likes > 0 && post.likes}</p> </div> </div> ))} </div> );};export default Posts;Create a listener on the Node.js server that accepts the post id, updates the number of likes, and sends the post with its newly updated likes count back to the React app.
/*The increaseLikes function loops through the array of posts,fetches for a post with the same ID, andupdates the number of likes*/const increaseLikes = (postId, array) => { for (let i = 0; i < array.length; i++) { if (array[i].id === postId) { array[i].likes += 1; } }};socketIO.on("connection", (socket) => { console.log(`: ${socket.id} user just connected!`); socket.on("newPost", (data) => { posts.unshift(data); socket.emit("posts", posts); }); socket.on("postLiked", (postId) => { //Function accepts the post ID and post array increaseLikes(postId, posts); //Sends the newly updated array to the React app socket.emit("posts", posts); }); socket.on("disconnect", () => { socket.disconnect(); });});Congratulations! The application is almost complete.
We've been able to able set up the communication channels between the React app and the Node.js server. Next, let's learn how to display notifications to the users when a new blog post is created or liked.
How to add Novu to a React & Node.js app
In this section, you'll learn how to add Novu to the DEV Community clone to enable us to send notifications from the React app to the Socket.io server.
Novu - the first open-source notification infrastructure
Just a quick background about us. Novu is the first open-source notification infrastructure. We basically help to manage all the product notifications. It can be In-App (the bell icon like you have in the Dev Community - Websockets), Emails, SMSs and so on.
We are putting awesome stuff every week!
Follow us on twitter so you can get things we don't put here!
https://twitter.com/novuhq
Navigate into the client folder and create a Novu project by running the code below.
cd clientnpx novu initYou will need to sign in with Github before creating a Novu project. The code snippet below contains the steps you should follow after running npx novu init.
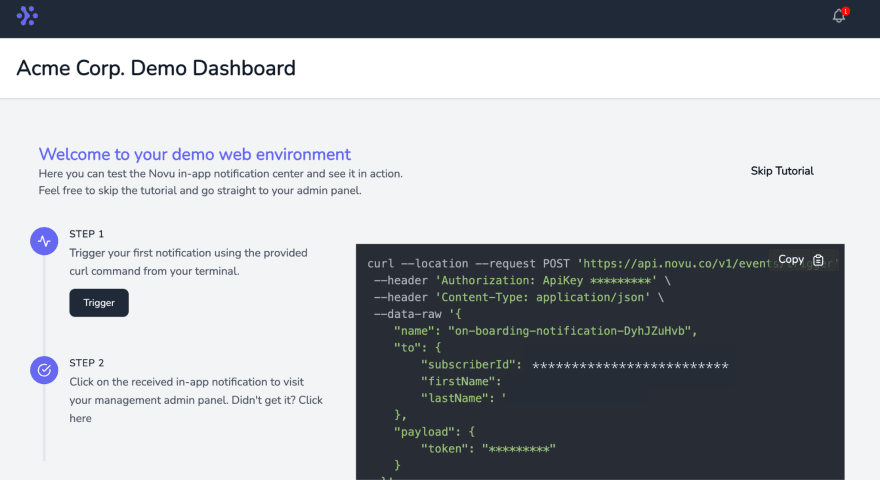
Now let's setup your account and send your first notification What is your application name? Devto Clone Now lets setup your environment. How would you like to proceed? > Create a free cloud account (Recommended) Create your account with: > Sign-in with GitHub I accept the Terms and Condidtions (https://novu.co/terms) and have read the Privacy Policy (https://novu.co/privacy) > Yes Create your account successfully.We've created a demo web page for you to see novu notifications in action.Visit: http://localhost:57807/demo to continueVisit the demo web page http://localhost:57807/demo, copy your subscriber ID from the page, and click the Skip Tutorial button. We'll be using it later in this tutorial.
Install Novu Notification package as a dependency in your React project.
npm install @novu/notification-centerUpdate the components/Nav.js file to contain Novu and its required elements from thedocumentation.
import React from "react";import { NovuProvider, PopoverNotificationCenter, NotificationBell,} from "@novu/notification-center";import { useNavigate } from "react-router-dom";const Nav = () => { const navigate = useNavigate(); const onNotificationClick = (notification) => navigate(notification.cta.data.url); const handleLogOut = () => { localStorage.removeItem("_username"); navigate("/"); }; return ( <nav className='navbar'> <div> <img src='https://res.cloudinary.com/practicaldev/image/fetch/s--R9qwOwpC--/c_limit%2Cf_auto%2Cfl_progressive%2Cq_auto%2Cw_880/https://thepracticaldev.s3.amazonaws.com/i/78hs31fax49uwy6kbxyw.png' alt='Dev.to' className='logo' /> </div> <div className='notification__container'> <div> <NovuProvider subscriberId='<YOUR_SUBSCRIBER_ID>' applicationIdentifier='<YOUR_APP_ID>' > <PopoverNotificationCenter onNotificationClick={onNotificationClick} colorScheme='light' > {({ unseenCount }) => ( <NotificationBell unseenCount={unseenCount} /> )} </PopoverNotificationCenter> </NovuProvider> </div> <button className='logOutBtn' onClick={handleLogOut}> LOG OUT </button> </div> </nav> );};export default Nav;The code snippet above adds Novu's notification bell icon to the Nav component, enabling us to view all the notifications in our app.
The
NovuProvidercomponent requires your Subscriber ID - copied earlier fromhttp://localhost:57807/demoand your application ID available in the Settings section under API Keys on theNovu Manage Platform.

Navigate into the server folder and install the Novu SDK for Node.js.
cd servernpm install @novu/nodeImport Novu from the package and create an instance using your API Key.
//server/index.jsconst { Novu } = require("@novu/node");const novu = new Novu("<YOUR_API_KEY>");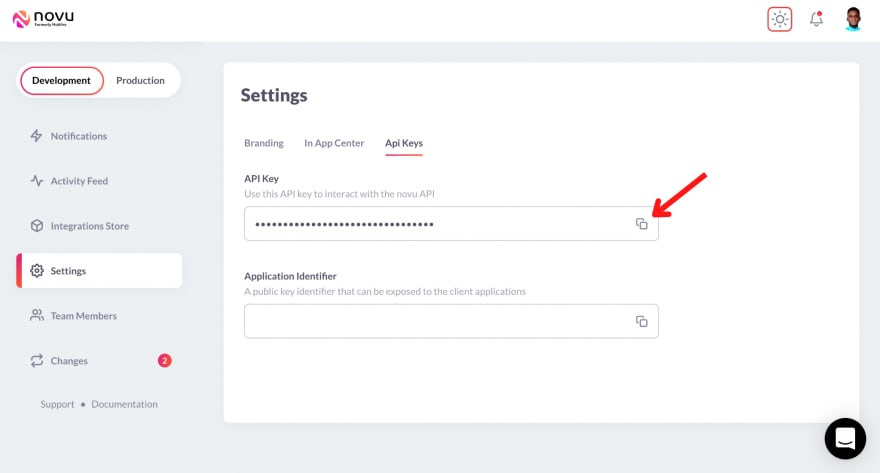
Create a new POST route on the server - from which Novu will send the notifications.
app.post("/notify", async (req, res) => { const { username } = req.body; console.log({ username });});Sending in-app notifications with Novu
In the previous section, I walked you through setting up Novu on the React and Node.js server. Here, I will guide you through sending notifications via Novu in your web application.
Open theNovu Manage Platform in your browser; a notification template is in the Notifications tab.
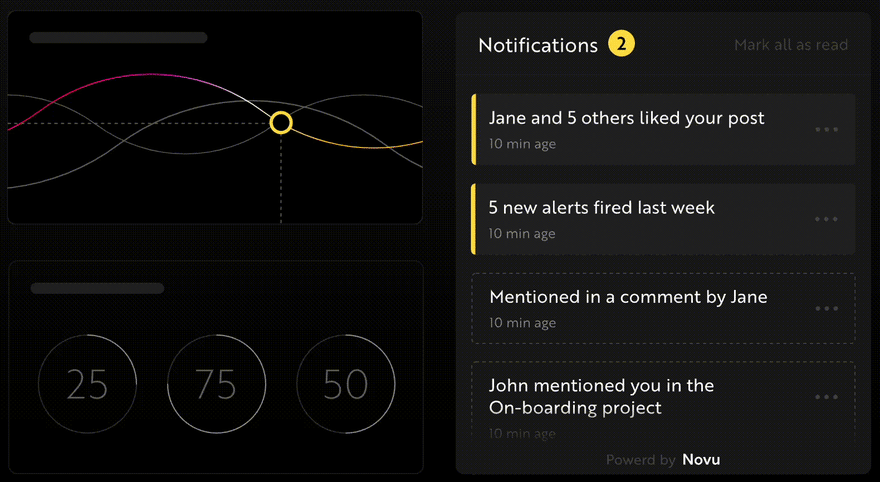
Select the template, click on Workflow Editor, and ensure the workflow is as below:
Novu Digest allows you to control how you send notifications in your app. It collects multiple trigger events and sends them as a single message.
Click the In-App step and edit the template to contain the content below
{{username}} just added a new post!Novu allows you to add dynamic content or data to the templates usingthe Handlebars templating engine. The data for the
usernamevariable will be passed into the template when making the POST request to Novu.
Save the template by clicking Update button, then head back to your code editor, and update the POST route from the previous section as below:
app.post("/notify", async (req, res) => { const { username } = req.body; await novu .trigger("<NOTIFICATION_TEMPLATE_IDENTIFIER>", { to: { subscriberId: "<YOUR_SUBSCRIBER_ID>", }, payload: { username, }, }) .catch((err) => console.error(err));});The code snippet above triggers the notification template via its ID and also provides the required data - username as a payload to the template.
Having configured Novu on the server and created the route for sending the notifications, send a request to fetch the notifications on the frontend.
Update the CreatePost.js file as below:
import React, { useState } from "react";const CreatePost = ({ socket }) => { const [title, setTitle] = useState(""); const [content, setContent] = useState(""); function addNewPost(e) { e.preventDefault(); socket.emit("newPost", { id: Math.random(), title, content, likes: 0, username: localStorage.getItem("_username"), }); /* Calls the sendNotification function immediately after creating a new post */ sendNotification(); setContent(""); setTitle(""); } /* The sendNotification function makes a post request to the server containing the username saved in the local storage. */ async function sendNotification() { try { const sendNotification = await fetch("http://localhost:4000/notify", { method: "POST", body: JSON.stringify({ username: localStorage.getItem("_username"), }), headers: { Accept: "application/json", "Content-Type": "application/json", }, }); const data = await sendNotification.json(); console.log(data); } catch (err) { console.error(err); } } return ( <div className='input__container'> <form className='input__form' onSubmit={addNewPost}> ... </form> </div> );};export default CreatePost;Congratulations! We've completed the code for this project. You can view the notifications by clicking on the notification bell in the nav bar.

Conclusion
So far, you've learnt how to add Novu to a React and Node.js application, send notifications with Novu, set up Socket.io in a React and Node.js application, and send messages between the client and a Node.js server.
This article demonstrates what you can build using Socket.io and Novu. Feel free to improve on the project by:
- adding an authentication library
- saving the blog posts to a database that supports real-time communication
- adding the ability to comment on each blog post
- sending notifications via Novu when a user reacts and comments on a blog post.
The complete code for this tutorial is available here: https://github.com/novuhq/blog/tree/main/devto-notifications-novu
Thank you for reading!
P.S We are putting awesome stuff every week!
Follow us on twitter so you can get things we don't put here!
https://twitter.com/novuhq

Original Link: https://dev.to/novu/i-implemented-the-dev-community-notification-center-with-react-novu-and-websockets-7fk
Dev To
More About this Source Visit Dev To