
An Interest In:
Web News this Week
- April 2, 2024
- April 1, 2024
- March 31, 2024
- March 30, 2024
- March 29, 2024
- March 28, 2024
- March 27, 2024
Some of Our Sources
- Simplebits
- Creative Curio
- Noupe
- Fudge Graphics
- Specky Boy
- Freelance Switch
- Web Resource Source
- Codrops
- Android Headlines
- Hashedout
Help Webnuz
Referal links:
30 Minute Builds: Google Lens Rebuild with Airkit
A standard mental exercise that all software engineers and web developers inevitably participate in is looking at a piece of software or an application, and thinking to themselves: How would I make that? It can come from either a stylistic interest, wanting to see what their take or spin on the product could be, but it could also come from a place of intellectual curiosity, wanting to walk through their own steps on developing a product they see in front of them.
As a web developer, I have started to try my hand at this more and more with low code tools, and wanting to see just how much faster building an application with them can be in the hands of an engineer. So I decided to take a stab at recreating a specific feature of Google Lens, which is to create an application that takes in an image with text present in it in a foreign language, and to translate that for the user into english.
Feel free to follow along with this tutorial, or, if you would prefer, follow along with the Youtube version of this build below!
Application Overview

The application itself is deceptively simple to create. The front end is a simple page with a file upload control, and a few variable dependent controls that would display the results of the returned data from Google.
It requires an integration with a Google Cloud application, however, with both the Google Cloud Vision and the Google Cloud Translation APIs enabled. The Data Flows would then use the Google Vision OCR capabilities to detect text in an image, and would then send that text to the Google Translation API.
Prerequisites
To build along with this tutorial, you will need a few things to get started:
- Access to the Airkit Studio
- A Google Cloud Platform Account
Creating the Google Cloud Application
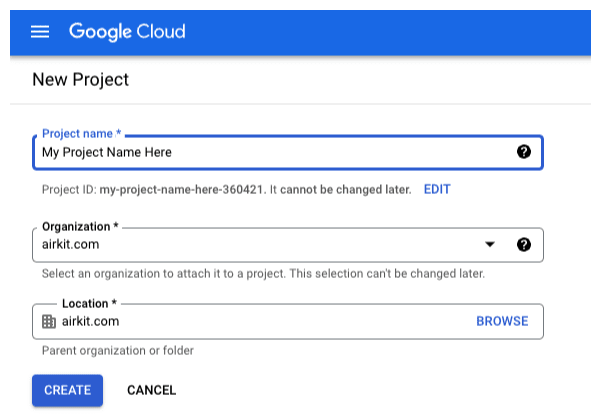
The first step in building out this application is to create the Google Cloud Project we will be integrating with. First, create the project in the organization that you have access to. Once it is created, you first need to build the OAuth Consent Screen. The app type is External, and from there youll need to fill out the application information youll be displaying to users. No need to fill out any test users or scopes for the moment, well be finishing those portions later in the build.

Next, type either translation or vision into the search bar at the top of the cloud console. Youll then navigate to either the Cloud Translation API or the Cloud Vision API, depending on what you searched, and click the Enable button on both. Fair warning, Google Cloud Services may require you to input a credit card at this time. For the purposes of this build, we wont be exceeding the basic tier version of these API endpoints, but feel free to watch the youtube video linked above to follow along if you would like to avoid storing your credit card.

Once both APIs have been enabled, were navigate back to the console using the hamburger menu in the top left, and click on the APIs and Services section. From here, we are going to be creating the authorization credentials for our integration. Click the Credentials option on the left, and click Create Credentials at the top of this page, and choose OAuth Client ID from the list of options. The application type is going to be Web Application. This will populate the fields we need to fill out for our OAuth Integration with Airkit.
The only required inputs here, other than naming your application at the top of the page, are the specific Airkit Authorized Redirect URIs for this application. Youre going to add both https://app.airkit.com/internal/session-gateway/v1/oauth/callback and https://us.api.prod.airkit.com/internal/sessions/v1/auth/callback as redirect URIs here, and then youll click create. This will generate a Client ID and a Client Secret for your application! Be sure to copy and paste them somewhere, because we will be using them in our custom Airkit integration.
Creating the Custom Integration
Back in the Airkit console, It's time to actually create the custom integration we're going to be using to connect to our Google application. In the integrations section of the console, create a new Custom Integration, and create a name and custom key for the integration. For authentication type, select OAuth 2.0. Then add two Integration Parameters, client_id and client_secret. Beneath those, select Authorization Code under the grant type. The token verb will be POST, and the token endpoint will be https://oauth2.googleapis.com/token. For Authorization Endpoint, put https://accounts.google.com/o/oauth2/v2/auth?access_type=offline&prompt=consent.

Now under scopes, we need to put two different scope URLs here, since we are accessing two differently scoped APIs within the same Google application, so separating them with a single space, put https://www.googleapis.com/auth/cloud-vision https://www.googleapis.com/auth/cloud-translation. The next two fields should be Client Id and Client Secret, and in these fields you will paste in those values you received from Google Cloud.

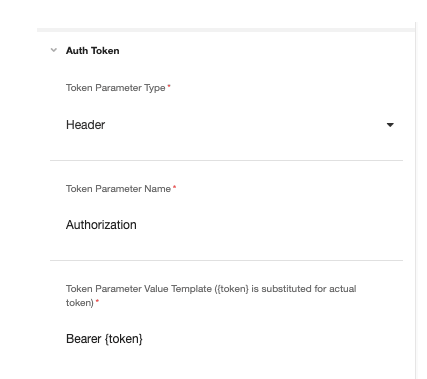
Finally, set up your Auth Token parameters using the example below.
Click Create, and our custom integration is ready for use! Well next establish a connection with our Google application. In the Airkit Console, under Connected Accounts, click Create New and select the integration we just made after naming the account. The integration parameters we added should now appear here as fields to fill out. These will also be the Client ID and Client Secret that were generated for us by Google. Once you click create, the OAuth Consent screen you made in the cloud console should appear. Accept the request, and the integration is ready for use!
Building the Airkit Application
Create a blank application and go to the Airkit Studio. Nn Settings, ddd the Google Integration we created in the Integrations section of the Builder, and select the Connected Account in the available dropdown. This allows our Airkit application to now interact with the Box application we created.
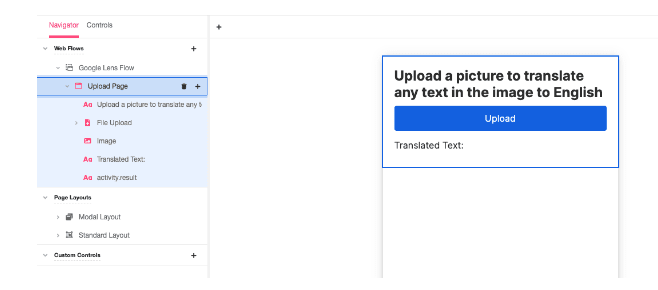
Next, add a Visit a Link Trigger in the Journey Builder, and in the first Step of the Journey add a blank Web Flow. From there, go to the web flows builder, and add a Title and some instructions for the user using Label controls. Then, add a File Upload Control, and inside the control add a Button Control. Underneath this, add a Media Control, and below that two different label controls. Change the top label control to say Translated Text.
In the Variable Tree, create two Activity level variables. One will be an asset variable called uploaded_image, and the other will be a text variable called result. Change the value of the URL in the Media Control to activity.uploaded_image.downloadUrl, and change the value of the last Label to activity.result. Your application should look something like this:
Functionality through Data Flows
The last step is to build the Data Flows we will be using to hit the two different Google API endpoints. Create two different blank Data Flows in the Connections Builder. In the first one, which will be the Data Flow that uses the Google Vision endpoint, add an Asset Input called uploaded_image. Add an HTTP Request Data Operation, and under service make sure the Google Integration youve added has been selected. The method for this operation is POST, and the URL is "https://vision.googleapis.com/v1/images:annotate", according to the Google API documentation. Under Body, follow the example below:

Add a new Transform Data Operation underneath this one, and in the expression follow this example below:

This will return a List, or an Array, of all the words found in the image we sent to the Google Vision API. The last step is to add the Run Data Flow Data Operation, and here is where we will be running the second Data Flow we created, which will hit the Google Translate API. Pass in the transform result, which should be a list of text.
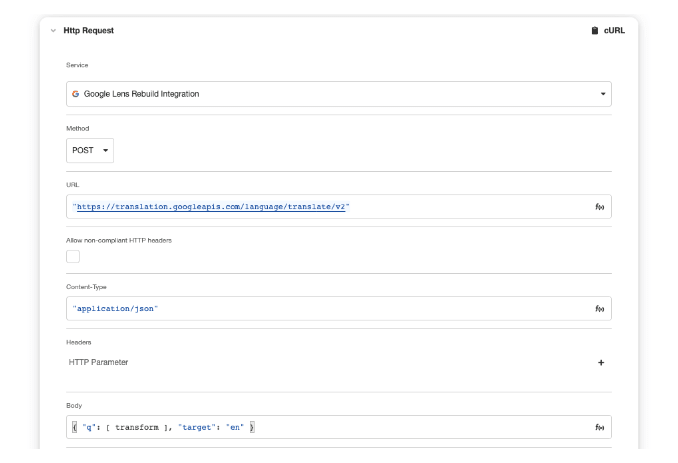
In the Translate Data Flow, lets add an input called words that is a List of Text (feel free to paste the transform result from the previous page so we have something to work with here). Next, add a Transform Data Operation, and in the expression write JOIN(words, ). This will give us a single string of text to send to the Translate API. Next, add an HTTP Request Data Operation, which will look very similar to the operation from the previous Data Flow, except the URL will be "https://translation.googleapis.com/language/translate/v2". For the body, follow the example below:
Next, add another Transform operation, following this example to extract the results we need from the Translate API.

Finally, make this most recent transform the return value at the bottom of this second Data Flow. Back on the first Data Flow, make the return value here the connectionOutput variable, which will contain the results of the second Data Flow.
To wrap it all up, return to the Web Flows Builder and select the File Upload control on the left. Click the Actions tab in the inspector, and on the On Upload Finished Event, add first a Set Variable Action to assign a value to the variable bound to the Media Control URL value, and add a Run Data Flow Action to run the Google Vision Data Flow, and make the output binding the activity.result variable.

Wrap Up
Once building out the application, a few thoughts initially came to mind. The first was to stress test the application as is without much tweaking to see how well this first iteration performs. The answer ended up being: fine? I went around my house with my phone with the app on screen and tested its ability to translate ingredients in my pantry. At its base level, the OCR were using still captures special characters, and has a hard time organizing text that isnt laid out in an organized way, so the full text string it detects can be a bit disorganized depending on the image it analyzes. In the next iteration, Im going to dive more into the Cloud Vision API documentation, and see if there are preventative measures against this, and Im going to tweak the conditional logic in the Transformations I have in my Data Flows, to see if I can prevent this from happening.
The second thought was just the vision of potential here. I instantly thought about new layouts for the front end, adding selectors for language result options, and better ways to more effectively lay out the information being taken in and being spit out by the application. I cant wait to keep tinkering with this app and more like it!
Original Link: https://dev.to/brooksnaylor/30-minute-builds-google-lens-rebuild-with-airkit-3e5c
Dev To
More About this Source Visit Dev To