
An Interest In:
Web News this Week
- April 20, 2024
- April 19, 2024
- April 18, 2024
- April 17, 2024
- April 16, 2024
- April 15, 2024
- April 14, 2024
Some of Our Sources
- BoingBoing
- Techcrunch
- Pearsonified
- Smashing Apps
- Abduzeedo
- TutsPlus - Design
- Creative Curio
- Noupe
- Spyre Studios
- Codrops
Help Webnuz
Referal links:
CI/CD Pipeline Hands-on | AWS Code Pipeline, Elastic Beanstalk, GitHub
Introduction
In this article we are going to see how to use AWS code pipeline to set up a a very simple CI/CD pipeline for your developments with three products:
- AWS Code Pipeline
- Elastic Beanstalk (EB)
- GitHub
I already have written some article covering each and everything about CI/CD, Do have a look to previous articles to have a better understanding of this one.
- Why CI/CD? How was a life without CI/CD & how is it now?
- Getting intimate with CI/CD and CI/CD Pipeline
Contents:
- Intro to AWS Code pipeline
- Architecture of Our Code Pipeline
- Lets start building our Pipeline
- Environment Setup
- Set up Pipeline
- Testing Our Code Pipeline
- Conclusion
Intro to AWS Code pipeline
AWS Code Pipeline is a fully managed continuous delivery service that helps you automate your release pipelines for fast and reliable application and infrastructure updates. Code Pipeline automates the build, test, and deploy phases of your release process every time there is a code change, based on the release model you define. This enables you to rapidly and reliably deliver features and updates. You can easily integrate AWS Code Pipeline with third-party services such as GitHub or with your own custom plugin. With AWS Code Pipeline, you only pay for what you use. There are no upfront fees or long-term commitments.

Architecture of Our Code Pipeline
We are going to deploy a code pipeline on AWS. Below is architecture of our pipeline

- We will be using sample node.js application located in the GitHub Repo.
- Setup a pipeline so, whenever we commit any changes to our code in GitHub it will trigger AWS code pipeline instance to kick-in and start deployment process
- Finally code pipeline will deploy our application to our target Web Server which will be setup in AWS Elastic Beanstalk which essentially means our code will live on EC2 instances behind the scene.
So, that's it very simple one stage pipeline.
- Go to GitHub and host your application there.

Lets start building our Pipeline
- Login AWS console
Environment Setup
- Go to elastic beanstalk
In a nutshell Elastic Beanstalk is just a way to deploy our resources to AWS. In this case it's gonna deploy resources to EC2 instances behind the scene. if this were a great prod application i may directly go to ec2 and set it up directly there just to have a little bit of more control but at the expense of little bit of control it allows us to deploy very quickly.
You will be landed to this page. Just click on Get started/create application

- Name your application
- Choose platform
- Ill go with the sample code. Im not gonna upload our code because I want our pipeline to do it for us.
- Click on create Application

- It will take several minutes to create and you can see all the logs to get to know whats happening.

- It will be deployed successfully after some time with
health status OK. It has also deployed sample application into that as well. We used ec2, s3 behind this but you really dont look at that, we can see in the logs. Elastic beanstalk take care of provisioning of those resources for us. - One more thing you
dont need to install any package for your application, if Elastic beanstalk detects any package in our application it will automatically install for us. Everything about this process is very automatic where the convenience factor comes in. - So, just for the test if its working. EB gives us a
URLat the top to test your running application

And there we go, our first application is running and our very first deployment was successful.

Set up Pipeline
- Next step is to go to AWS pipeline and setup a pipeline for our application.
- Go to the code pipeline from AWS management console.

Now go ahead and click on create pipeline.
You will see 5 stages to complete in order to create your pipeline.Step 1
Choose pipeline settingsStep 2
Add source stageStep 3
Add build stageStep 4
Add deploy stageStep 5
Review
Let's explore all 5 steps.
Step 1:
- Just name your pipeline and leave all the settings as it is.
- And click on next


Step 2
- Detect option this is saying how you want to trigger your pipeline. Go with the default for better ease. Because default one is more event driven model.
Version 1:

Version 2:

Step 3
- Build stage is optional so, we are going to skip it for this project.

Step 4
- Deploy provider is elastic beanstalk which is our target.

Step 5
- Then just review everything and click on create pipeline.
- Now we can see pipeline has been created and now its deploying to elastic beanstalk.

- It will take minute or two then we can verify if its been deployed.
- Now go to EB by clicking the URL

- You will see your app is running in browser

Testing Our Code Pipeline
Now lets do some updates in your code from GitHub and see if our pipeline detect those changes and populate them automatically to our application that is running on Elastic Beanstalk.
You can update and commit your changes from directly GitHub or you can do it also by cloning your repo, updating your changes and them committing them locally.
Update changes in code from GitHub:

Update changes in code locally & then commit to online repo:
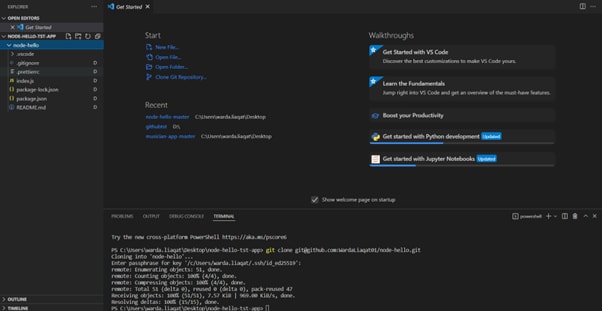


- After updating your changes in code either from GitHub or Locally, when you'll go to your code pipeline you will observe that your pipeline is in action, It will detect changes and then update the source and will deploy changes to EB automatically.


- When you observe that pipeline is successfully done then if you open/refresh the URL of your application in the browser you will observe that changes have been deployed successfully.

Conclusion
See, how code pipeline can make things easy for you when you are working on your development projects, now you don't have to manually write test cases after each change and update those changes manually. Code pipeline will handle all of that automatically for you. Now you just need to relax and focus on adding more new features to your application and do lots of advancements.
> Let me know what do you think about it or if you are already using Code Pipeline for your developments?
Connect with me:
Original Link: https://dev.to/wardaliaqat01/cicd-pipeline-hands-on-aws-code-pipeline-elastic-beanstalk-github-35n3
Dev To
More About this Source Visit Dev To